Pages
Thursday, May 31, 2012
2012 Destash Challenge Update
There are still lots of ‘good’ things left in my destash tray, but a lot of pieces are still there because I’m just afraid to use them. Some are wacky and weird, and others have simply dropped off of my radar because they don’t fit my current style. The real challenge will be to use these beads in a way that’s still me. Let’s take a look at what I’m up against!
The Focals
We’ve already seen a few of these pieces during the challenge, and I’ve used them successfully, which makes them even more tricky from here on in. I’m waiting for yet another bolt of inspiration to strike, so that I don’t have to repeat an old design. On the other hand, if it isn’t broke…
Here we have one heart-shaped nut bead, two rivolis, two of four glass rings, a lampwork spacer, a ceramic round, one of two crystal rondelles, and a Swarovski crystal button. I’ve actually had that thing for years, but I keep forgetting that it’s there, so I’ve never even used it for a color palette, let alone a design. I also have three of the painted shell flower charms, which will probably be the greatest triumph of all if I manage to use them successfully - they’re hideous in a cute kind of way.
The Accents
These beads are actually giving me the most trouble, even though there are plenty of them, so design options are wide open. Pictured above are my two intact strands of crystal pinch bicones, and ironically, it’s the large quantity of them that has me stumped.
I also have some top-drilled hot pink shell coins, dusty blue shell coins, a few furnace glass tubes, Czech glass leaves, gunmetal E beads, some Czech clam shells, a sprinkling of turquoise blue pinch bicones, and just a few Czech glass nuggets with a swirly blue and red finish. Not pictured is my huge collection of wood macrame beads, but I'm actually looking forward to using those!
The Seed Beads
Finally, I have a terrifying amount of random and assorted seed beads, custom mixes, and other tiny things. Although the purpose of this challenge is to use up all of these leftover and forgotten beads, I can’t say for sure if all of them will be used by me. Some of them have just exhausted their inspiration in my studio, and I may have to find them new homes before the year ends.
This is just a little sampling of the small beads and mixes I have to work with. I combined the last of my beach sand mixture with what was left of my 1.5mm cubes, and mixed together a bunch of random hex cut and triangle seed beads. There’s a small amount of striped Czech seed beads that I collected from a store-bought mixture, and just a few Swarovski crystal bicones in shocking orange hyacinth. I’m also thinking of throwing in all of my 4mm cube beads, which haven’t seen the light in a long time. In front we have the leftover beads from my tribal fringe necklace, to which I added the last few 6/o and 4/o beads from other projects.
After all of the challenge pieces I’ve completed so far, I thought I was on a roll. Looking at all of these beads laid out, I realize I’ve still got a long way to go. Luckily, I still have half a year to get beading! I’m thinking it’s almost time for a bead-collector necklace.
Have you made any destash projects so far? How did they turn out?
Copyright 2012 Inspirational Beading
Subscribe to Inspirational Beading
Get inspired on Facebook and Google+
Wednesday, May 30, 2012
Jewels and Bugles
I added a few other elements from the destash tray, including the last remnants of my ruby red rice beads, and ruby red pinch bicones. I’ve also got quite a few nearly finished packets of hex cuts and cube beads, so I grabbed some pretty teal blue hexes. All I needed was some seed bead bumpers, and I thought I had just enough silver-lined topaz for the job.
I liked the palette, but it wasn’t until I started building the first strand that I realized just how pretty all of the beads looked together. Instead of stringing beads at random, I used a repeating pattern of 4 hexes for every ruby bead, and the results were beautiful. The more strands I made, the better they looked. And by the time I was finished, I only had a finger full of gold seed beads left, and most of them were wonky - perfect!
Copyright 2012 Inspirational Beading
Subscribe to Inspirational Beading
Get inspired on Facebook and Google+
Tuesday, May 29, 2012
Collections: Antique Romance
This month I asked what your favorite metals or metallic bead colors are. Your answers were varied and unique as always. Some readers like traditional metals such as silver and copper, which are both excellent for all types of jewelry design. Others prefer metallic colors like blue and red, and gunmetal is always a favorite.
Kashmira’s favorite metals are those with an antique finish, especially gold. The addition of a patina to metals adds a little bit of mystery and romance to any design, so I was inspired to collect some pretty metallic jewelry and a few feminine finds.
Do you have a favorite fairy tale romance? What bead colors or materials would you use to capture it in jewelry?
Copyright 2012 Inspirational Beading and Friends
Subscribe to Inspirational Beading
Get inspired on Facebook and Google+
Monday, May 28, 2012
More Lampwork Inspirations
What's your favorite summer inspiration?
Copyright 2012 Inspirational Beading and Friends
Images Hosted by Polyvore
Subscribe to Inspirational Beading
Get inspired on Facebook and Google+
Friday, May 25, 2012
Bead Giveaway: Turquoise and Gold
How to Enter
For a chance to win all of the beads shown, all you have to do* is leave a comment on this post, and answer the following question:
What is your favorite metal or metallic bead color?
*Please make sure to leave your entry comment here on the blog, and include a contact link (such as a website or email) if you do not have a Blogger profile with email contact enabled. This giveaway is open to readers from Canada and the US. One lucky ready will be drawn at random on Tuesday, May 29th.
Good luck, and happy beading!
Update: This giveaway has closed.
Copyright 2012 Inspirational Beading
Subscribe to Inspirational Beading
Get inspired on Facebook and Google+
Thursday, May 24, 2012
Inspired by Dads
Some designs can be made more manly simply by changing up the colors. Rustic tones like black, brown, navy, and burgundy are a good place to start, although color isn’t always an important factor. When I was working in a very manly sporting goods store - cheap Fireline was a great perk! - I once spotted a young man wearing a hot pink bracelet, made from bead-like fishing lures called corkies.
Anchor Cuff Links
by Waxwing Jewelry
Texture and shape are things to consider when designing for men. Simple designs and natural materials work well, like a set of bone and glass beads on a leather cord. On the other hand, silver beads and jewelry blanks can be given a masculine look with the right approach.
To help inspire your Father’s Day projects, I found some fantastic designs, projects, beads, and artwork just for dads.
Monkey Business Bracelet
by Artbeads.com
Rustic Iron Bronco Pendant
from Happy Mango Beads
Piranha Agate Pendant
by Too Fancy Jewelry
Modern Forest Ring Project
by Beadaholique
Pewter Pebble Alphabet Beads
from Auntie's Beads
Fish Tail Braid Tutorial
by Lima Beads
Midnight Tagua Pendant
from Lima Beads
Maybe not...
Upcycled Leather Cuff
by Rainwheel
Forza Necklace Project
by Artbeads.com
Thai Buddhist Takrut Talisman
from Happy Mango Beads
Leather Wrap Bracelet
by Risky Beads
Have you tackled the men’s jewelry challenge? What materials or techniques do you like to use?
Copyright 2012 Inspirational Beading and Friends
Images Hosted by Pinterest
Subscribe to Inspirational Beading
Get inspired on Facebook and Google+
Wednesday, May 23, 2012
The Last Medallion
Turquoise blue was my first choice for a contrasting color, but I had only enough to do the pendant, and not much left over. I eventually settled on silver lined topaz for the necklace, and added some of my tortoiseshell druks to coordinate. I also grabbed the last of my turquoise blue pinch bicones from the destash tray, even though they don’t quite match - I was up for the risk and the challenge of mixing many similar hues.
The necklace turned out pretty well, and I love the double layer of fringe at the base of the pendant. It’s short, but still has lots of movement. Now I have only two rivolis to work on. Hopefully some inspiration will come along!
Copyright 2012 Inspirational Beading
Subscribe to Inspirational Beading
Get inspired on Facebook and Google+
Tuesday, May 22, 2012
Wish List: Heishi Beads
Today’s heishi beads come in a variety of styles and colors. Rough chip shell heishi are a common component in West Coast and surfer style jewelry, while gemstone rounds make for beautiful, slinky necklaces. You can even get metallic ‘heishi’ spacers for capping precious stone or lampwork beads.
Red Lip Shell Heishi Beads
From Artbeads.com
Labradorite Heishi Beads
From Happy Mango Beads
Red Bamboo Coral Heishi Beads
From Auntie’s Beads
Black Pewter Heishi Spacer Beads
From Beadaholique
Garnet Cube Heishi Beads
From Gemalicious Beads
Turquoise Heishi Beads
From FusionBeads.com
Peridot Heishi Beads
From Lima Beads
Spiny Oyster Shell Heishi Beads
From Happy Mango Beads
Copyright 2012 Inspirational Beading and Friends
Images Hosted by Pinterest
Subscribe to Inspirational Beading
Get inspired on Facebook and Google+
Monday, May 21, 2012
Inspiring Links: May 2012
In an excerpt from Margie’s Muse, color expert Margie Deeb discusses the ways that patterns can enhance beadwork and create a unified, eye-catching design.
Cuffs are in! Cindy Caraway of Artful Living on the Bluff shows off some gorgeous freeform cuffs, and how to use a two-color bead soup two ways! And what do you get when you add ribbon to right angle weave? Gorgeous beadwork corset cuffs by A Rose by Name.
The idea of working with metals might make me cringe, but when another artist does something spectacular with them, I can’t help but appreciate it. This Handy Dandy copper bracelet project from the Artbeads.com learning center really caught my eye!
In honor of their 15th anniversary, Beadwork magazine is hosting a beaded bead bead-along and contest. In each 2012 issue of Beadwork, you can find a new beaded bead tutorial to try. Share a piece of jewelry using one or more of the beads, and you could have your design published in the first issue of 2013!
Neons have been a fashion staple for the past few seasons, and now they are finally part of our bead palettes too! Three new bright and bold Swarovski Elements crystal pearls offer some fun possibilities for summer designs. So far we have hot pink, orange, and yellow to choose from. Check out the Bright Back Atcha Bracelet project from Fusionbeads.com to see them in action.
Source: quiltrobin.com via Mary Anne on Pinterest
If you’re thinking of making some jewelry gifts for dads this Father’s Day, Fire Mountain Gems has some tips for dressing up your favorite guy in sophisticated black and blue beads. And for the bead embroidery lovers, here’s a fun tutorial for making your own sewing tool and pincushion caddy, from Flamingo Toes.
There’s a little something missing from this list of beautiful upcycled light bulb projects on Dishfunctional Designs. Imagine some of them filled with beautiful beads!
What’s your favorite inspiration of late?
Copyright 2012 Inspirational Beading and Friends
Subscribe to Inspirational Beading
Get inspired on Facebook and Google+
Friday, May 18, 2012
Time Capsule: May 2009
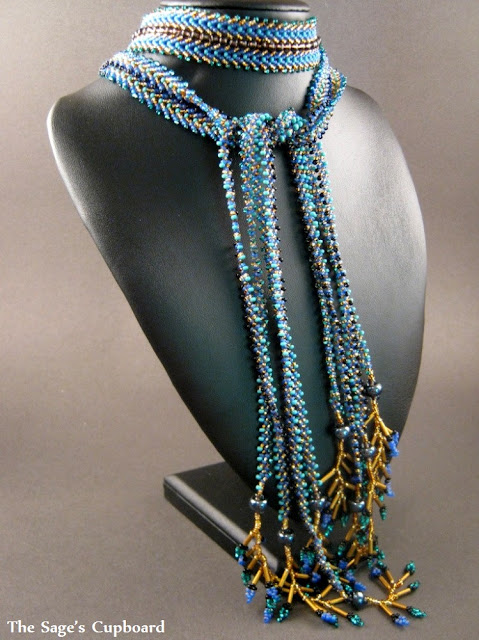
It took a while to plan, and plenty of time to stitch and triple check measurements along the way, but the construction is actually quite simple. I can’t explain why I’ve never made an improved version of this necklace, but I think its time may be coming. I’ve been in the mood to make something big, and this design fits right into my current style.
The only thing I need to do is decide on a palette and pattern. Should I go with Egyptian stripes and gemstone colors, or something more earthy, perhaps with a dash of African Christmas beads?
Copyright 2012 Inspirational Beading
Subscribe to Inspirational Beading
Get inspired on Facebook and Google+
Thursday, May 17, 2012
Beading Tutorial: Connecting St. Petersburg Chain
You can connect chains of St. Petersburg together indefinitely, for bracelet cuffs and more, and connect the ends of the beadwork together for rings. Here’s how to do it…
Triple and Quadruple St. Petersburg Chain
Begin by weaving a double St. Petersburg chain of the desired length. When choosing bead types and patterns, keep in mind that the tips of the second chain will also be shared by the next (or third) chain. If you are using beads one size larger for the ‘spine’ of your first double chain, you can also use them at the tips. These beads will become the spine between chains two and three.
Before starting the third chain, use your needle to nudge the tip beads from chain 2 so that they are resting horizontally, with the hole pointing North-South. You can do the first one or two, and then adjust each bead as you add new stitches.
Begin a third St. Petersburg chain: Attach a stop bead to your thread, leaving a comfortable tail, and pick up 6 seed beads. Stitch up through beads 3 and 4, and pull snug to form a little P shaped cluster. Rather than pick up one seed bead here, you will share with chain 2.
Stitch down through the first tip bead from the previous chain, and down into beads 4, 3, and 2 from the first stitch in the new chain. Stitching from the top down mimics the same thread path that would be created if you picked up a single bead here, as well as mirror the thread path through this shared bead in the opposite chain.
Pull the thread snug, and make sure that the shared bead is resting evenly. If the threads are not aligned properly, the bead will look twisted, exposing the thread, and give the beadwork a less than polished appearance. Pick up one bead, and stitch up through beads 5 and 6 of the P cluster. If you plan to add a fourth chain, this ‘under’ bead will also become a spine, between chains 3 and 4.
Continue weaving with St. Petersburg chain, using the tip beads from chain two to connect the third chain. The fourth chain is added in the same way as the second chain of basic double St. Petersburg, by sharing the ‘under’ beads from the previous chain. You can add as many chains to the beadwork as you like, with an odd or even number, and a variety of fun patterns.
Zipping Up Multi St. Petersburg Chain
To connect the ends of St. Petersburg chain, you must first finish the ends so that the last stitches match the rest of the beawork. At the working edge, add the final under bead, and stitch up through beads 5 and 6 of the P. Pick up 3 beads, skip the last bead added, and stitch down through the rest of the stack. Repeat for the remaining chains on this side.
At the starting edge, remove one stop bead, and pick up a matching seed bead. Stitch up through the first row and pull snug. Remove the other stop bead, and stitch down through the bead just added. Pass up through the stack of this chain again.
Now that the ends are finished, the beadwork will fit together and can be zipped up, creating a seamless connection. Use square stitch to connect the middle two beads of each edge row, and zip the V shapes together. Weave through the connection, following the natural thread path of the beadwork, to secure the stitches, then weave in the remaining thread as desired.
Happy beading!
Copyright 2012 Inspirational Beading
Subscribe to Inspirational Beading
Get inspired on Facebook and Google+