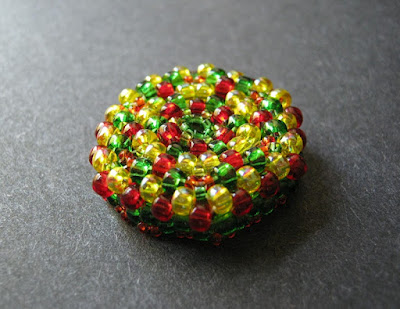
Although the weather is still warm and summery around here, I thought it was time to finally tackle a particularly tricky, and very wintry bead from the destash tray last week. I’ve had this ceramic focal for years, leftover from an Emily Carr inspired necklace, and I thought it would be perfect in an elemental pendant.
I combined a variety of blue and white seed beads, including some destash selections: Ceylon pearl 6/o, white 4mm cubes, sapphire hex cuts, and a new strand of blue cat eye rectangles that were left over from some custom work. I had a little trouble deciding on a pattern for the herringbone beaded bead, because I didn’t want similar colors too close together. In the end, I had to place the pearl and white beads together, but I like the contrast of finishes.
The elemental pendant series is turning out to be a great outlet for leftover beads, and a fun way to combine colors and themes. So far I’ve got Light, Earth, Fire, and Ice. Rather than focus on just the four elements, I’m taking a more fantastic approach, and drawing on all the different incarnations of nature. The possibilities and options are very inspiring. Before the weather does turn white, I’d like to tackle Flora and Water.
While I was stitching the pendant, I set up the camera and put together a little inspiration video, to complement last week’s herringbone tutorial. This time I added some captions for a little filler, and I think it is an improvement over my first sped-up beading video. I’d like to do more variations on this theme - any suggestions?
Copyright 2012 Inspirational Beading
Subscribe to Inspirational Beading
Get inspired on Facebook and Google+
Pages
▼
Thursday, September 27, 2012
Wednesday, September 26, 2012
Time Capsule: September 2009
Three years ago this month, Inspirational Beading was all about necklaces and the ocean. When I look back on some of those designs, I see the beginnings of some of my current favorites. Things were really starting to roll, and I was finding my beading groove.
There was a lot of stringing going on that month. After completing a freeform necklace inspired by Caren Schwartz’s Organized Chaos project, I started to see new possibilities for seed beads and Fireline. This led to an adaptation of my first peyote rings project, with a nautical inspired palette, and shell beads in an SOS pattern.
One of my all time favorite necklaces also debuted in September ‘09. It all started with a carved bone seahorse, and a whole lot of blue and green beads. The ombre strands of beads with shell and pearl accents are still a beading success that I look back on fondly, and one that I have yet to recreate.
Last but not least, I also completed my first square stitch Wavy Wedges bracelet, adapted from one of my earliest beading experiments. After a few more variations, I eventually created a tutorial for this very fun technique.
Although these projects are very different in many ways from what I’m doing now, I see so many important discoveries there that would eventually lead me to what I’m making today. These little beading epiphanies were the first steps towards really creating, instead of just playing with beads.
Do you have a favorite a-ha! moment in beading?
Copyright 2012 Inspirational Beading
Subscribe to Inspirational Beading
Get inspired on Facebook and Google+
Tuesday, September 25, 2012
Halloween Skulls and Flowers
When I started the destash challenge, my purpose was to use up and eliminate all the beads I had been keeping around for more than a year - that is to say, since before January 2011. It’s been almost a year now, and I’m starting to eye some of my older new beads in the same way. So when I realized that summer was officially behind us, I decided it was time to try and use up some of my Czech glass skulls for a fun Halloween design.
I took a while deciding just what type of project to do. I didn’t want to fall into my old habit of making something to suit the beads, even if it didn’t suit me. I’ve been having fun with beaded flowers lately, so I thought I would to start by making a few jet black daisies to go with the skulls and see where that got me.
I used jet AB druks for the flower base, and opaque black 15/o seed beads. The shimmery finish of the druks called out for another dash of color, so I made sure to include some jet lined garnet AB 6/o’s when I started compiling a final palette. From the destash tray, I grabbed those gunmetal E beads that never seem to go away no matter how many times I use them. To help the white skulls blend in, I also added the last of my batik bone beads.
Rather than make something elaborate that would showcase the skulls and flowers in a really obvious way, I made a simple, though very long, Y necklace. I really like the way the red seed beads help to blend everything together - skulls and flowers, blood and roses.
Have you made any spooky designs for Halloween this year? What was your inspiration?
Copyright 2012 Inspirational Beading
Subscribe to Inspirational Beading
Get inspired on Facebook and Google+
Saturday, September 22, 2012
Inspiring Links: September 2012
Although fall can sometimes mean penciling in creative time between so many other tasks, like making school lunches, planning Halloween costumes and parties, harvesting the last of our gardens, and cooking heartier autumn meals, there is still plenty of inspiration to go around! Here are some of my favorite beading and craft links of late.
First, I want to extend a very warm welcome to Inspirational Beading’s newest sponsor, The Best Beads - bead distributors direct from the Czech Republic. I hope you’ll stop by to browse through their beautiful selection of glass beads and buttons!
If you’re looking for a little project inspiration, the Global Genes Project has put out another call for denim inspired pieces for the 7000 Bracelets for Hope campaign. Anyone can create and submit a blue bracelet to help give hope and support to families living with rare genetic diseases.
Good posture is an important part of crafting - for beaders and knitters especially. This quick Crafting Calamities video from Interweave explains how to avoid repetitive stress injuries and back pain while doing your daily creative work.
It’s always fun to make a project that turns single beads into a new object, like the adorable lucite pumpkin earrings in a video tutorial from Beadholique. You could make all kinds of variations with melon beads or rondelles!
Beaders who sell their jewelry are always comforted to know that even the most famous and fashionable people of the world like to buy unique and one of a kind pieces. Someday it could be yours! Although My Flash Trash isn’t exactly in our circle, it is nice to know that someone as posh as the Duchess of Cambridge likes indie designs.
Are you thinking ahead to next year’s jewelry designs? Pantone has already released their picks for 2013’s spring fashion colors. This line up has fantastic harmony, with lots of pretty hues that work together or in pairs. Which is your favorite?
Avoiding metal in beadwork is never as hard as when I just want to string. I’ve been meaning to take the time to really learn how to make a great sliding knot for metal-free necklaces and pendants. This sliding knot bracelet tutorial from Honestly…WTF might help!
If fall has you feeling leaf inspired, a super cute Swarovski earring tutorial from Fusionbeads.com may do the trick. The No Leaf Unturned project uses emerald and fern green sew on leaves, which makes them perfect for year-round wear.
Do you like to wear holiday themed jewelry? For a little Halloween inspiration, check out this very wearable witchy necklace by Margot Potter.
Have you ever gone forward with a project, even if you had a lot of doubts about it? I’m very pleased - though still a bit sheepish - to announce that Inspirational Beading’s companion vlog series, Bead Show and Tell will continue, whenever there are new beads to share. The first two videos were not my best work, but everything improves with practice, and I hope that I can continue to get better! Here is part three, featuring lots of seed bead hanks:
What is your favorite inspiration this month?
Copyright 2012 Inspirational Beading
Subscribe to Inspirational Beading
Get inspired on Facebook and Google+
First, I want to extend a very warm welcome to Inspirational Beading’s newest sponsor, The Best Beads - bead distributors direct from the Czech Republic. I hope you’ll stop by to browse through their beautiful selection of glass beads and buttons!
If you’re looking for a little project inspiration, the Global Genes Project has put out another call for denim inspired pieces for the 7000 Bracelets for Hope campaign. Anyone can create and submit a blue bracelet to help give hope and support to families living with rare genetic diseases.
Polymer Clay Bracelet - Falling Leaves Mobile
Good posture is an important part of crafting - for beaders and knitters especially. This quick Crafting Calamities video from Interweave explains how to avoid repetitive stress injuries and back pain while doing your daily creative work.
It’s always fun to make a project that turns single beads into a new object, like the adorable lucite pumpkin earrings in a video tutorial from Beadholique. You could make all kinds of variations with melon beads or rondelles!
Beaders who sell their jewelry are always comforted to know that even the most famous and fashionable people of the world like to buy unique and one of a kind pieces. Someday it could be yours! Although My Flash Trash isn’t exactly in our circle, it is nice to know that someone as posh as the Duchess of Cambridge likes indie designs.
Are you thinking ahead to next year’s jewelry designs? Pantone has already released their picks for 2013’s spring fashion colors. This line up has fantastic harmony, with lots of pretty hues that work together or in pairs. Which is your favorite?
Avoiding metal in beadwork is never as hard as when I just want to string. I’ve been meaning to take the time to really learn how to make a great sliding knot for metal-free necklaces and pendants. This sliding knot bracelet tutorial from Honestly…WTF might help!
If fall has you feeling leaf inspired, a super cute Swarovski earring tutorial from Fusionbeads.com may do the trick. The No Leaf Unturned project uses emerald and fern green sew on leaves, which makes them perfect for year-round wear.
Do you like to wear holiday themed jewelry? For a little Halloween inspiration, check out this very wearable witchy necklace by Margot Potter.
Have you ever gone forward with a project, even if you had a lot of doubts about it? I’m very pleased - though still a bit sheepish - to announce that Inspirational Beading’s companion vlog series, Bead Show and Tell will continue, whenever there are new beads to share. The first two videos were not my best work, but everything improves with practice, and I hope that I can continue to get better! Here is part three, featuring lots of seed bead hanks:
What is your favorite inspiration this month?
Copyright 2012 Inspirational Beading
Subscribe to Inspirational Beading
Get inspired on Facebook and Google+
Friday, September 21, 2012
Tutorial: Graduated Herringbone ‘Bobble’ Rope
Have you ever been completely smitten with shaped seed beads, only to find yourself at a loss when it comes to using them? One of my favorite techniques for combining a variety of seed bead sizes and shapes is tubular herringbone weave. Not only can you use up a lot of beads at once, but the possibilities for color and pattern combinations are endless!
This technique, which I like to call ‘herringbone bobbles’ uses at least two seed bead sizes, or as many as you can come up with. The only restriction is that the beads need to gradually change in size. You can begin as small as you like, although for the best durability, I recommend going no smaller than standard size 11/o Delicas. While 15/o round seed beads could fit into a sequence nicely, the smallest sections of a graduated herringbone rope bear the most pressure and wear, and cylinder beads provide a lot of compact strength.
When choosing your beads and pattern, look carefully at the sizes to determine the best sequence for increasing and decreasing your rope. I like variations of: Delicas - 11/o rounds - 10/o rounds or 11/o triangles - 8/o rounds or hex cuts - 6/o rounds - 4 mm cubes - 4/o rounds or E beads. When in doubt, try stitching a few rows to see how it looks - you can always remove stitches if you don’t like the shape of the beadwork. Combining Czech and Japanese seed beads will give you the widest range of bead sizes.
To Make a Herringbone Bobble Rope:
Begin by weaving a regular tubular herringbone base. Using your smallest beads, create a two-bead ladder with an even number of stitches. Eight columns is an ideal size for this technique. Ladder stitch the ends of the strip together, and weave through a few columns to secure the ring. Exit from the opposite side from your tail thread.
Pick up two small beads, and stitch down through the adjacent bead in the previous round. Pull snug, and stitch up through the next bead in the base. Continue all around the ring, and step up through 2 beads to begin the next round.
Add several more rounds of tubular herringbone with this bead size, until you have a comfortable base to work with. Make it as long or as short as you like before adding the first increase. If you’re making a necklace, consider where you would like the first ‘bobble’ to appear.
Move up to the next bead size in your pattern, and add 2 or more rows of tubular herringbone. If you will be using more than 3 bead sizes in your rope, giving the smallest bead sizes at least 2 rows each is ideal, to give the larger, roomier rows a strong base.
Continue adding new rows of tubular herringbone, gradually increasing bead sizes as you go. The more variety of beads you have, the more elongated your bobbles will be, especially if you use the same bead for more than one row.
Doubling up on rows can also help make smoother transitions from one bead size to another, just like in spiral peyote. For a strong but flexible rope, ease into larger size jumps by adding lots of transition rows.
Bigger beads can change the structure of the rope - really big bobbles can be squishy in the middle. Make sure to use strong, even tension as you increase your bead sizes. When you have reached the largest bead size in a sequence - or if your stitches feel like they’re starting to roam - reinforce the row by repeating the herringbone stitches all the way around, without picking up any beads. This dummy stitch will tighten things up before the decrease begins, and add strength to the finished design. I like to keep my tails extra long, so that I can go back and reinforce any loose areas once the rope is finished. Reinforcing sharp-edged rows like cubes and hex-cuts is a good idea, too!
To decrease, add new rows of tubular herringbone, but move down in bead size. You can use the same pattern as the increasing rows, or change it up a little for a more freeform look. You don’t have to go all the way up or down the size scale, either. Moving back and forth in short sections of the bead sequence works, too, as long as you don’t jump sizes too much.
Small accent beads can also be added to the rope, provided they are similar in size to the adjacent seed beads. Try crystals, druks, daggers, or even bugles! When you’re ready to finish the rope, decrease all the way back down to the smallest bead size, and stitch a few rows. Dummy stitch the last row to the previous one, and weave in your tails to add strength.
Do you like to weave with shaped seed beads? What’s your favorite style?
Copyright 2012 Inspirational Beading
Subscribe to Inspirational Beading
Get inspired on Facebook and Google+
This technique, which I like to call ‘herringbone bobbles’ uses at least two seed bead sizes, or as many as you can come up with. The only restriction is that the beads need to gradually change in size. You can begin as small as you like, although for the best durability, I recommend going no smaller than standard size 11/o Delicas. While 15/o round seed beads could fit into a sequence nicely, the smallest sections of a graduated herringbone rope bear the most pressure and wear, and cylinder beads provide a lot of compact strength.
When choosing your beads and pattern, look carefully at the sizes to determine the best sequence for increasing and decreasing your rope. I like variations of: Delicas - 11/o rounds - 10/o rounds or 11/o triangles - 8/o rounds or hex cuts - 6/o rounds - 4 mm cubes - 4/o rounds or E beads. When in doubt, try stitching a few rows to see how it looks - you can always remove stitches if you don’t like the shape of the beadwork. Combining Czech and Japanese seed beads will give you the widest range of bead sizes.
To Make a Herringbone Bobble Rope:
Begin by weaving a regular tubular herringbone base. Using your smallest beads, create a two-bead ladder with an even number of stitches. Eight columns is an ideal size for this technique. Ladder stitch the ends of the strip together, and weave through a few columns to secure the ring. Exit from the opposite side from your tail thread.
Pick up two small beads, and stitch down through the adjacent bead in the previous round. Pull snug, and stitch up through the next bead in the base. Continue all around the ring, and step up through 2 beads to begin the next round.
Add several more rounds of tubular herringbone with this bead size, until you have a comfortable base to work with. Make it as long or as short as you like before adding the first increase. If you’re making a necklace, consider where you would like the first ‘bobble’ to appear.
Move up to the next bead size in your pattern, and add 2 or more rows of tubular herringbone. If you will be using more than 3 bead sizes in your rope, giving the smallest bead sizes at least 2 rows each is ideal, to give the larger, roomier rows a strong base.
Continue adding new rows of tubular herringbone, gradually increasing bead sizes as you go. The more variety of beads you have, the more elongated your bobbles will be, especially if you use the same bead for more than one row.
Doubling up on rows can also help make smoother transitions from one bead size to another, just like in spiral peyote. For a strong but flexible rope, ease into larger size jumps by adding lots of transition rows.
Bigger beads can change the structure of the rope - really big bobbles can be squishy in the middle. Make sure to use strong, even tension as you increase your bead sizes. When you have reached the largest bead size in a sequence - or if your stitches feel like they’re starting to roam - reinforce the row by repeating the herringbone stitches all the way around, without picking up any beads. This dummy stitch will tighten things up before the decrease begins, and add strength to the finished design. I like to keep my tails extra long, so that I can go back and reinforce any loose areas once the rope is finished. Reinforcing sharp-edged rows like cubes and hex-cuts is a good idea, too!
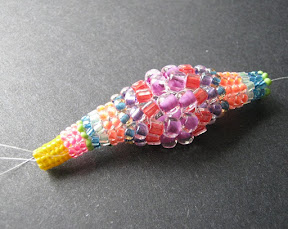
To decrease, add new rows of tubular herringbone, but move down in bead size. You can use the same pattern as the increasing rows, or change it up a little for a more freeform look. You don’t have to go all the way up or down the size scale, either. Moving back and forth in short sections of the bead sequence works, too, as long as you don’t jump sizes too much.
Small accent beads can also be added to the rope, provided they are similar in size to the adjacent seed beads. Try crystals, druks, daggers, or even bugles! When you’re ready to finish the rope, decrease all the way back down to the smallest bead size, and stitch a few rows. Dummy stitch the last row to the previous one, and weave in your tails to add strength.
Do you like to weave with shaped seed beads? What’s your favorite style?
Copyright 2012 Inspirational Beading
Subscribe to Inspirational Beading
Get inspired on Facebook and Google+
Thursday, September 20, 2012
Candy Colored Herringbone Rope
For last week’s bead tray update, I showed a preview of a new rope necklace that is a little different than the designs I’ve been making of late. Although it was a bit of a departure from my ‘make what I like’ mission, I couldn’t resist taking a little herringbone break. Not only would I be able to use up a lot of destash beads, but I thought it would make a fun tutorial. Stay tuned for a step-by-step on how to make what I like to call herringbone bobbles!
I combined as many seed bead sizes as I possibly could, and chose colors that I’m not likely to use ever again, like hot pink 11/o’s and canary yellow Delicas. There are also lots of destash hex cuts, cubes, some leftover pinch bicones from the Sunrise Collar, and magenta lined E beads (though I barely made a dent in those).
Although this started as a bit of a ‘just do it’ kind of project, I was really excited about all that color, and I’m actually thrilled with how it turned out. The colors are so vibrant and cheerful in their rows, and the rope itself has a great flow. I seriously considered keeping this one for myself, but I thought it would be even more fun to give it away on my ArtFire blog.
Have you had any great design surprises lately?
Copyright 2012 Inspirational Beading
Subscribe to Inspirational Beading
Get inspired on Facebook and Google+
Wednesday, September 19, 2012
Learning Beadwork with CraftArtEdu - Giveaway
Peyote Button Design by Jean Campbell
Imagine if you could combine the one-on-one attention of a live class with the convenience of an around-the-clock website. You could learn and practice new techniques at your own pace, any time you want. That is exactly the type of instruction you get from classes on CraftArtEdu.
The online learning community at CraftArtEdu is designed for the modern crafter. Classes in everything from beadwork to woodworking are available, all created by experienced artisans and teachers from around the world. Some of the beading instructors include familiar faces like Margie Deeb, Jean Campbell, Sherry Serafini, Marcia DeCoster, and Donna Kato.
A typical CraftArtEdu course includes downloadable PDF ‘class handouts’, but instead of sitting in a classroom, you can bead along with a detailed step-by-step video on your laptop, in your pajamas, or on your lunch break. The class videos are highly professional and easy to follow, and include the added convenience of a pause button. Once you purchase a class, you can watch it again and again, as often as you need to.
After viewing Jean Campbell’s Peyote Buttons class, I gathered up some beads, and followed along a second time while creating the most ingenious little beaded component. Named for the actual cactus button as well as the stitch, these cute little forms combine tubular and circular peyote stitch to make perfect hexagons for pendants, bracelets, or bezels.
In addition to the classes themselves, each instructor also has a forum on CraftArtEdu.com, where students can post photos of their creations, ask questions, and get additional help with projects and techniques. You get all of the personalized instruction of a live class, but without the gas mileage of attending in person!
If online classes sound like your cup of tea, you can try out some of their free tutorials for jewelry and polymer clay techniques. Better still, CraftArtEdu is having a fantastic sweepstakes giveaway this month, with $4500 worth of jewelry making prizes up for grabs, including free online classes, supplies from RioGrande.com, and custom CraftOptics telescopes. To learn more, check out the My Dream Jewelry Studio Sweepstakes, but do it soon - the draw closes on September 30th!
Bonus Giveaway
I really enjoyed the learning experience at CraftArtEdu, and I’m really exited to be sharing it with you! One lucky Inspirational Beading reader will receive a free class of their choice, courtesy of CraftArtEdu.
To enter, simply leave a comment on this post, and tell us which CraftArtEdu class you would most like to take - from the jewelry category, fine art section, anything goes! You can browse through classes by media, materials, or instructor. One winner will be drawn at random on Monday September 24th. You can enter both the My Dream Jewelry Studio Sweepstakes, and this giveaway.
Important: If you do not have a Blogger account or profile with email contact enabled, please make sure to include a website or email address in your comment, so I can contact you if you win!
Good luck!
I would like to thank CraftArtEdu for allowing me to sample some of their fantastic classes, and for offering a free course to Inspirational Beading readers. Inspirational Beading does not receive a commission for featuring CraftArtEdu products or services.
Copyright 2012 Inspirational Beading and CraftArtEdu
Subscribe to Inspirational Beading
Get inspired on Facebook and Google+
Monday, September 17, 2012
Orange Sunrise Collar
Today’s destash challenge design was a long time in the making. I’ve been pondering possible uses for two strands of translucent white pinch bicones for months now. In the back of my mind, I knew that sooner or later I would make a collar with them, but I was waiting for some other inspiration to strike. With the really ‘usable’ beads that need to be destashed winding down to a minimum, I decided it was time to just cut these strands and make something great.
Right around the same time that I pushed the pinch bicones to the front of the queue, I had another light bulb moment. Why has it been so long since I’ve made any Egyptian replicas? It felt like the right time to remake some favorite Egyptian jewelry, and I went with the collar of Princess Nofret as inspiration. The pinch bicones could stand in for the silver paddle fringe.
Unfortunately, when I went to my bead stash to choose colors, I was stumped. I had the red, but no pale green, and no dark gray. I tried dark green and pale gray, but to do that, I would have to combine multiple finishes - transparent, matte, colorlined. I didn’t like the way it looked at all, so I decided to stretch the palette a little and combine colors that were similar, but looked fantastic together.
The final palette includes ceylon cream, transparent rootbeer, aqua lined jonquil, and red lined topaz. The colors all have a lovely warmth. The red lined topaz is especially beautiful - a perfect sunset orange. I’m still planning to do a more accurate recreation of Nofret’s collar, once I have a chance to find just the right combination of colors. I may have to cheat a little though, and assume that the green has faded over time, just to add a little more color.
Copyright 2012 Inspirational Beading
Subscribe to Inspirational Beading
Get inspired on Facebook and Google+
Saturday, September 15, 2012
Bead Color Ideas: Blue Coconut
One of the challenges that comes with choosing a bead color palette, is balancing the shapes and textures of the beads to create a harmonious theme. Whether you’re making an abstract or simple piece, or recreating an object of inspiration, the individual bead finishes, shapes, and color can have a big impact on the overall design.
This week I wanted to explore possible color palettes to use with some new coconut shell daggers. Tropical blue dye gives them a very playful look, while still maintaining their natural earthiness. The challenge would be to not only find palettes that enhanced the tropical theme, but also some that would alter it entirely by using color to change one’s perception of the daggers.
I started easy by choosing some bright and citrusy colors. Lime green and lemon yellow go together quite nicely, and add a very watery element to the palette in plain transparent glass. Together, all three beads make me think of spots of sunlight dancing under the shadow of a Palm Tree.
For a more challenging palette, I wondered if it would be possible to make spiky blue shapes look like ice, so I grabbed some matte polar white seed beads to start. They have a wonderfully snowy look, but aren’t as stark as true white. Rather than go with another neutral, I decided to complement the blue with some frosty matte emerald to create a winter Tundra. I think with the right stitches, this palette could look icy, but the organic texture of the coconut would still be difficult to blend.
Finally, I couldn’t resist using some of my favorite colors. I wanted a palette with lots of impact, so I started with opaque pepper red - a very bold contrast for the daggers. To this I added warm and exotic Autumn Tucson seed beads. All three colors, along with the pointy shapes, remind me of exotic and dangerous things, like poisonous frogs and flowers in a Deep Rainforest.
What kind of theme would you create with spiky blue coconut?
Copyright 2012 Inspirational Beading
Subscribe to Inspirational Beading
Get inspired on Facebook and Google+
Wednesday, September 12, 2012
World Beaders: Israel
Today I want to extend a warm welcome to Inspirational Beading readers from Israel - home to some of the world’s most talented and innovative jewelry designers. Chances are good that you’ve seen the work of artists like Shay Aaron, Yoav Kotik, Lital Mendel, Orly Zeelon, and Sigal Buzaglo, who’s book Creative Beaded Jewelry is a personal favorite.
Israel is also a source of one of the beading world’s greatest treasures - ancient Roman glass. The very limited and incredibly beautiful nature of beads and components made from these relics makes them more valuable than gold for some!
Happy beading, Israel!
Copyright 2012 Inspirational Beading and Friends
Images Hosted by Pinterest
Subscribe to Inspirational Beading
Get inspired on Facebook and Google+