Pages

Thursday, January 31, 2013

Bead Inspired: Spring Swirls

Thanks to the inspirations of soutache artist Amee K., I’ve been noticing soutache embroidery jewelry everywhere lately. The wonderful swirling, curving shapes of this unique beadwork are hard to resist. There’s just something so appealing about all of those beads snuggled into the fibers.

Swirl patterns, especially organic or freeform ones, are always in style. They bring to mind some of our favorite comforting things, like tropical waves, dandelion seeds on a breeze, or just doodling while on the phone with a good friend. When I came across a beautiful pink and blue lampwork bead by Michal Silberberg, I couldn’t resist adding it to a collage. Not only does it have wonderful layers of multicolored swirls, but marching dots of glass - one of my favorite lampwork embellishments.


Spring Swirl


I added some more swirling, soft, and curvy elements, as well as a good dose of stripes. I was so eager to get started that I didn’t spend much time around the shop. There are some even more inspiring designs in amazing color combos. This is one of my favorites, which features a gorgeous contrast of black, lime, and orange:

Rainbow Lampwork Focal Bead by Michal Silberberg

Rainbow Lampwork Focal by Michal Silberberg


And, while I was at it, I decided to make use of a favorite bracelet clipping from my round up of Pantone inspired emerald goodies. I'm a sucker for chunky bangles when looking for collage ideas, especially transparent ones. Even though I’m anti-plastic in my designs, I can't help but love the look of chunky resin - probably because it reminds me so much of glass, but in delightful abundance.


Dorothy's Lunch Date


Whenever I see crystal clear emerald green, I instantly think of the scene in Return to Oz, when Dorothy must rescue her friends who have been turned into emerald figurines. It’s a favorite collage and treasury theme of mine -there’s something so great about the combination of ruby red, emerald green, and a chicken.

What’s inspiring you today?

Copyright 2013 Inspirational Beading and Friends
Images Hosted by Polyvore
Subscribe to Inspirational Beading
Get inspired on Facebook and Google+

Wednesday, January 30, 2013

Red and Pink Jewelry Designs

Just as fashion trends come and go, so too do the ‘rules’ of what to wear. At this time of year, one of the biggest debates has often been whether or not it’s acceptable to combine red with pink. For a long time it was a most definite Don’t, but things are changing. If mixing prints is okay, then so is the combination of two colors that were once thought to clash. The trick is using the right proportions.


Red and Pink Bead Embroidery by Dreams of Charlotte


With color blocking continuing to be a popular trend for garments, pairing bold colors together is almost always a Yes. But what about jewelry? Thanks to the wide variety of finishes and shapes available for beaders, there are a lot of great ways to pair pink and red for romantic and cute spring jewelry. Lipstick red and hot pink are a favorite, but there's also room for scarlet, baby pink, and the orangey shades of coral.


I recently went on a hunt for fabulous pink and red designs. Some of my favorite pieces are those that made use of a third color - something to both anchor and separate the two colors and create a pleasing trio. Some combinations work better than others, and as with all bead palettes, the finish is just as important as the color.


Spring Earrings by Little Apples


Necktie Bracelet by Pistil and Pennyroyal


Fused Glass Heart Pendant by Silver River Jewelry


Valentine Necklace by Sweety Stuff


Red Sorbet Bracelet by Town of Beadrock


Valentine Button Charm Bracelet by randomcreative


Retro Fabric Button Earrings by Hollywood Hillbilly


Double Strand Stone Necklace by Red Chair


Wooden Triangle Necklace by Theia Design


Cherry Blossom Earrings by Verveine Designs


Neon Minimalist Necklace by NES Wedding Garden


How do you feel about this newly approved color combo? Are you using it in your spring designs?

Copyright 2013 Inspirational Beading and Friends
Images Hosted by Pinterest
Subscribe to Inspirational Beading
Get inspired on Facebook and Google+

Tuesday, January 29, 2013

Time Capsule: Three Short Years

Do good things happen to those who wait? I think this is often the case, although perhaps there’s a little more involved than just sitting idle while that waiting goes on. As I approach my 4 year anniversary of selling jewelry online, I find myself wondering if I should assess just what it means to be successful. To be honest, moving forward and improving in beadwork and presentation are always at the top of my goals list. As long as I can continue to stay in business, I will, even it it’s not making me rich.

Three years ago this month, I debuted my first Egyptian inspired beadwork collar, as part of a series of designs I made based on famous females. It was a great theme, which also included favorite designs like Emily Carr’s necklace, and a fantastic interview with Barbie maven Margaux Lange. Coincidentally, Nefertiti’s collar found its owner this week, and I suddenly realized just how long it’s been waiting.


But is three years such a long time? Even brick and mortar stores have product that doesn’t sell for years. I used to shop at a tiny grocery store that had housewares from the 1970’s, so dusty that you could barely see the labels on the package. I certainly don’t want that to happen to any of my designs. Last year’s jewelry purge was a very rewarding experience, and one I plan to repeat whenever it needs doing.

If you love something you have to let it go - or in the case of jewelry inventory, sometimes you just have to keep it for yourself. One piece of advice that is often repeated by help articles for online sellers is not to get attached to your work. Be critical. Take the crud out. And while I agree one hundred percent, I also think it’s important to persevere when you know that somewhere out there, your design has a mate.

Let’s confess and compare. What’s the longest you’ve had a design in your shop before selling or retiring it?

Copyright 2013 Inspirational Beading
Subscribe to Inspirational Beading
Get inspired on Facebook and Google+

Thursday, January 24, 2013

Jewelry Design Intern Opportunity with iSanctuary

We all know about the healing properties of beads, and the amazing way that jewelry design can change the world. Organizations like Soul of Somanya and The Andean Collection are just two examples of the way that beads and jewelry can help women and young people around the globe. Purchasing their products and talking to others about the cause is a great way to help, but for great change to occur, more hands are always needed.

If you’ve ever wanted to join in a great cause full tilt and feet first, but weren’t sure how to begin, this may be the perfect opportunity for you! iSanctuary - a non-profit that teaches jewelry making skills to survivors of human trafficking - is looking for talented designers with big hearts to help their outreach efforts in India.


iSanctuary Purchase with Purpose


iSanctuary is looking for: “candidates that are not only talented designers but can create within our branding and for our target market, and are culturally and emotionally sensitive. And last but certainly not least, candidates should be multi-talented because as in most non-profits everyone wears many different hats.”

Bravery, generosity, and determination are just a few key ingredients for the perfect volunteer. Flying across the world to begin such a quest can be a huge leap, and interns must provide for themselves during their 12 month stay - the internship is a volunteer position. I asked the iSanctuary founder, Stephanie Pollaro, to tell us a bit more about the organization, and the work that they do.

Inspirational Beading: How did you first get involved with the issue of human trafficking?

Stephanie: About 9 years ago I picked up a magazine (something I rarely do) and in it was a story of Anuradha Koirala (who later became a CNN Hero in 2010). I was blown away by several things: the amazing work Anuradha was doing and even more overwhelmingly was the eye-opening realization of learning about the existence of human trafficking for the first time. I immediately went to my computer and started doing research to validate the unbelievable facts I had just learned. As the truth began to grow more evident and more dark I knew in an instance I couldn’t go back to living life the same way… Life as I had known it had been flipped upside down and now I had to respond.

It took several years of planning and talking with professionals in the field to develop an NGO that would best meet the needs of the anti-trafficking community and the survivors themselves. In 2007, with the help of my co-founder Wendy Dailey we started International Sanctuary (iSanctuary). Fun fact: Also in 2007 I got to personally meet Anuradha and thank her for opening my eyes.

In our search to see where we were needed in the anti-trafficking community we heard from many social workers and victims’ rights advocates in India and the US. They all shared the same understanding—trafficking survivors need job skills and economic opportunities. In the USA, Health and Human Services (HHS) often run out of funds to assist survivors waiting for their cases to come to trial (TIP 2012). Internationally, the lack of economic opportunities can be detrimental to a survivors reintegration. According to a study conducted by USAID (2007) the lack of economic opportunities and the skills to earn an adequate income places survivors in vulnerable situations that can lead to retrafficking. It was this realization of the great need for economic opportunities both here in the US and abroad that served as the impetus for the formation of iSanctuary and the iSanctuary POST program.

Inspirational Beading: When did jewelry design and beading become a part of your mission?

Stephanie: It was there from the beginning, as it was the only thing that I had in common with many of the girls in the aftercare homes. To fill the days, the girls are given classes in many different handicrafts: candle making, silk flower making, painting, and jewelry making. However, the jewelry they were making was very Indian and mostly just beads strung on thread. When I introduced the girls to western fashion jewelry and wire wrapping they instantly loved it.

Inspirational Beading: For you, what’s the most difficult part of working with these young women and girls?

Stephanie: The most difficult thing is getting these girls to see themselves the way I see them: talented, smart, beautiful and worthy of great things. Many time the damage from the years of trauma wins- they give into the lies they had been forced to believe, and they settle for much less than they deserve.

Inspirational Beading: What is your favorite, or most rewarding part of the cause?

Seeing change!

Once in our workshop in India, I overheard one of the young ladies complaining about how difficult something was and how she didn’t think she could do it. Then all of a sudden I heard one of our other young ladies tell that girl, “ We aren’t weak, we are iSanctuary girls. You can do it!” It still gives me chills.

Inspirational Beading: You’re currently looking for designer/interns to help out. Tell us a little about the position.

Stephanie: iSanctuary is currently seeking an adventurous woman looking to have her life shook up. She must be flexible yet structured, patient yet persistent, and a go-getter. The one year volunteer position IN INDIA is for a multi-talented Jewelry Designer/ Maker that can help us create pieces that fit our brands' strategic and financial objectives.

Inspirational Beading: In addition to using their jewelry making skills, what should hopefuls be ready to face?

Stephanie: India is a land of contradictions. Poverty is everywhere but so is wealth. It is a filthy place but they are trying to fix that. The people are lovely especially the iSanctuary people.

Inspirational Beading: Do you have any advice for women working in relief services in unfamiliar countries?

Stephanie: Take care of yourself…. Make time for exercise and rest. You are no good to anyone else if you are burnt out!


The International Sanctuary Story


If you’d like to learn more about the opportunity of a lifetime, please visit the iSanctuary field interns page. You can also find additional information about the organization, and all of their efforts in India, the Philippines, and the US, as well as human trafficking issues and what you can do to help. iSanctuary also supports local chapters for promoting awareness, and accepts applications for new advocates. If you’re moved by these issues, but aren’t able to work in the field, starting or joining an iSanctuary chapter is a great opportunity to support an important cause.


Copyright 2013 Inspirational Beading and iSanctuary
Images Hosted by Pinterest
Subscribe to Inspirational Beading
Get inspired on Facebook and Google+

Tuesday, January 22, 2013

How to Make a Floating Bib Necklace

Do you remember the illusion necklace? Not so long ago, it was a popular trend in strung necklaces, using crimps to suspend beads in a widely spaced, multi-strand design. The idea has since evolved, and combined with gorgeous rhinestones and the bib necklace trend, the design possibilities are stunning!


Swarovski Floating Bib Necklace by Jamie Smedley


On the cover of the current Fire Mountain Gems catalogue is a great example of the floating bib necklace, which uses a tulle backing to float a variety of Swarovski sew-ons in a beautiful arrangement. You may have seen this necklace style around the fashion pages, particularly the work of Sparkle Beast Designs. The illusion of sporting jewels right next to the skin is hugely popular, and no wonder, with all of the wonderful shapes and colors of affordable baubles available.


Midnight Sky Floating Bib Necklace by Sparkle Beast Designs


If you’re not afraid of a little glue or sewing, there are a variety of ways that you can make this necklace style your own. You'll need a good selection of rhinestones and flatbacks, along with some sheer mesh fabric like tulle. Since there are no stitches or strings to contend with, you can arrange your baubles in any way you like!

Here are some of the best tutorials I found for floating bib necklaces:


The Rainbow Bling necklace project from Bird Hearts Bear
uses hot glue and flatbacks.


The Nikki’s Disco Dickie tutorial on CraftStylish
uses sew on stones and organza.


I also found some other beautiful bib necklace projects, many of which can be adapted to use a sheer mesh fabric to get the illusion look. Big, chunky rhinestones are a popular jewelry trend right now, so any way you stitch it, they are sure to be a hit. Here are my favorite bib necklace tutorials:


Button and Pearl Bib Necklace Tutorial by Little Miss Momma


Sparkling Bib Necklace Tutorial from Martha Stewart


Satin Bib Necklace Tutorial by Angela Osborn


Beaded Denim Bib Necklace Project from Random Chic Musings


For really affordable and lightweight designs, many artists prefer acrylic rhinestones to crystal. You can find a great selection of the same pieces used in Sparkle Beast necklaces in her destash shop, Sparkle Beast Supplies.

What do you think of the floating rhinestone technique?

Copyright 2013 Inspirational Beading and Friends
Images Hosted by Pinterest
Subscribe to Inspirational Beading
Get inspired on Facebook and Google+

Thursday, January 17, 2013

Bead Color Ideas: Pantone Spring 2013

We’ve already played a bit with matching up this year’s fashion color choices, so now it’s time to take a look at what they can do when combined with the versatile nature of beads. As we all know, the fluid quality of the beads themselves, along with the organic and playful nature of assorted finishes, makes it tough to trade the colors on a screen with the ones in our bead stash. For me, this exercise is a great way to look at bead colors with fresh eyes.

Pantone Spring 2013 Colors


I promised to include Grayed Jade with the bead palettes this time around, so the green tray was my first stop. I debated back and forth between white lined peridot and aqua lined jonquil for awhile, and even rearranged which colors I would pair it with. Both greens seem to fade away next to brighter colors, so I made sure to include a neutral similar to Linen. I didn’t have anything quite so peachy, so opaque cream would have to do. I finished the Vintage Picnic palette with some yellow AB for Lemon Zest, and just a dash of Poppy Red, like a swipe of lipstick.

Vintage Picnic Bead Palette


Although this year’s Pantone palette looks fantastic, in practice it was proving quite a challenge. With very few oranges in my stash to choose from, I ended up with some amber colored Czech glass where Nectarine should be. The addition of wisteria for African Violet, and some matte sky blue for Dusk, cheered things up a little bit for Garden Gate, and reminded me that I need to stock up on pale blues.

Garden Gate Bead Palette


The final palette was just as tough, and it took a long while to decide on a stand in for Monaco Blue. I eventually settled on everyday opaque blue, which makes a great match for transparent lemon lime magatamas (aka Tender Shoots) in this Mill Pond trio. I cooled things off with turquoise lined amber in place of Emerald, adding to the fragrant spring mood.

Mill Pond Bead Palette


This may have been my least successful set of bead trios, but I’m not feeling at all discouraged. After last year’s destash challenge, I’ve really started to hone my stash, cultivating a palette of colors that works for me and my style goals. As this year moves forward, I may find myself switching to a new system where I purchase the beads I need when a project calls for them, and not just when the color catches my eye.

Have you ever been stumped on bead colors when trying to recreate a real-life palette?

Copyright 2013 Inspirational Beading and Pantone
Subscribe to Inspirational Beading
Get inspired on Facebook and Google+

Wednesday, January 16, 2013

Wings of Isis Collar

Although I started my Egyptian gods series late last year, making it my 2013 beading challenge has already had some great advantages. Giving myself an entire year to move through the pantheon allows lots of time for re-dos if something doesn’t come out quite befitting an ancient god, and I’m much more eager to jump in and try the first great idea that comes to mind.

The latest addition to the series is Isis, and as the most well known goddess of not just Egyptian but probably all ancient mythology, making her necklace was a tall order. Instead of wondering if I was up to the task, I got straight to work on choosing the shapes and colors that I would use to represent her with my favorite techniques.

The mother goddess’ magical wings seemed like the most obvious path to choose, not just because it would allow for some fun color use, but because the shape is so ideal for beadwork. I sketched out a few different ideas for netting patterns, picked out a few colors, and got to work on a collar.

I selected some jet lined blue magatamas for the edges of the collar, to help create the look of wing tips. Cobalt blue white hearts made up the bulk of my palette, along with raspberry, Rosaline, and pale jade. Once I got about a thread’s length into the beadwork, I started to have some doubts. Was there enough color? Would this pattern be magical enough for Isis? And I realized that I might run out of some colors before the design was complete.

Isis Bead Palette


The most obvious solution to those three problems was simple: add more beads. I got out all of my bead trays again, and started taking things out and shuffling them around, until a new idea began to form. I decided to divide up the collar into halves and thirds, blending the different color choices together, while also creating two separate “wings”.

I ended up adding three new shades of green and some green 8/o accents, orange topaz, and lime magatamas. Only a wider selection of bead choices could have made this project more satisfying. The pattern came out exactly as I had hoped, and the opposing fans of magatamas really help to create the winged look, and give the split colors a little more purpose.

Isis the Mother Collar


Copyright 2013 Inspirational Beading
Subscribe to Inspirational Beading
Get inspired on Facebook and Google+

Tuesday, January 15, 2013

Wear It Twice: Pantone Spring 2013

This year’s collection of spring fashion colors by Pantone is a very bead-friendly palette, including the lovely Emerald color of the year. Each hue in the Spring 2013 lineup is fresh and exciting, with lots of bold warm colors, and soft cools. I’m particularly fond of Tender Shoots - a crisp lime green - and this year’s Nectarine orange is much more wearable than Tangerine Tango.

To help inspire some trendy designs for the new year, I put together some collages of necklace and bracelet picks with coordinating outfits for day and evening. It was tough to decide which of the ten colors to drop, and how to mix and match the remaining nine into perfectly harmonious trios.

Pantone Spring 2013 Fashion Colors


I started with Monaco Blue, Poppy Red, and this year’s neutral - Linen. It’s a wonderfully peachy nude that has just the right amount of warmth, and would have looked great with any of the other picks. I chose the two boldest colors for this trio to leave room for the more tropical colors, and ended up with a fun nautical theme. Round beads, buttons, and bangles bring everything together with plenty of curves.

Sailing to Monaco


I can’t resist a fruity palette, so Tender Shoots, African Violet, and Nectarine seemed like the perfect trio. This collage is all about frilly texture softness, and plentiful bunches. I fell in love with the chunky faux-shell necklace at first sight, and paired it with lots of lacy fabrics and seed shapes.

Sweet Spring Bounty


Finally, Emerald takes center stage with some geometric and tribal shapes. Dusk Blue and Lemon Zest bring lots of tropical flavor, perfect for an early spring getaway. Grayed Jade was the only color that didn't make an appearance, although it is a lovely muted green that deserves a lot of attention this year. I'll be sure not to neglect it at bead trio time!

Tropical Tart


Which Spring 2013 color is your favorite?

Copyright 2013 Inspirational Beading and Friends
Pantone and Polyvore
Nicole Miller and Rachel Roy
Subscribe to Inspirational Beading
Get inspired on Facebook and Google+

Monday, January 14, 2013

Bead Wish List: Hearts and Cupcakes

Valentine’s Day is just around the corner, and what better way to celebrate than with cupcakes? Everyone loves cupcakes. They’re better than flowers because you can eat them, and better than chocolate because you can have them however you like: gluten-free, fair trade, dairy free, extra sprinkles…

I went on a hunt for some fun and fabulous heart and cupcake beads for February jewelry designs. Here are my favorites:


Jangles Ceramic Heart Polkadot Pendant from Lima Beads


Natasha Puffer Lampwork Cupcake from FusionBeads


Victorian Czech Glass Hearts from Gypsy Bead Peddler

Venetian Glass Klimt Heart Bead from Artbeads.com

Blue Enameled Copper Heart Discs from Happy Mango Beads

Vintage Black Resin Heart Beads from Lady K Jewels

Yellow Lampwork Heart Beads by IrinaS

Lillypilly Mother of Pearl Heart Pendant from Artbeads.com

Organic Lampwork Heart Bead from Stone Designs by Sheila

Cobalt Glass Heart Toggle Clasp from Auntie’s Beads

Flamingo Pink Heart Shell Beads from Happy Mango Beads

Peruvian Ceramic Cupcake Beads from The Crafty Bead

Swarovski Elements Marbled Terracotta Heart Pendant from Fusion Beads

Pink Cupcake Charm from Beadaholique

Czech Glass Cinnamon Hearts from Beach Castle Beads

Light Green Ceramic Heart Beads from WISHsupplies


Earthenwood Studio Ceramic Aqua Crackle Heart Pendant from Lima Beads


Swarovski Elements Amethyst Truly in Love Pendant from Beadaholique


Do you have a favorite treat to recreate with beads?

Copyright 2013 Inspirational Beading and Friends
Subscribe to Inspirational Beading
Get inspired on Facebook and Google+

Thursday, January 10, 2013

Beading Tutorial: Ogalala Netting

Ogalala Butterfly Netting

Although some stitches can be occasionally frustrating, we can probably agree that all beading techniques are fun - some are just more fun than others. Take ogalala butterfly weave for example. It’s not as versatile as peyote or herringbone, but it stitches up quickly, and creates a pleasing, twisty ruffle that’s perfect for frilly necklaces and interesting trim.

Ogalala stitch is a variation of netting that is worked from an existing strand or strip of beadwork. The tightly packed stitches create a wonderful ruffle effect with a very organic feel. The basic technique uses beads of the same size, but once you get the hang of it - one try is all you need! - you can experiment with switching up the bead types for different effects.

To Make an Ogalala Bracelet Strip:

Attach a stop bead to a comfortable length of beading thread. Here we’ll work with two bead colors (A and B) for clarity, but once you know the steps, you can easily work with a single color, or create a pattern within the netting.

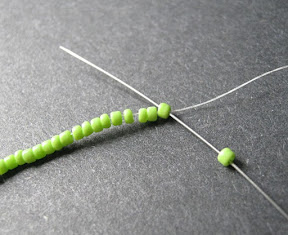
As you may have guessed, this technique finishes off smaller than it begins. To make a strip of ogalala long enough for a 7 inch bracelet, start with about 8 inches of 11/o seed beads. String Color A beads in multiples of three, until you reach the desired length. Since the stitches are worked in 3-bead sequences, you can skip the counting and use your bead spinner if you like. At the most, you’ll have 2 extra beads at the end of the strip.

Bead Strand Base for Ogalala Netting How to Start Ogalala Weave


Slide all of the beads down to the stop bead, and pick up one more Color A seed bead, then stitch back through the last bead added to the strand (skipping the bead just picked up). Pull snug, but not taught. Tip: Because ogalala is such a snug stitch with lots of twists, I don’t recommend using matte finish beads for your first try. It’ll be awfully crunchy!

Oglala Weave Row One Ogalala Stitch Tutorial Oglala Butterfly How To


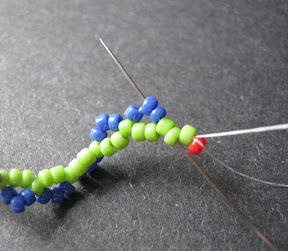
Pick up 3 Color B seed beads. Count up 3 beads in the base strand, and stitch through the 3rd bead. Do not count the bead that your thread is exiting. Pull snug to form a little arch with the new beads. Pick up 3 more Color B, and stitch through the 3rd bead up in the base strand. Continue adding stitches this way until you reach the end of the strand.

Partial Ogalala Weave Strip


Stitch through the end of the strand, and back into the beadwork, skipping the bead on the end. Exit from the middle Color B bead of the set you just added.

Ogalala Butterfly Weave Tutorial Ogalala Weave Row Two Ogalala Netting Tutorial


Pick up 5 Color A seed beads, and stitch through the middle Color B of the next set in the previous row. Pull snug. Continue adding sets of 5 beads between Color B sets, stitching through the middle of each set.

To get a fluffy, freeform ruffle, allow the stitches to rest wherever they fall. If you would like a more uniform spiral, hold the beadwork securely with your off-hand, and gently feed it through your fingers as you add new stitches. Make sure that new beads are all added on the same ‘side’ of the beadwork. Ogalala is naturally curvy and twisted, but this will make it easy to adjust the placement of the turns for further embellishing later.

Ogalala Weave Ruffle Ogalala Netting How To


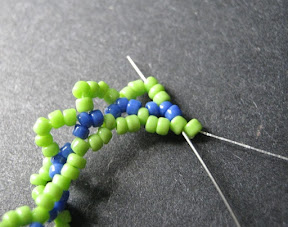
Pass through all of the beads at the end of the work, skip the last bead, and stitch back up through the beadwork to exit from the middle bead of the last Color A set added. Pick up 7 Color B seed beads, and pass through the middle bead of the next Color A set in the previous row.

Ogalala Weave Row Three Ogalala Butterfly Stitch Tutorial


Continue adding sets of 7 beads along the strip, until you reach the end, adding thread if necessary. To make the strip into a bracelet, add a loop of seed beads at one end, and use the tail thread to secure a button. Weave in the threads, and you’re done!

Completed Ogalala Netting

You won’t believe how easy it is to weave ogalala netting once you try it. There are lots of possibilities for color and pattern use, and the odd-numbered stitches are perfect for adding small accents like magatamas or chip beads. You can also weave ogalala from existing beadwork, such as peyote bezels, or herringbone ropes.

Copyright 2013 Inspirational Beading
Subscribe to Inspirational Beading
Get inspired on Facebook and Google+