Pages

Sunday, January 31, 2016

How to Mix and Use Bead Soups

How to Mix Bead Soups

There’s something wonderfully enticing about a mixture of beads. The combination of colors and shapes all playing together before the beadwork has even begun can be so much more inspiring than a single seed bead color. Bead soups are an excellent source of creative juice, not to mention a great way to experiment with new colors, or use up leftover beads.

One of the best ways to create a gorgeous bead soup is to hand select colors and shapes that work well together, as well as with your favorite techniques. A lot of bead sellers create their own custom mixes and blends, so the work of building a palette is done for you. If you want to experiment with concocting your own bead soup recipes, leftover beads are a great way to play with colors.

Starting with a single color is a good way to play it safe and see what your beads can do. You can mix together similar hues and shades to get a wonderful monochrome palette of ready-to-use seed beads. It’s a good idea to keep track of how much you’re adding with each new color, especially if you already have a project in mind. This way you can get a good balance of shades and be sure you’ll have enough beads to complete your design. If you’re not sure how your mix will turn out, start with a few grams of each color and add a dash of this-and-that until you get the perfect blend.

Blue Seed Bead Soup
Mix together seed beads of different sizes for texture.


Blue is a great color for bead soups because you can combine almost any number of shades together and they’ll still look great. Turquoise, aqua, cobalt, indigo…they all play well together. When planning your soup, try placing the beads you want to use together before mixing, to see how different finishes will look. Sometimes transparent, lined, or matte looks great when mingled, but different finishes can dramatically affect how other colors look.

Green Seed Bead Soup
Shaped seed beads are great in soups.


This green mix is a great example of too many shades. The mint and lime beads would look wonderful paired with the emerald. When all three come together, they clash. One way to salvage this soup would be to add some yellow or blue. This would allow either the mint or lime to attach itself visually to the new color, leaving the other to pair off with emerald.

Red Bead Soup
Try adding accents of similar sizes and shapes to start.


You can add accent beads directly to your bead soups. This is a great way to build a palette for freeform peyote, multistrand pieces, or bead embroidery. Depending on your project, you may want to go for a small range of sizes (from 3 to 6 mm), or add a handful of chunkier pieces. This is another great way to use up odds and ends in your bead stash.

Sandy Bead Soup Bead Soup Herringbone Stitch
Bead soups look great with freeform stitches and motifs.


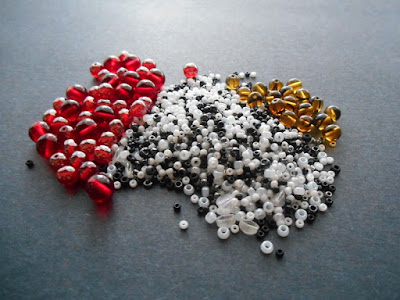
Blending similar hues together can work out really well. This mix combines neutrals and a variety of warm tones for a sandy look. Starting with a base of neutrals (white, black, grey or beige) and then adding a few highlights is a great way to experiment with mixing colors.

Ombre Bead Soup Palette Ombre Multistrand Design
Bead soups are great for multistrand and fringe projects.


You can also use multiple bead soups in a single design. To create an ombré effect, create two bead soups with colors that are close together on the color wheel, or use one all-neutral palette. Remove one third of each soup and mix those thirds together to create an additional blend. Alternate between the three soups to gradually change the look and color of your beadwork.

If you're not using a bead spinner or stringing multiple beads at once, it can be tricky to find a truly random groove. When working with mixes, I like to pour out a portion of soup onto my workspace, then pinch a few grams into a line that I can choose from. By moving steadily through this row of beads, I can be sure that I'm not favoring a color or creating a pattern instinctively.

Do you like to mix your beads together? What’s your favorite bead soup palette?

Mortira

Subscribe * Facebook * Google+
Send your beading questions to InspirationalBeading@gmail.com
Support Inspirational Beading for bonus tutorials and more!

Copyright 2016 Inspirational Beading

Friday, January 29, 2016

Favorite Techniques: Soutache and Bead Embroidery

Orange Dangle Soutache Earrings by Ozdoby Ziemi

Whenever new beading or jewelry materials come on the scene, it’s always exciting to see where designers will take them. One of the most amazing developments in recent years is soutache and bead embroidery. Beaders who are working with this amazing technique create designs that look like pure magic. Marthe of Poland-based Ozdoby Ziemi creates a wide variety of jewelry styles – each one a riot of color and curves.

Inspirational Beading: What is your favorite beading or jewelry technique?

Marthe: My favorite and inspiring technique of creation is a soutache embroidery. It took me a lot of time to express myself the way I want and the soutache embroidery is for me the most important and interesting. I started thinking about design, jewelry, vintage things as a teenager. Finally, I went to college to become a forester, but I still kept dreaming about making pretty things - I sketched designs. Then, four years ago I realized that I should to live what I love and I decided right then that is what I was going to do - my new goal was to make pretty things every day.

Soutache embroidery - it is a very labor-intensive technique and it requires precision. However, it is very grateful. This technique is exceptional, because it combines not only a shape and a design, but as well as the colors. You know, when you create a new piece, you link the particular soutache cords and then, you compose them with unlimited variety of stones. In this process you can create something unusual and unique! Thanks to this technique, you can express your vision overall, both in the large forms like necklaces as well as very small as tiny ornaments. Regardless of the form and size, the jewelry, made in this technique, impresses and catches the looks.

Emerald Soutache Earrings by Ozdoby Ziemi Violet Soutache Pendant  by Ozdoby Ziemi


In my work I also use the elements of beading embroidery. I’m inspired by different things each season: nature, folk art, religious symbols, cults and subcultures, geometric figures, ancient art and nature, so every collection I make has its own style. I like to explore new areas within each collection. I respect and appreciate the Mother Nature’s color combinations and textures. I am also interested in traditional methods of jewelry creation, e.g. silver jewelry and I am looking for more information about jewelry silver technique.

Inspirational Beading: How did you first learn to do this technique?

Marthe: I am a self-taught. Almost 5 years ago, I found a jewelry made in this technique completely accidentally. At that time, there were very few people working in the soutache technique. Immediately, I was charmed and intrigued by this kind of jewelry. I decided to find out more about this technique. I found the information about this jewelry, and I decided to buy very basic materials to try to do something for myself. I had no problem with a needle because when I was a child I sewed clothes for my dolls. I watched every piece on the Internet and I learned how it was made. Practice makes perfect, so when I achieved a basic level I started to invent my own designs. With time, my technique and design were getting better, so I decided to looking for a better materials. When the first steps, I had no available tutorials, so I had to learn everything myself. Today, I think that it was good for me, because I had a possibility to express my own inner creativity.

Purple Soutache Brooch by Ozdoby Ziemi Red Soutache Earrings by Ozdoby Ziemi


Inspirational Beading: Of all the creations you've made with this technique, which one is your favorite?

Marthe: I have the several favorite pieces that I love. Each of them is different and brings other emotions. I spend most of my time brainstorming and doing rough concept sketches. I enjoy this process, as it allows me to free my mind and express myself fully. I use a sketchbook to draw out my ideas, then I gather my materials. But my favorite part of the creative process is watching how the finished pieces end up - they are always a bit different than I planned. That’s part of the fun, and it makes for a great surprise at the end.

I have got two the most favorite pieces that I created in a soutache technique. These are two exceptional necklaces. I like them the most, because in the creation of them, I put a lot of work, time and imagination. I sacrificed them many hours of hard work: sewing, matching stones and joining elements, but - in my opinion – it was worth of it. I'm proud of them. One of them is ivory-colored necklace - ideal for unconventional bride, the second is a kiwi-necklace (I awarded the second place in the competition), inspired by a kiwi fruit.

Ivory Soutache Necklace by Ozdoby Ziemi Kiwi Soutache Necklace by Ozdoby Ziemi


Inspirational Beading: Can you share any tips for getting started?

Marthe: For getting started:

1. Firstly, if you want to work in this technique, you must be very patient, because the first works are never perfect. You should buy good kinds of materials (high quality strings, threads and a needle - very thin and sharp). Our skills we acquired through exercise, so never give up when your work is not ideal. Never throw away the first works, because through them you can see your progress you made!

2. If you want to start create jewelry you must select stones and ornaments that are drilled. It will be easier for you to sew them to strings. After that, you can use cabochons in the next stages of learning.

3. We learn by observing others, so follow others works and artists. It is very helpful to understand and learn the techniques, but remember - never copy the work of others!

Inspirational Beading: If someone had to choose to learn only one technique, would you recommend this one?

Marthe: If you had only enough time and patient, I recommend this technique. Thanks to them you can play with shapes, colors, space (3D projects). Soutache technique is used not only to create a spectacular jewelry, but to make many useful things. You can decorate your clothes (dresses applications), make a beautiful lampshades, bookmarks or even - images.

You can also make something special for others! In Poland we have The Great Orchestra of Christmas Charity. One year ago, I and my friends, who love soutache technique, we created a beautiful breastplate and show bridle (pieces of riding equipment used on horses) to help sick children.

Purple Soutache Hair Comb by Ozdoby Ziemi Colorful Soutache Cuff by Ozdoby Ziemi


Inspirational Beading: What is your least favorite thing about working with this technique?

Marthe: Soutache jewelry is usually one-sided. To protect them you must finish them, where necessary with leather, felt, lace or alacantara (back) and also you must impregnate them with Professional Nano Fabric Protection which also protects from damp. Thanks to that, you will be able to enjoy their beauty for a long time after the purchase.

This stage of creation is the least liked by me, because the process is over and you only need to fine-tune all nicely and finishing off the pieces. However, when this step is completed, you can really enjoy the final effect of the jewelry you made.

Inspirational Beading: Do you have a favorite color or color combination to use it with?

Marthe: I do not have a favorite set of the colors, because I like to mix and match colors in different - sometimes surprising - combinations. It gives me joy and it is also an awesome fun. Very often, the source of inspiration for me is the shape, color and structure of stones, minerals or beads. I choose the strings in this way to best bring out the beauty or the color of the mineral. As you know, quite often I use turquoise color, I like to mix it with many other colors to create something unusual.

Green Soutache Earrings by Ozdoby Ziemi

Inspirational Beading: What is your all-time favorite material or bead to use in your work?

Marthe: I most like to use in my work natural minerals, the highest quality materials, precious stones, soutache, silver beautifully stained precious and semi-precious. I use also crystals and beads of glass, but I try to my jewelry was the most natural. It is associated with the message of my brand to create things closest nature, our environment. Hence the name of my brand - in direct translation 'Ozdoby Ziemi' (from Polish to English) means 'The Ornaments from the Earth'.

Inspirational Beading: Who do you hope to inspire with your designs?

Marthe: My collection of handmade jewelry is dedicated to the exceptional women, who appreciate the beauty and originality. My shop - Ozdoby Ziemi - offers mainly unique earrings, bracelets, necklaces, brooches, rings in various styles, sizes and colors. If you're looking for exceptional ooak jewellery and you want to express yourself with jewelry you wear - you're in the right place!

You can see more of Marthe’s beautiful soutache work in her Etsy shop Ozdoby Ziemi. You can also follow along on Facebook, Instagram and Pinterest for her latest inspirations and creations!

Mortira

Subscribe * Facebook * Google+
Send your beading questions to InspirationalBeading@gmail.com
Support Inspirational Beading for bonus tutorials and more!

Copyright 2016 Inspirational Beading and Ozdoby Ziemi

Wednesday, January 27, 2016

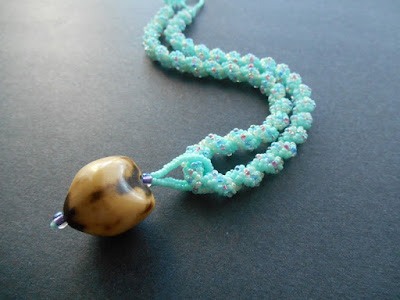
Work in Progress: Neverending Collar

Just look at how neat and tidy my bead tray is right now! I’ve decided to put away the ever-growing culled bead RAW panel that I’ve been working on between projects until I’m back down to just one thing on the go. The herringbone necklace, which I still haven’t quite finished, is awaiting the final stage of beadwork and photos, so I’ve been able to set it aside as well and really get a fresh start on my workspace. Now I just need to find a new tray, as this one is really on its last legs.

Turquoise Collar in Progress


I’m still working on the new collar design, making a little bit of progress at a time. At this point I’m kind of regretting not including a pattern, as it’s getting to be a bit dull just adding blue beads over and over. I really wanted to get the perfect sequence of stitches down first before playing with colors. I’m looking forward to starting again with a much more exciting palette.

What are you working on right now?

Mortira

Subscribe * Facebook * Google+
Send your beading questions to InspirationalBeading@gmail.com
Support Inspirational Beading for bonus tutorials and more!

Copyright 2016 Inspirational Beading

Tuesday, January 26, 2016

Frog it or Wear it Update

One of my creative resolutions for this year was to finally try frogging some old designs and salvage the beads. I’ve never really bothered with this beading step before, since it always seems a shame to cut up Fireline when I could just wear the designs instead. After my most recent jewelry shop overhaul, I was left with a lot of pieces that actually seemed to be worth ripping up. I thought I would give it a go and see if the resulting salvage would be worth the time spent.


I went through the box in my bead cupboard labelled ‘Frogs’ and sorted them into piles – one to wear and one to deconstruct. There are quite a few pieces that are mostly seed beads – I think it would probably be cheaper just to purchase the same beads again than to go to all the trouble of ripping out those stitches. I added a few pieces to my jewelry collection, including a spiral rope pendant and a couple of fun bracelets. At first I wasn’t sure about the peyote tube and cat eye bracelet, but decided that I didn’t want the beads that badly, and it would be more fun to just wear it instead.


The pile of pieces to be frogged was a lot bigger. There were a few designs that I really liked, and I almost added them to the wear pile. The stick pearl necklace was definitely a tough one. But with this piece, I like the beads a lot more than I need another necklace, so I decided to rippit! I also decided to finally dismantle a necklace set that I made for an Egyptian Hallowe’en costume about 20 years ago. Most of the beads are acrylic, but there are some really great teal Czech glass beads in both pieces that I’ve had my eye on for a long time. I’ve always liked having the necklaces around as decoration, but since I was going to be frogging, I thought it was time to take back those glass beads.


I ended up with a pretty good haul of worthwhile accents. I’m particularly happy to have some black and white druks again. I’m not sure how or when I’ll use them, but it feels good to have them in my stash. I wasn’t quite brave – or patient – enough to take apart the beaded flowers from that piece, so I’ll be saving them to use in other designs – possibly a set of rings!

I also got some lovely bead soups out of the deal. When I was finished frogging, I mixed the seed beads with assorted leftovers from my stash and now I’ve got all kinds of new inspirations for later. I think there might be a few multistrand necklaces and herringbone cuffs in my future.


In all, I think this particular frogging session was worthwhile. I still can’t see myself sitting down to rip a single piece at a time, but I would definitely like to keep them saved up for an occasional destruction fest. It was rather therapeutic, and it gave me a break from the monster collar that I’m currently working on.

Do you find it difficult to dismantle unwanted or unfinished designs? What do you like to do with your mishaps?

Mortira

Subscribe * Facebook * Google+
Send your beading questions to InspirationalBeading@gmail.com
Support Inspirational Beading for bonus tutorials and more!

Copyright 2016 Inspirational Beading

Monday, January 25, 2016

Inspired Bead Maker: Serena Smith Lampwork

Iris Lampwork Focal by Serena Smith

Whatever new innovations in beads come our way, nothing quite beats the beauty of a handmade lampwork bead to inspire amazing creations. The colors, shapes, and patterns of unique flameworked glass go so perfectly with our favorite techniques and materials. One of my favorite lampwork artists of late is Serena Smith, whose floral creations are a delight to behold.

Inspirational Beading: How did you first get started with lampwork?

Serena: In 1991 I was working my first "real job" after college in Seattle, at a company called TSI that sold jewelry and lapidary supplies. I found out through them about the Pratt Fine Arts Center in Seattle where they were doing all kinds of art classes, including glass. I took the bead making class and not long after I turned my bedroom in my 1 bedroom apartment into a studio and moved into the living room, bought an oxy/propane set up and supplies from Frantz, and started making beads. Not long after that I returned to school to get a degree in glass art from the Rhode Island School of Design. At that time, lampwork was not given much respect in the art world and the department didn't even have a lampworking torch - other than mine. With my degree I learned about all different kinds of glass working, some of which I still do today, but lampwork is my first love.

Inspirational Beading: Do you remember your first bead? Where is it today?

Serena: Not my first bead, but I do remember the first demo the instructors did on sculpting beads. Most of the class was about how to make a round bead with dots on it. But they demo'd a pudgy little bug thing and warned us that sculpted beads were pretty much guaranteed to break so the demo was just a throw away idea. This was back before annealing kilns were on the market, didn't even know about fiber blanket, we used vermiculite in a can and flame annealing was considered a myth by a lot of people. But, once I saw the potential in sculpting glass that was pretty much it for me, I knew that was what I wanted to do. I used vermiculite for years and did in fact have a lot of luck with flame annealing. I still make a version of my first sculpted bead designed after the Venus of Willendorf sculpture.

Purple Goddess Lampwork Focal by Serena Smith Black and White Garden Lampwork Focal by Serena Smith


Inspirational Beading: Where do you look for inspiration? How does it translate in your designs?

Serena: I have a lot of books with flower pictures in them, but I think I get most of my inspiration just from nature in general, as well as the glass colors they make now. I work in my garden and grow flowers. I also go for long walks, and especially when the flowers are blooming I get inspired to get into the shop and try to create some new bloom or color I've never noticed before. That's how the japonica style flower came to me. I saw bushes in a parking lot that had masses of wee flowers and I took a close look to see these lovely vase shaped blossoms I'd never seen before. I looked them up when I got home to find the name (japonica pieris) and started working with the shape. I don't always try to be faithful to the original flower, as you can see in some of my fantasmagorical Lady Slippers.

Pink Japonica Lampwork Beads by Serena Smith Lampwork Lady Slipper Bead by Serena Smith


Inspirational Beading: Do you have a favorite color or combination to work with?

Serena: Always, pinks make me happy even though I think my favorite color in general is turquoise blue (I have a terrible time with high metal content opaque turquoise glass). These days there are so many more glass colors to work with, some fantastic pinks from Bullseye glass and not just the ruby pink from Moretti that used to turn brown. It's amazing to me to think back to when all we had was Moretti (Effetre) to now when we have so many manufacturers and some really incredibly beautiful colors to work with. I think one of my favorite new colors these days is from Bullseye, an opalescent blue purple color which is fantastic over petal pink.

Inspirational Beading:
Do you have a favorite bead style or shape to create?

Serena: That's a tough one. I don't think I do as far as making them, what I like is to be able to have a variety of things to work on so I make things in small batches. It's not fair to the pretty beads I make to feel irritated because I had to work all day making the exact same thing so I try to avoid doing that. Regardless, I am always cheered when I open the kiln and see a beautiful bouquet of flower beads in a rainbow of colors. What could possibly be better than that? As far as shape, I think my favorite flower to look at right now is the tulip. Simple but lovely.

Lampwork Tulip Beads by Serena Smith Lampwork Heart Beads by Serena Smith


Inspirational Beading: What is the most rewarding moment in your design process?

Serena: I think it must be that "aha" moment when I finally know how to do it, whatever "it" is. Getting the color right, or just figuring out how to create a shape. There is a certain amount of frustration when you first start out something new and you can't "see" or "feel" it, and when it settles down into your hands and they just start making it happen, it is a really good feeling. I've learned not to let those moments of frustration deter me from believing that I can really, truly, figure it out. And the only way to fail is to quit.

Inspirational Beading: What is the most exciting design in your shop right now? What makes it special?

Serena: I have been making a lot of Lady Slippers this month and it has been fun. I designed them a while ago but sort of let them go and hadn't made any in several years when I looked back through some of my history and realized how long it had been, and how special they were! They are a real joy to make, each one comes out different and I am playing with different colors and details and combinations that really makes it fun. I love the moment I open the kiln! Sometimes on my walk from the studio into the house I forget what I'm doing and just stand in the yard looking at each one and smiling.

Fused Glass Heart Cabochon by Serena Smith Turquoise and Ivory Fused Glass Cabochons by Serena Smith


Inspirational Beading: Do you have any plans for new bead styles or themes in the works?

Serena: I've always been interested in different forms of glass work so I do casting, fusing, pate de verre, etc. always looking for ways to incorporate lampwork. What I have been working on this last 6 months or so is how to make cast beads, and also fused components like cabochons. The cabochons often include a lampworked element, like the heart in this cabochon, and just recently I've made just a couple of lampwork blobs that I want to put in the kiln and fuse and just see what happens. I might try fusing some holes into the cabochons to make them into beads. Not sure yet, just expanding my horizons!

Needle Felted Animals with Lampwork Flowers by Serena Smith

Inspirational Beading: Who do you hope to inspire with your work?

Serena: Definitely jewelry makers! But, speaking as a person who likes to try just about every craft, I really would like to reach people who work in areas I might not know anything about, and who might never have considered that their work could include lampwork or glass components. For instance, I also do needle felting and have incorporated my beads into those projects. People think of beads as just for jewelry but they are so versatile and useful and add a wonderful element to any kind of creation.

You can see more of Serena’s gorgeous lampwork beads at the 2016 Best Bead Show in Tucson, Arizona, on her website Serena Smith Lampwork, and on Etsy at Serena Smith and 4GlassCabochons. Follow along on Facebook to see her latest creations and inspirations!

Mortira

Subscribe * Facebook * Google+
Send your beading questions to InspirationalBeading@gmail.com
Support Inspirational Beading for bonus tutorials and more!

Copyright 2016 Inspirational Beading and Serena Smith

Sunday, January 24, 2016

Peyote Stitch Master Class: Two Drop Peyote

Peyote Stitch Master Class - Two Drop Peyote Cuff

For our very first beading Master Class, we’re going to explore the essential and often frustrating peyote stitch. This technique is one of the most common in beadwork, with many applications and variations; it is also one of the most difficult to learn. The first few rows of peyote stitch are tricky to control on a first or even tenth attempt. New beaders often complain of uneven stitches, curving beadwork, tangling threads, and all kinds of aggravations.

The key to mastering any beadwork stitch is muscle memory. With enough practice, the moves and steps become second-nature, allowing you to achieve better results over time. In order to practice peyote stitch and gain that ‘groove’ for how the stitches work, it is best to skip the frustration of those first few rows and go straight to the skip-a-bead-add-a-bead flow. Working peyote stitch off of a strip of right angle weave, or with a Quick Start Card is one way to do this. I like two-drop peyote because you still get the benefit of practicing the first rows of peyote stitch, but in a much more cooperative format.

Working with multiple beads per stitch - rather than the one bead per stitch of traditional peyote - creates a stronger base that holds together much better, and is easier to grip. This helps to prevent any twisting of the beads while you work, giving you a cleaner start. Once you’ve made a few samples or projects with two-drop peyote, you’ll have some valuable insight into how the technique feels, making your future attempts and traditional peyote stitch that much stronger.

Peyote Stitch First Attempts
Failed First Attempts and Peyote Stitch


I’ve used 8/o seed beads for the basic instructions below, but I highly recommend using 11/o seed beads for your first few tries. The extra space in 8/o seed beads doesn’t grip the thread as snugly, which can make it difficult to control the beadwork as you build. Japanese or Czech seed beads will both work – the added bonus of two-drop peyote is that slight changes in bead shape are automatically corrected and supported by the surrounding beads – one more reason that it’s a great technique for beginners.

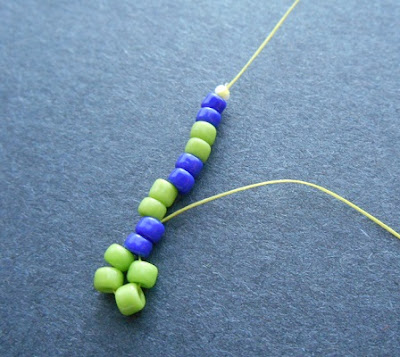
Like most peyote stitch variations, you’ll need to string the first 2 rows. The real work begins once you start to stitch on the third row. This technically isn’t relevant unless you’re working with a pattern so don’t worry if it sounds confusing; it is important to remember that with basic (even count) peyote, the first beads that you pick up must be an even number. For two-drop peyote, they must also be divisible by 4, since each stitch is two beads, and there must be an even number of pairs in those first 2 ‘rows’. We’ll start with an easy 12 beads – use this basic technique to stitch a few practice panels of any length you like. This is a great opportunity to test out any new bead colors in your stash, or start a swatch collection to help with color selection in future projects.

Basic Two-drop Peyote Stitch:

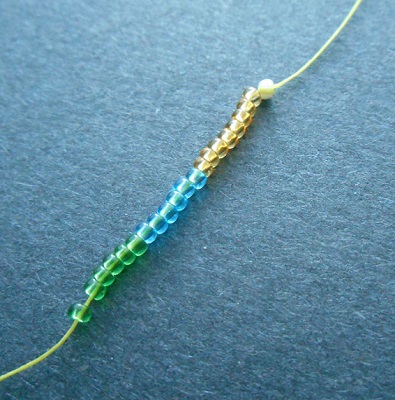
1. Attach a stop bead to a comfortable length of beading thread, leaving at least a 6 inch (15 cm) tail. Pick up 12 seed beads and slide them down to the stop bead. Flip the work so that the stop bead is facing away from you, and the working thread is facing towards you.


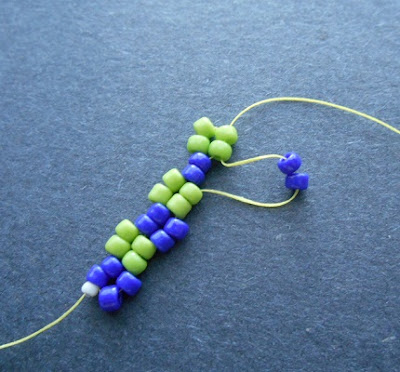
2. Grip the last 4 beads added and the start of the working thread firmly with your off hand, allowing a bit of space to needle through. Pick up 2 seed beads. Skipping the last 2 beads picked up (the two beads closest to you) stitch up through the next 2 beads in the strand and gently pull snug. The new beads should click into place below the beads that you’ve just stitched through.


For best results, maintain your hold on the beadwork, nudging it downward bit by bit as you work the rest of the row. Once all of the beads are in place, the beadwork will be sturdier – until then it is easy to lose your place or twist the beadwork, resulting in a big mess right out of the gate.

3. Pick up 2 seed beads. Skip over the next 2 bare beads in the strand (the two above those you’ve just stitched through) and stitch up through the following 2 beads. Pull snug so that the new beads click into place. Repeat once more to finish the row.


4. Flip the beadwork so that the working thread is facing you again. You should be able to recognize the beads that were added to the previous row. Often called ‘up’ beads, the last row along the edge of peyote is always raised a little higher than the beads of the previous row. It is now a little easier to see those first 2 rows that we strung – row one is green, row two is blue, and the third row that was stitched on is also green.


Pick up 2 seed beads. Stitch up through the first set of raised beads from the previous row (the last 2 beads that you added in the previous step). Pull snug so that the new beads click into place between the surrounding beads.

5. Pick up 2 beads, and stitch up through the following set of raised beads. Pull snug, then repeat once more to finish the row.


6. Repeat steps 4 and 5 until your panel reaches the desired length.


Now that we’ve covered the basics, it’s time to make a practice piece to build that muscle memory and prepare for future peyote projects. If you’re ready to move beyond beading samples and swatches, this simple two-drop cuff is a great place to start. It has a built-in fringe and an easy freeform pattern that is neither dull nor distracting. You’ll need 11/o seed beads in 3 colors, 2 colors of 15/o seed beads, and a clasp of your choice. You can substitute the 15/o seed beads with additional 11/o colors if necessary.

Ocean Waves Two-Drop Peyote Cuff with Trim:

1. Attach a stop bead to a comfortable length of beading thread, leaving an 8 inch (20 cm) tail. Pick up 8 topaz 11/o seed beads, 6 blue, and 6 green. Flip the beadwork so that the stop bead is facing away from you.


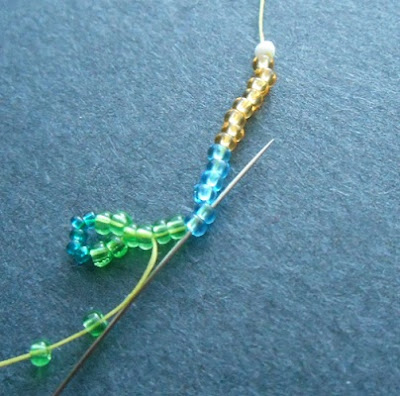
2. Pick up 5 green 15/o seed beads, and 2 green 11/o. Skipping the last 2 green beads added in the first step, stitch up through the following 2 beads and pull snug so that the 2 new green beads click into place. The 15/o accents should form a small loop of fringe along the edge.

3. Pick up 2 green 11/o and stitch up through the following 2 (blue) beads. Pull snug.


4. Add 2 blue, 2 topaz, and 2 topaz to finish the row with two-drop peyote.

5. Flip the beadwork, and pick up 5 topaz 15/o, and 2 topaz 11/o beads. Stitch up through the last 2 topaz beads added in the previous row and pull snug to click the new 11/o’s in place.


6. Complete the rest of the row, adding 2 beads per stitch: topaz, blue, blue, green. On the final stitch, pass up through the last (nearest) 2 size 15/o beads on this edge.

7. Flip the beadwork. Pick up 3 green 15/o, and 2 green 11/o beads. Stitch up through the last 2 beads added in the previous row.


8. Finish the row with pairs of green, blue, topaz, and topaz.


9. Repeat steps 5-8 until the beadwork reaches the desired length for your bracelet, adding 3 15/o beads at each edge for the remainder. To get the optional freeform look, replace one bead in each 11/o pair at random with the following or previous color, to expand and contract the length of each color section. Repeat the addition 1-3 times before returning to the normal pattern. Replace colors at random intervals along the beadwork.


10. When you've completed the cuff, weave your remaining thread across the last row to secure it, then exit from a central pair, 3 or more rows back from the edge. Pick up enough blue seed beads to create a loop that will fit around your clasp or button. Stitch through the same 2 beads in the cuff again, moving in the same direction.

Weave through the loop and along the last few rows of beadwork 1-2 more times to add strength, then trim any remaining thread.

11. Remove the stop bead from the first tail thread, and repeat step 10, stringing your clasp at the center of a bead loop. Make sure that you are exiting from the same side of the cuff as the previous loop so that the components will connect.


Secure any remaining tail threads in the beadwork and trim. If you’re not yet familiar with the technique, we will fully cover adding and finishing threads in an upcoming Peyote Stitch Master Class lesson. For now, be sure to follow the natural thread path – stitching through 2 beads at a time across the width of the cuff, and turning at the edges. Cross over your tail stitches at least once for added security, then trim the thread as close to the beadwork as possible.

Two Drop Peyote Cuff Master Class Tutorial


Happy beading!

Mortira

Subscribe * Facebook * Google+
Send your beading questions to InspirationalBeading@gmail.com
Support Inspirational Beading for bonus tutorials and more!

Copyright 2016 Inspirational Beading