Pages

Monday, November 30, 2009

Paper Bead Bangle

Making your own one of a kind beads can be a very rewarding experience. Not only to you get to enjoy creating them, but once you’re finished, you can use them to make a completely unique piece of jewelry that is totally you. The only thing better than just making unique beads, is reusing something that might otherwise be thrown away to create beautiful up-cycled treasures.

The Inspiration:

While I was experimenting with making my own paper gift bags, I thought it would also be fun to try making my own recycled magazine beads as well. I didn’t have a plan for how to use them when I started, I just got to work hunting down some boldly colored pages to cut up.

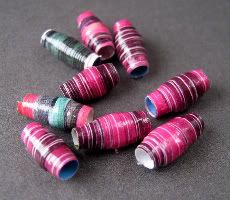
Recycled Paper Beads

The Beads:

The first few pages I tore from a fashion magazine were pink and green. After I had cut, glued, and rolled them into beads, I continued to flip through the same issue and found several more pink and green pages that were just right for bead making.

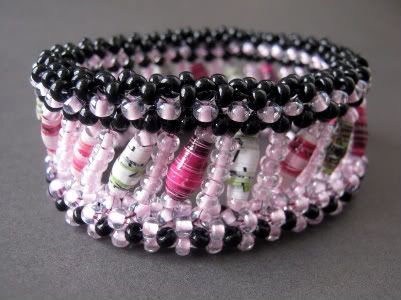
Once I had all of the beads made, I decided to go ahead and use all of the different shades of pink in one piece of jewelry. This made it a bit difficult to find other beads in the right colors. I didn’t want to have too bold a contrast that might not blend well with green, magenta and light pink. So I went with 6/0 seed beads in a pale shade of pink, and black - which goes with everything.

The Beadwork:

To really put the paper beads on display, I decided to center them on a bangle bracelet. Using right angle weave, I created two separate bangles with the 6/0 beads, then connected them with the paper beads in between. The bracelet is quite large, and has a nice slinkiness to it. I like the idea of the paper beads being nice and snug between the outer beads

Pink Orchid Bangle


To create the paper tubes used in this bracelet, I had a little help from a Paper Bead How To video from Aubrey’s Beads, and a wonderful book called Creating Extraordinary Beads from Ordinary Materials, by Tina Casey. If you have any old magazines or catalogs lying about, I highly recommend giving paper beads a try. They're so easy to make, and turn out gorgeous no matter what's printed on the paper.

Copyright 2009 Inspirational Beading

Saturday, November 28, 2009

Beading Tutorial: Peyote Stitch Bezel

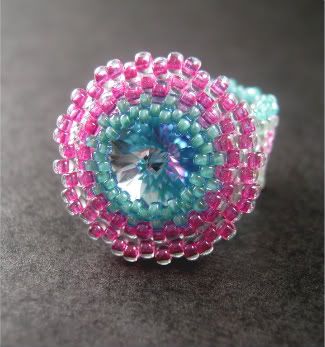
Rivoli Bezel Ring - The Sage's Cupboard

The Encarta English Dictionary defines a bead as “a small ball, pierced for stringing on a cord or sewing onto fabric”. This is a pretty accurate description of the average bead, but adventurous crafters know that there are so many other forms of beads to choose from that they could never be named in one place.

Aside from the many types of “pierced” or drilled objects, there are also many different materials that can be used as embellishments in beadwork that have no holes at all. Most beaders are familiar with cabochons, which can be flat or domed, and of course there are rhinestones as well. Some of the most wonderful un-beads are the things that don’t normally appear in beadwork, but which are so pretty or interesting that we can’t help but use them.

One of the most useful methods for incorporating a found object into a beading design is to surround it with a jacket of seed beads called a bezel. There are a few different ways to approach this task, but if an object is fairly uniform in shape, a circular peyote bezel is an easy technique to use. Once you have mastered it, you can turn many unique objects into beautiful un-beads.

How To Bezel a Rivoli with Peyote Stitch:

A great way to practice making peyote bezels is with Swarovski rivolis. The 14mm size is easy to work with, and comes in a variety of inspiring colors. To bezel a 14mm rivoli with circular peyote, you will need seed beads in size 15/0 and 11/0.

Start by stringing 32 size 15/0 seed beads onto a comfortable length of beading thread. When working with circular peyote, it’s a good idea to start with a number of beads divisible by 4. This will ensure that each row is even if you need to alternate bead sizes later on.

Slide the beads down until there is about a 6 inch tail, and stitch up through 16 of the beads again. Pull the thread snug so that the beads form a ring. If you’re working with a soft thread like Nymo, you may want to tie a square not to secure the ring. If you’re working with a braided thread like Fireline, you can simply bend the tail thread a little to form a kink where it meets the ring. This will keep it secure, but leave a little slack to prevent the first two rows from rippling. To stop the thread from slipping, hold the tail against your hand with your pinkie finger as you stitch.
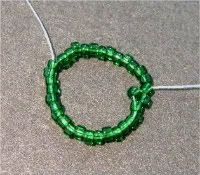
Circular Peyote Stitch Tutorial

Pick up one 15/0 seed bead. Skipping the next bead in the ring, and moving in the direction that the working thread is facing, stitch through the next bead in the ring. Pull the thread snug to lock the bead in place. Pick up one 15/0 seed bead and repeat, skipping the next bead and stitching through the following bead in the ring. Continue adding beads with peyote stitch all the way around the ring.

When you reach the first stitch again, you will need to step up to start the next row. Add the final bead, and stitch through the next bead, and the first raised bead following it. Pull the thread snug and check your work for loose beads.
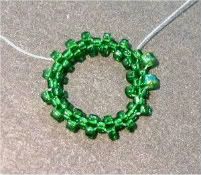
Circular Peyote Stitch Tutorial

Pick up one 11/0 seed bead, and stitch through the next raised bead in the ring. Continue adding 11/0’s with peyote stitch, and step up at the end of the row.
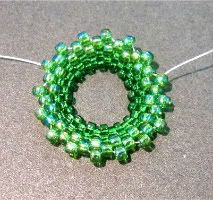
Circular Peyote Stitch Ring

Add two more rounds of 11/0 seed beads, so that the pattern of 11/0’s is the same as the 15/0 rows.

For the next row, switch back to 15/0 seed beads. Be sure to pull the thread snug after each stitch so that there are no openings in the beadwork. Once this row is complete, place the rivoli in the centre of the beadwork and hold it in place with your thumb and forefinger as you stitch.
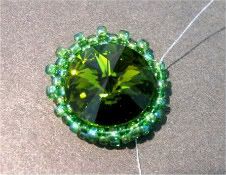
Peyote Stitch Bezel Tutorial

Add two more rows of 15/0 seed beads. As you work, the beadwork will tighten up around the rivoli, trapping it within the two rings of smaller beads. Once the last row has been added, weave through the last two rows again, pulling snugly to strengthen the beadwork. Repeat with the tail thread, and trim the excess.

If you still have plenty of working thread left, you can add embellishments around the 11/0 section, stitch on a bail, or connect this rivoli to other beadwork. Have fun!
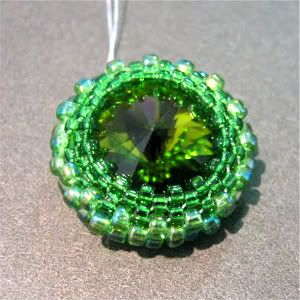
Swarovski Rivoli with Peyote Stitch Bezel

Copyright 2009 Inspirational Beading

Thursday, November 26, 2009

Inspiration Tip: Pretty Packaging

Whether you make beaded items for sale or to give to friends, having something beautiful to send it in is always a nice touch. Everyone loves to open a gift or pretty package tied up with string, and even if the item inside was a purchase, it’s still fun to dress up a trinket or treasure.

Fortunately, being green is not only really trendy, it’s also really affordable. So there’s never been a better time to try making your own gift packages to add that little something extra to your beadwork. Using repurposed materials like old calendars, coloring books and magazines is not only economical, it’s also really creative and charming, too.

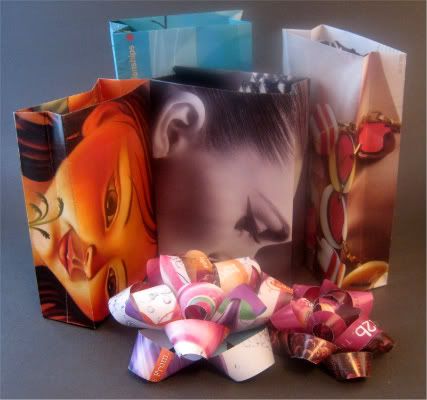
Paper Bags and Bows Made from Magazines

To make the paper gift bags shown here, I searched through some of my old fashion magazines for nice, bold pages with big pictures. Then I took apart a small store-bought gift bag that had been re-used many times, and figured out the folding pattern that would transform my fashion pages into tiny gift bags. After making two or three, the technique becomes almost second nature. Different sizes of bags can be made without using scissors, just by changing the width of the top and bottom folds.

The paper bows are also made with magazine pages, using a tutorial from How About Orange. I made the smaller bow by cutting away the rough edge of a magazine tear-out, and cutting the strips width-wise, about ½ thick. These bows are a metal-free version of the original design. Instead of using staples, I glued each component together. This method works great, as long as you don’t mind waiting for the glue to dry between steps.

If you give handmade packaging a try, you might be surprised to discover how much it can inspire beadwork. You’ll be eager to create some beaded treasures to hide inside!

Copyright 2009 Inspirational Beading
Tuesday, November 24, 2009

Inspired Beader: Owl and Oak

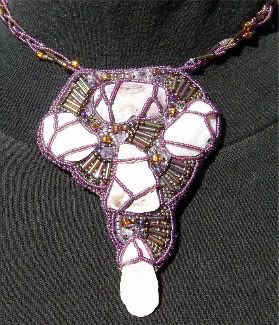
Scattered Shells Necklace - Owl and Oak Creations

Off-loom beadweaving techniques are incredibly versatile when it comes to incorporating found objects into jewelry and art work. The application of thread and beads allows interesting objects to be captured and displayed in many gorgeous ways.

Although using found objects in bead embroidery can be more of a challenge, the amazing shapes and textures that are created by sewing beads and stones onto fabric are often awe-inspiring. Some of the most beautiful embroidery pieces contain treasures such as sea creatures, photographs, and even pottery shards.

The designs of Heather from Owl and Oak are wonderful examples of how one can transform ordinary things into extraordinary jewelry. Her intricate bead embroidery designs feature some of the best “beads” that nature has to offer.

Inspirational Beading: How did you first discover beading?

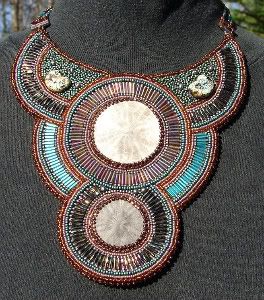
Colors of the Coast Bib Necklace - Owl and Oak Creations

Heather: I don't remember when I first worked with beads. I know I still have beads that my Mom gave me when I was young, and I used them in the crocheting and cross-stitching I did back then. I've occasionally tried different bead projects I've liked from magazines, and I've almost always included beads in anything I was making - crocheting, knitting, art dolls, clothing, etc. But until I bought a copy of the The Art of Bead Embroidery by Heidi Kummli and Sherry Serafini, I never found anything that just clicked - beadwork or otherwise. Since I got the book 2 years ago, bead embroidery is pretty much all I do.

Inspirational Beading: Where do your inspirations come from?

Heather: I love color. I love flowing lines. I've always loved the little details I see in plants, rocks, tree bark, and leaves. So much inspires me I can't pin one thing down. I find something I like - a focal piece, a shape to a leaf, or just a bead color in my stash that strikes me at the moment - and I just start going.

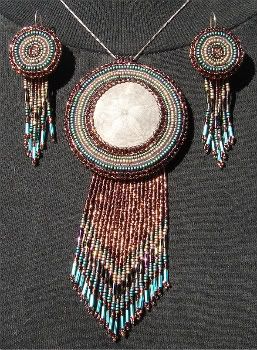
Autumn Sand Dollar Set - Owl and Oak Creations

Inspirational Beading: What is your favorite color to work with?

Heather: My husband and I were just talking about this. My favorite colors have always been greens, blues and purples, but in my beadwork pieces I seem to be drawn mostly to browns and golds, with reds and greens thrown in. I found a neat stone focal piece at a recent bead show, and it's gold and brown; of course the colors I picked to go with it are golds and browns, with a little green/turquoise thrown in. It seams to be working though, so until something shifts I'll keep going with what's working for me.

Inspirational Beading: What is the most unique material you have ever used?

Heather: So far the sand dollars I've used in a lot of my pieces. I have a small box of them that my Mom gave me a few years ago, and they were the first thing I thought of when I needed a focal piece for my first embroidery project. Sometime soon I'm going to try using what I call a “tree limb-ring” as a focal piece. When a tree looses a branch close to the trunk, new growth forms around the area and starts growing inward, forming a smooth, burled ridge. My Father has a small lumber mill, and he usually cuts them off to prepare the log for milling. The centers rot out, leaving a really pretty ring. It should be an interesting experiment.

Emerald Fans Set - Owl and Oak Creations

Inspirational Beading: Who do you hope to inspire with your work?

Heather: I really hope to inspire the people who are looking for something that inspires their creative passion. I've spent 30 years dabbling with this and that, never quite finding something that really spoke to me, something I didn't want to put down because I got bored with it and wanted to move on to the next thing. Keep trying new things, keep being excited about learning new techniques, and have fun.


Heather creates her wonderful collars and necklaces from her home in Maine. She and her husband Glenn are currently building a small off-grid cabin there. In addition to jewelry design, Heather is also passionate about martial-arts, particularly Tae Kwon Do. Right now she is working towards a Brown Belt and a national certification in women’s self-defense.

Sand Dollar Necklace - Owl and Oak Creations

Copyright 2009 Inspirational Beading and Owl and Oak Creations

Sunday, November 22, 2009

Poster Sketch: Almost Twilight

If you go to Etsy.com and type “Twilight” into the Handmade search bar right now, you will find yourself with over 800 pages of results. Somewhere around 40 of those pages will include Scrabble tile pendants and the materials to make them. On Artfire.com, the results are well over 100 pages of Cullen Family Crests and some pretty exceptional fan art. (The secret lesson here may be that if your handmade products don’t appeal to teenagers, perhaps they should!)

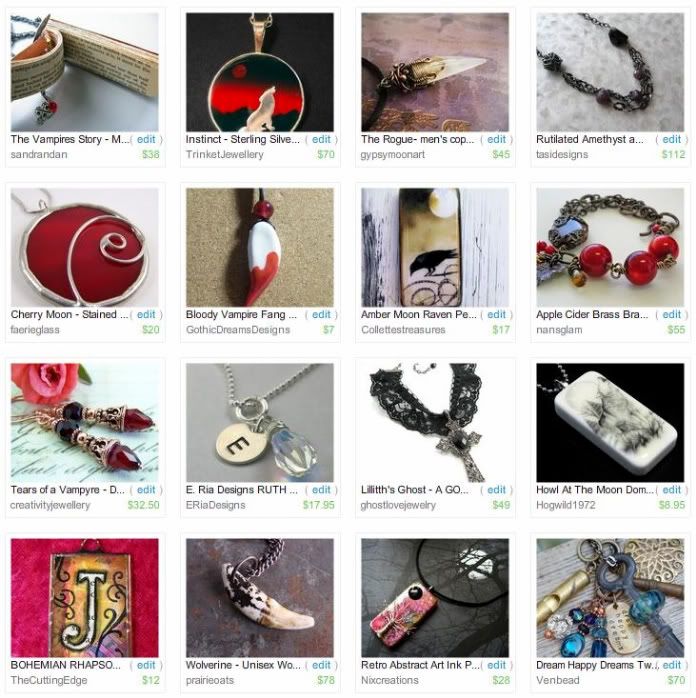
This week’s Poster Sketch showcase features items that could be treasured by Twilight fans, and everyone else, too. There are no Edward Cullen Domino pendants, or Team Jacob bottle cap charms. Of these 16 items, only one is directly inspired by Stephenie Meyer’s vampire saga. Can you tell at first glance which one it is?

The fourth item, “Rutilated Amethyst and Sapphire Necklace”, is from Tasi Designs - the team that created much of the jewelry seen in the first Twilight film. These talented ladies are still creating the simple and beautiful style of jewelry that made it to the silver screen, including a collection of wardrobe replicas.

Etsy Picks: Almost Twilight


Row 1:
The Vampire’s Story - from sandrandan
Instinct Pendant - by TrinketJewellery
The Rogue Chalcedony Pendant - by gypsymoonart
Rutilated Amethyst and Sapphire Necklace - by tasidesigns

Row 2:
Cherry Moon Pendant - by faerieglass
Bloody Vampire Fang Pendant - by GothicDreamsDesigns
Amber Moon Raven Pendant - by Collettestreasures
Apple Cider Brass Bracelet - by nansglam

Row 3:
Tears of a Vampyre Earrings - from CreativityJewellery
E Initial Necklace - by ERiaDesigns
Lillitth’s Ghost Choker - by ghostlovejewelry
Howl at the Moon Domino Pendant - by Hogwild1972

Row 4:
Bohemian Rhapsody Initial Charm - by TheCuttingEdge
Wolverine Fang Necklace - by prairieoats
Tree of Life Moon Pendant - by Nixcreations
Dream Happy Dreams Necklace - by Venbead

Copyright 2009 Inspirational Beading and Etsy.com
Thursday, November 19, 2009

Inspired Beader: Madame Teasley

Tiered Necklace with Heart Pendant - le Boudoir Secret

The tired old expression “one man’s junk is another man’s treasure” is one that may apply to mixed media artists, but it doesn’t flatter much. For one thing, some of the most amazing artists working with found objects and unique materials are women. As the fairer creatures of our species, we have a unique ability to capture beauty in our favorite mediums; turning cast-offs into couture is one of those special talents.

Heather Teasley, otherwise known as Madame Teasley of le Boudoir Secret, has a passion for rare and unique materials, which she uses in her incredible jewelry designs. Through unique beads, ephemera and embellishments, she creates jewelry that shares a personal side of the wearer. Her philosophy is that jewelry should be one of a kind, because each person is one of a kind.

Inspirational Beading: Has jewelry design always been a passion for you?

Heather: I have a passion for telling stories. So designing jewelry that tells a story is very fulfilling.

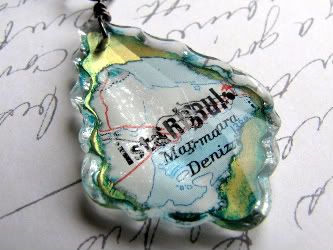
Istanbul Gypsy Love Rosary Necklace - le Boudoir Secret

Inspirational Beading: What types of things inspire you the most?

Heather: I am inspired by items that have a history or have been used for other purposes.

Inspirational Beading: What is your favorite color to work with?

Heather: I like gold/copper and patina green.

Inspirational Beading: What is the most unique material you have ever used?

Heather: I have used broken glass and old candy tins to create jewelry. Also, copper pipes are one of my favorite things to use.

Inspirational Beading: Who do you hope to inspire with your work?

Heather: I hope to inspire those who are filled with a passion for life and a love for the obscure.

Heather is a lover of all things “forgotten, old, broken and rusted”, and is a 2-D artist and graphic designer as well as an assemblage jewelry maker. You can check in with Heather’s latest creations and inspirations on her blog, Living with a Constant Muse, or connect with her on Facebook. Her website, Once Possessed Studios, includes a gallery and information about shows and events featuring her paintings and other works.

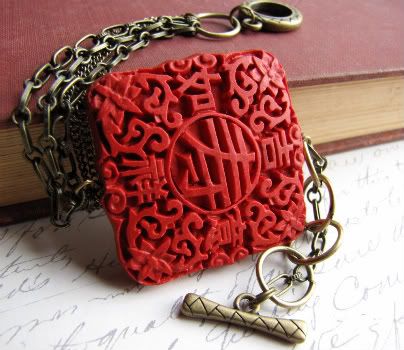
Cinnabar Red Bracelet - le Boudoir Secret

Copyright 2009 Inspirational Beading and le Boudoir Secret

Tuesday, November 17, 2009

Poster Sketch: Red Is Best

This week I was very excited to learn that one of my latest creations, a poinsettia bracelet, was featured on the FoundHandmade.com blog. As many Etsy sellers know, being found and featured is a rare treat, and it inspired me to do some finding of my own.

Getting a treasury spot to showcase one’s Etsy favorites isn’t an easy thing to do. With only a few hundred spots open, and thousands of users, it can be a time consuming affair. Luckily, Etsy has provided us with the Poster Sketch tool, which allows you to create an Etsy treasury template to save until a spot opens up.

Rather than wait for a treasury, I’ll post my recent finds here for you to enjoy. Each of these items fits in with this month’s Inspiration Theme. Can you guess what it is?

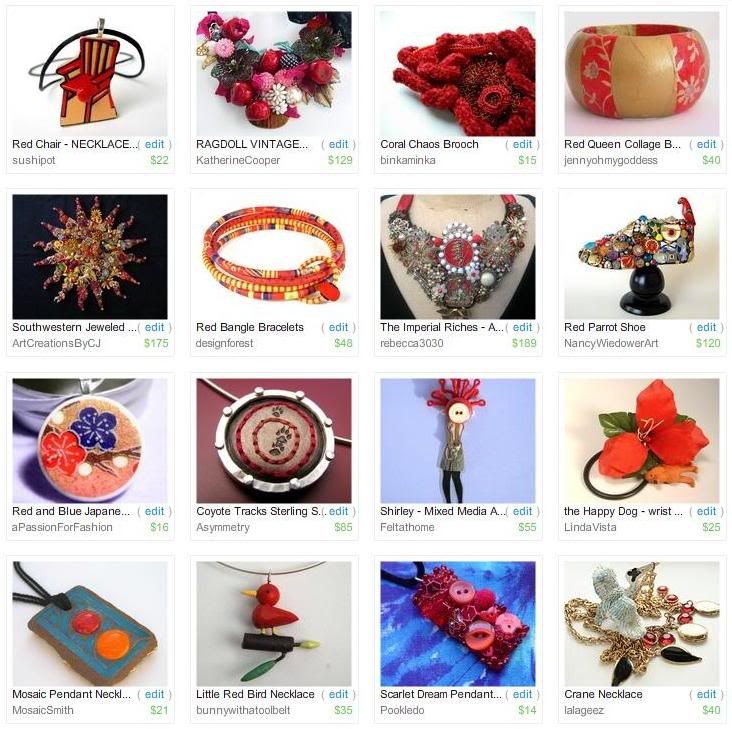
Etsy Picks: Red is Best


Row 1:
Red Chair Necklace - from sushipot
Ragdoll Vintage Textile Necklace - by KatherineCooper
Coral Chaos Brooch - by binkaminka
Red Queen Bangle - by jennyohmygoddess

Row 2:
Big Red Sun - from ArtCreationsByCJ
Red Bangle Bracelets - by Designforest
Imperial Riches - by Rebecca3030
Red Parrot Shoe - by NancyWeidowerArt

Row 3:
Japanese Cherry Flower Pendant - from aPassionforFashion
Coyote Tracks Necklace - by asymmetry
Shirley Necklace - by Feltathome
Happy Dog Wrist Corsage - by LindaVista

Row 4:
Plain or Peanut Necklace - from MosaicSmith
Little Red Bird Necklace - by bunnywithatoolbelt
Scarlet Dream Pendant - by Pookledo
Crane Necklace - by lalageez

Copyright 2009 Inspirational Beading and Etsy.com

Sunday, November 15, 2009

Pine Cone Necklace

Evergreen and Pine Cone Covered in Snow, Murren, Interlaken, Switzerland

There’s something wonderful and magical about a pine tree in winter. The pretty green boughs seem to carry us through cold and gray winters, keeping our spirits up just enough until the weather warms up again. Because there are so few lively plants around the holidays, evergreens are an obvious choice for decorating. No matter how they are used, pine cones and needles tend to look festive and cheerful.

The Inspiration:

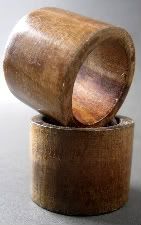
During the summer months, my neighborhood grocery store had a large display of wooden patio accessories. Every time I passed by while shopping, I had to stop and look at the interesting selection of large wooden napkin rings. Something about them made me think of jewelry whenever I saw them, and I eventually got up the nerve to buy a few and see what could be done with them.

Wooden Napkin Rings

As soon as I had the napkins in my beading stash, I got out a scrap of paper to begin sketching some ideas. I wanted to cover at least one of the rings with beadwork and use it as a focal piece, so I started there.
The very first necklace design I drew looked more like a Christmas wreath, so I decided to transform a wooden napkin ring into a pine cone.

Evergreen Seed Beads

The Beads:

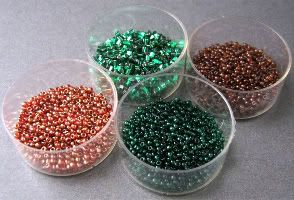
I started with some gold lustered rusty orange 11/0 Tohos, which have a nice rich brown color, with a hint of gold and red. I also grabbed some jade green and transparent brown root beer seed beads, as well as some emerald green Toho triangles. These four colors together really capture the beauty of an evergreen tree in winter.

The Beadwork:

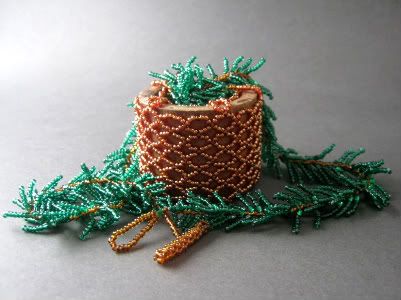
To make the napkin ring look like a pine cone, I made two strips of right angle weave circles - one for the outside and one for the inside - then attached them with a few loops spaced as evenly as possible around the edges of the ring. I had originally thought of using tubular netting, but I wanted something rounder, to mimic the little petals on a large pine cone.

I attached the pine cone to two lengths of branched fringe in brown and green. The sprigs of jade and emerald seed beads look so much like the real thing, that I could almost smell a Christmas tree as I stitched. With all of the components together, the napkin ring underneath is almost invisible - it wouldn’t look nearly as much like a pine cone without the green fringe. The straps of the necklace really trick the eye into seeing the whole piece as it’s meant to be.

Pine Cone Necklace

Copyright 2009 Inspirational Beading

Thursday, November 12, 2009

Bead Spotlight: Natural Beauties

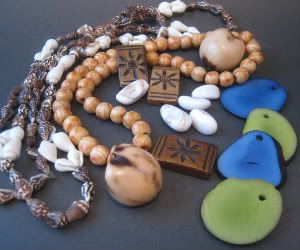
Natural Beads - Shell, Wood, Bone, Nuts, Tagua

Natural beads are among the most beautiful treasures a beader can have in their stash. Materials such as wood, bone, seeds and shell have been used for making beads since the art was first created. We modern beaders have the pleasure of purchasing them in endless variations, including the versatile and gorgeous Tagua Nut and other trendy ‘new’ substances.

While most shops carry a selection of natural beads, making your own can be a very rewarding experience. Creating a piece of jewelry or art work from materials found in your own neighborhood is a wonderful way to experience nature, to recycle, and to explore creativity.

Nuts, seeds, and even berries make great beads, not only because they are abundant, but their unique colors and textures are so beautiful. Once these tasty morsels have been dried, they can be drilled and lacquered, and transformed into one-of-a-kind baubles.

One of the most interesting materials for homemade beads is the potato. A fun craft project for families, making potato beads can also be a great way to create your own hand carved beads without worrying about using heavy tools. Try this project from Family Corner: Faux Turquoise Potato Beads.

Beads sculpted from flower paste are not something you see in your everyday bead shop. If you happen to have a lot of dried rose petals around, you can use them to create pretty and fragrant natural beads.

If you enjoy wire wrapping, you can also use tougher materials in beadwork. A wire-wrapped sea glass tutorial can easily be adapted for nuts, stones and other natural found objects. Try this project from Sea Glass Journal: Wire Wrap Sea Glass Pendant.

Remember to get out and explore nature, and see the beauty in the little things.

Necklaces on a Market Stall in the Cloth Hall on Main Market Square, Krakow, Poland


Copyright 2009 Inspirational Beading

Saturday, November 7, 2009

Girl Power Necklace

Disclaimer: This post features some (totally awesome feminist) content that might not be considered safe for work.

Statuette of the Goddess Isis and the Child Horus

While browsing around Etsy a while back, I stumbled across a wonderful shop called Vulva Love Lovely. The amazing handmade collection of “vulva pendants, vagina pillows, uterus plushies, eco friendly cloth menstrual pads and handmade feminist love” is a truly inspiring way to celebrate being a woman. Whether you're a true feminist at heart, or just proud to be female, the unique designs of Vulva Love Lovely are something to behold.

As soon as I saw the hand sculpted polymer clay vulva pendants, I knew that I had to get one for my wonderful sister in law. She is without a doubt the strongest woman I know, and much deserving of such a pretty badge of honor. Amy is a beautiful model, an incredibly dedicated mother, and a one of a kind friend. I can’t imagine a better way to celebrate her than with a necklace as bold and original as she is. She's also pretty cheeky and doesn't seem to know the meaning of the word "shy", so I thought a vulva necklace would be the perfect addition to her wardrobe.

The Inspiration:

I wanted to create a necklace of my own design, and so I asked the artist, Jessica Marie, if she would create a custom pendant for me to use in a special necklace for Amy. She kindly agreed, and soon after I had a gorgeous pink and orange “flower”. As soon as I picked up this little treasure, I felt instantly empowered.

Opaque Pink, Orange, Yellow and Black Beads

The Beads:

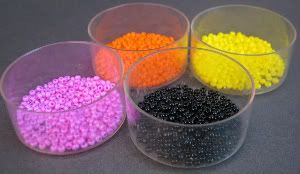
To match the vulva pendant, I picked some 11/0 seed beads in opaque pink and orange, as well as a sunny yellow. To add a touch of goth-punk flavor, I also grabbed some black 11/0‘s. Once I had this palette, I created a mixture of transparent pink and gunmetal seed beads to bring everything together.

The Beadwork:

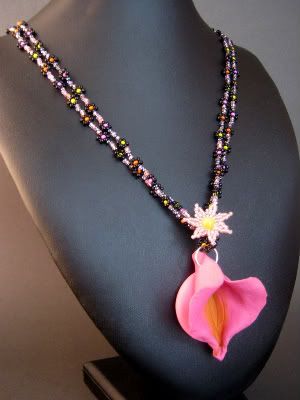
Amy is a big fan of classic daisy chain necklaces, so I started with a double chain with my chosen seed beads. I wanted to add something really special, so I made a pink and yellow beaded flower with a fiber optic center, and used it to create a bail for the vulva pendant. The necklace has a lot of personality - pretty and bold and spicy - just like Amy.

Happy birthday, Honey!


Girl Power Vulva Necklace

Copyright 2009 Inspirational Beading

Wednesday, November 4, 2009

Mother Nature Necklace

River Rocks II

The use of gemstones as beads is one of humanity’s oldest art forms. Colored stones have been used for adornment for as long as we have had the tools to work them. Many cultures throughout history have used the unique stones of their region not only for their beauty, but to symbolize deities, ward off spirits, and bring good luck. It is ironic that, to enjoy the gorgeous gemstones that nature has created, we have to extract them from the earth, leaving scars on Mother Nature that cannot, or will not, be erased.

The Inspiration:

I wanted to create an amulet that not only represented the power and beauty of the earth, but included a piece of her as well. Rather than use a traditional ‘natural’ bead, I chose a simple stone as the focal point.

Earth Tone Beads

An ordinary rock, polished by erosion, can be just as awe inspiring as the bluest turquoise, or shiniest diamond.

The Beads:

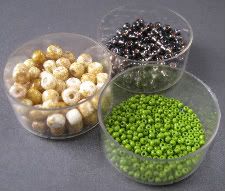
In addition to a dark gray stone, I selected a few earthy beads. To represent nature as vegetation, I picked lively green apple 11/0 seed beads. To compliment the stone, I grabbed some copper-lined gray 6/0’s, and white and brown flecked 4/0 seed beads.

The Beadwork:

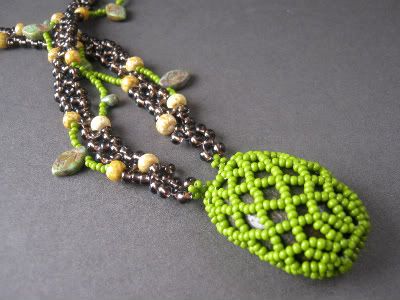
To make the amulet portion of the necklace, I encased the stone in seed bead netting. I was pleased to discover that, under the thick jacket of beadwork, the stone has a very ova-like shape. This adds one more element of “Earth Mother” that I hadn‘t counted on. The straps of the necklace were made with right angle weave, and I added looped fringe with some turquoise Picasso teardrops and leaves. Although the pendant isn’t the lightest of materials, the necklace does not feel heavy at all.

Gaia Pendant

Copyright 2009 Inspirational Beading

Sunday, November 1, 2009

Bed, Bath and Bamboo

Bamboo Forest, Sagano, Kyoto, Japan

Although jewelry design is a favorite activity among bead lovers, there are many different types of amazing beadwork to create with these little treasures. Not only can the usual seed beads and crystals be transformed into works of art, but all manner of materials can be drilled and made into useful objects.

The Inspiration:

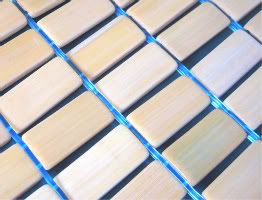
While browsing at my local bed and bath shop, I came across some pretty bamboo place mats. At first I thought they would look great on my kitchen table, and then I realized that the rectangular bits of bamboo were in fact beads. I scooped one up immediately and got to work on some ideas for using the smooth little rectangles in jewelry.

Beaded Bamboo Place Mat

The Beads:

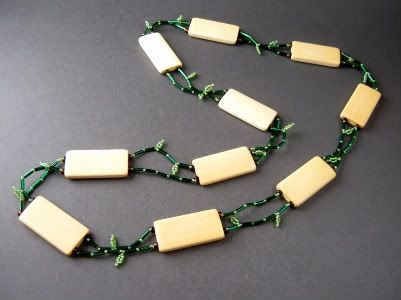
It occurred to me that it would be easy enough to mimic the look of bamboo stalks using green seed beads and bugle beads. I selected some emerald green bugles, and paired them up with lighter colored peridot 11/0’s. To act as bumpers between the smaller beads and the bamboo rectangles, I grabbed some foil-lined brown 6/0 seed beads.

The Beadwork:

To keep things simple, I selected enough bamboo beads for a long necklace that would require no clasp. Between each, I strung short rows of bugle and seed beads, then stitched back through and added little leaves here and there. This necklace is one of those great triumphs where the finished piece turns out exactly as envisioned.

Bamboo Zen Necklace

Copyright 2009 Inspirational Beading