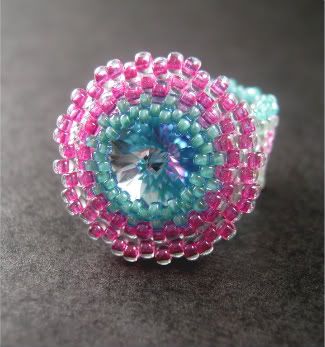
Aside from the many types of “pierced” or drilled objects, there are also many different materials that can be used as embellishments in beadwork that have no holes at all. Most beaders are familiar with cabochons, which can be flat or domed, and of course there are rhinestones as well. Some of the most wonderful un-beads are the things that don’t normally appear in beadwork, but which are so pretty or interesting that we can’t help but use them.
One of the most useful methods for incorporating a found object into a beading design is to surround it with a jacket of seed beads called a bezel. There are a few different ways to approach this task, but if an object is fairly uniform in shape, a circular peyote bezel is an easy technique to use. Once you have mastered it, you can turn many unique objects into beautiful un-beads.
How To Bezel a Rivoli with Peyote Stitch:
A great way to practice making peyote bezels is with Swarovski rivolis. The 14mm size is easy to work with, and comes in a variety of inspiring colors. To bezel a 14mm rivoli with circular peyote, you will need seed beads in size 15/0 and 11/0.
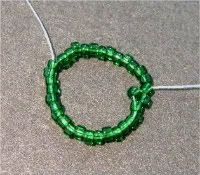
Start by stringing 32 size 15/0 seed beads onto a comfortable length of beading thread. When working with circular peyote, it’s a good idea to start with a number of beads divisible by 4. This will ensure that each row is even if you need to alternate bead sizes later on.
Slide the beads down until there is about a 6 inch tail, and stitch up through 16 of the beads again. Pull the thread snug so that the beads form a ring. If you’re working with a soft thread like Nymo, you may want to tie a square not to secure the ring. If you’re working with a braided thread like Fireline, you can simply bend the tail thread a little to form a kink where it meets the ring. This will keep it secure, but leave a little slack to prevent the first two rows from rippling. To stop the thread from slipping, hold the tail against your hand with your pinkie finger as you stitch.
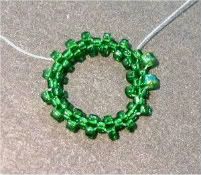
Pick up one 15/0 seed bead. Skipping the next bead in the ring, and moving in the direction that the working thread is facing, stitch through the next bead in the ring. Pull the thread snug to lock the bead in place. Pick up one 15/0 seed bead and repeat, skipping the next bead and stitching through the following bead in the ring. Continue adding beads with peyote stitch all the way around the ring.
When you reach the first stitch again, you will need to step up to start the next row. Add the final bead, and stitch through the next bead, and the first raised bead following it. Pull the thread snug and check your work for loose beads.
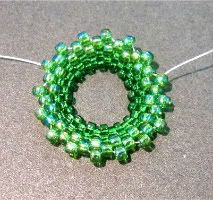
Pick up one 11/0 seed bead, and stitch through the next raised bead in the ring. Continue adding 11/0’s with peyote stitch, and step up at the end of the row.
Add two more rounds of 11/0 seed beads, so that the pattern of 11/0’s is the same as the 15/0 rows.
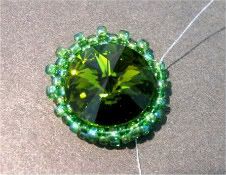
For the next row, switch back to 15/0 seed beads. Be sure to pull the thread snug after each stitch so that there are no openings in the beadwork. Once this row is complete, place the rivoli in the centre of the beadwork and hold it in place with your thumb and forefinger as you stitch.
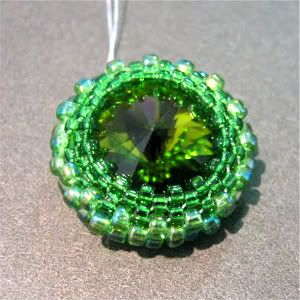
Add two more rows of 15/0 seed beads. As you work, the beadwork will tighten up around the rivoli, trapping it within the two rings of smaller beads. Once the last row has been added, weave through the last two rows again, pulling snugly to strengthen the beadwork. Repeat with the tail thread, and trim the excess.
If you still have plenty of working thread left, you can add embellishments around the 11/0 section, stitch on a bail, or connect this rivoli to other beadwork. Have fun!
Copyright 2009 Inspirational Beading

Thank you for such a great tutorial on how to bezel a rivoli!
ReplyDeleteI've been looking for a photo tutorial as I didn't really know where to start!
Esme
You're very welcome! I hope this helps - but once you start bezelling you never go back!
ReplyDeleteThanks for adding this tutorial. Does this really keep the rivoli in place??
ReplyDeletehow many beads would you start with for a 18mm rivoli ?
ReplyDeleteFor different rivoli sizes, a little trial and error is needed. Not only are seed bead sizes different for every manufacturer and finish, but it's difficult to tell the fit of the first ring of beads, because the rivoli cannot sit flat like a cabochon. Placing the rivoli in your palm so that the pointed back sits between your fingers helps, but it's important to check the fit again once the third row (or first round of peyote stitches) is complete.
ReplyDeleteLovely clear tutorial. I can feel confident beading this now and I can't wait to start :)
ReplyDeleteThank You Very Much for this excellent tutorial.
ReplyDeleteHalina in Australia.