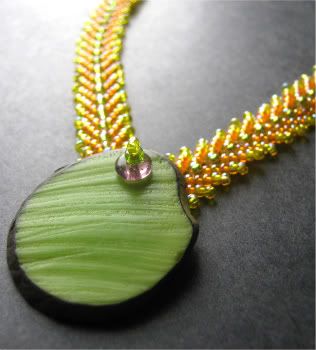
Is there a perfect bead weaving stitch for necklaces? As with most beading skills, a perfect necklace technique is a matter of preference. Some common criteria would be adaptability - a technique that can use many different types of beads, and support different types of embellishment is sure to rise above the rest.
Whenever I have an idea for a great beadwoven pendant, or just want to use a new focal bead, St. Petersburg chain is often the stitch that I think of first. It’s relatively easy to stitch up, it works with any color or size of seed bead, and there are lots of fun ways to make it more interesting. Unlike a lot of other chain stitches, St. Petersburg can be increased, and adding a second layer is easy to do once you know the basic steps.
To Make a Double St. Petersburg Chain:
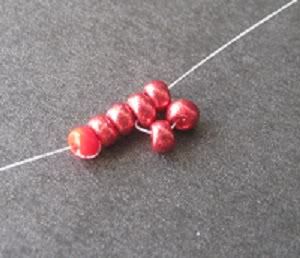
Start by creating a single chain. Attach a stop bead to a comfortable length of thread, and pick up 6 seed beads (Color A). Slide these down to the stop bead, then stitch back up through the 3rd and 4th beads again. Pull tight until the last two beads are snug against the middle two. If the first 2 beads have come loose, just snug up the stop bead.
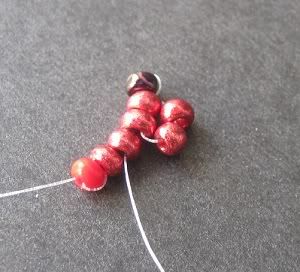
Next, pick up one seed bead (Color B), and stitch back down through beads 4, 3 and 2 from the previous steps. Pull the thread snug, and pick up one color B seed bead. Stitch up through the two separate A beads (5 and 6) and pull tight.
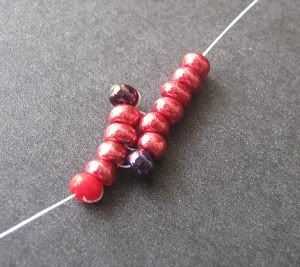
Pick up four A seed beads, and slide them down to the beadwork. Stitch up through the first two, and pull tight, making sure the new beads are snug against the beadwork. Add the B seed beads as before. Continue with the technique, until the chain reaches the desired length.
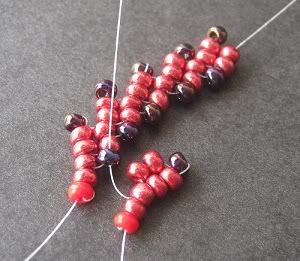
With a new thread, start a second chain as before. Instead of adding the second, lower Color B, stitch up through the first B from the other chain. Continue through the two Color A beads from the new chain, and resume stitching, sharing the center B’s along the chains.
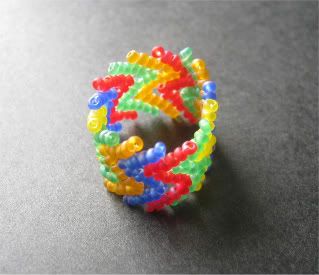
There are lots of ways to vary the look of a double St. Petersburg chain, such as using different sizes for the shared beads. You can also continue adding more chains, linking them together by the B beads to create flat beadwork with a triangular pattern. To create my Easter inspired Zig-Zag ring, I used separate colors for each row, and connected the 3 chains together at the ends.
For another fun St. Petersburg variation, you can add scalloped fringe to a finished chain. For a full project tutorial, see my
Desert Flower Necklace on the Auntie’s Beads Blog.
Happy beading!
Copyright 2010
Inspirational Beading


This is one of my favorites stitches.
ReplyDeleteNicole/Beadwright
I just started using this stitch a few months ago, and I love it.
ReplyDeleteI love the ring you made, very cute.
Thank you for this tuto, it's very clear ! I enjoy this stitch !
ReplyDeleteThis is just gorgeous! I also like your daisy chain one! Just sent you an email about linking! Pearl
ReplyDeleteThank you! I don't think I could live without this technique - it's definitely a favorite!
ReplyDeleteJust found your blog, and I really like this stitch! I can already tell that it is going to be one of my favorites! :)
ReplyDeleteMuchas gracias por el tutorial tan claro!!!!!
ReplyDeletethank you for this tutorial ! but how do finish the bracelet to put the clasp?
ReplyDeleteexcuse me for my bad english. I am french!!
@Brittalamime. Great question!
ReplyDeleteIt might depend on the type of clasp you want to add, but the easiest way to finish the chain is to use the tails to make a seed bead loop - one at each end - with the threads crossing over. You can pick up your clasp with the seed beads, or add a jump ring to plain loops.
Thank you very much, finally I got around teaching me that stitch which I always wanted to do but somewhat feared. I just love the looks though it's a bit hard on your hands and joints. But the outcome is so delicate and pretty.
ReplyDeleteI love the looks of your ring, maybe you could explain a little more exactly how you did it? THanks, Susanne from Germany
Thanks, Susanne! I'm glad I was able to help. I remember that when I finally learned this stitch, it opened a whole new world of beading ideas.
ReplyDeleteThe ring is worked basically the same was as the second chain of St. Petersburg - adding new chains onto existing ones with shared beads. There are some minor differences in thread direction that help to get a smooth finish. I'll try to get a tutorial up for the technique!
pas encore commencer pour ma part :-)
ReplyDeleteI am trying to print these instructions as I don't always like to bead in front of the computer, but only the pictures come up without the words ! What am I doing wrong ?
ReplyDeleteThere are a couple of things that you can try. First, make sure that you're viewing just a single post, not the entire blog. Go to File > Print Preview on your browser toolbar, to see how the print-out will appear. You can adjust the settings before printing if need be. You can also try using a different browser, which may give you different results.
DeleteIf all else fails, you are welcome to copy and past the images and text into a Word Processor and print the tutorial that way. Hope this helps!
Great tutorial! I have just finished two lengths of double St Petersburg chain...how would you suggest that I join them and add a pendant?
ReplyDeleteTo make a V-shaped necklace for attaching a pendant, I will typically bring the 'start' ends of the two chains together, and use ladder stitch to lash the lowest, inner rows to each other. Once that's done, you can stitch directly onto the join, or suspend a focal from the bottom of the chains.
DeleteThe beadwork at the join can get pretty snug, especially if you're going over your stitches twice for durability. I recommend having a size 13 needle on hand if things get too tight.
Would you email a photo of the back of the Tropical Fruit pendant so I can see how you attached the focal?
ReplyDeleteIf so, linnies123@bellsouth.net
You can get a glimpse of this pendant style from the back here:
Deletehttp://www.artfire.com/ext/shop/product_view/SagesCupboard/5158005/ (5th photo).
The technique is basically to 'sew' the pendant onto the beadwork, and is very similar to the one used in this tutorial:
http://www.inspirationalbeading.blogspot.com/2013/09/ombre-herringbone-cuff-tutorial.html
I have been trying to understand tutorials for about a year! I just came across your site from pinterest! I got it ! Thank you you for your instructions I can hardly wait to finally try this stitch, St.Petersburg here I come. Yeah!!!
ReplyDeleteHi SaBrina! I'm so glad that you found the tutorial helpful. You're gonna have a blast with this stitch - it is really fun to weave and always looks gorgeous.
DeleteThank you for all these tutorials. I was slow getting here, but now that I have found you I am a permanent fan.
ReplyDelete