Pages
Monday, January 31, 2011
Favorite Beads: Agate
Inspirational Beading: What is your all-time favorite bead? Why do you like them?
Scotti: I love beads made of agate, especially crazy-lace agate (also known as Mexican agate). Crazy lace agate is a cryptocrystalline quartz found in Mexico. I like agates because the stones give a feeling of being connected to the earth, and the "crazy lace" patterns are lively and bright.
Inspirational Beading: What is your favorite technique or method to use them?
Scotti: I like to string them on Soft Flex jewelry wire to make necklaces or bracelets. I also make some of them into pendants and earrings.
Inspirational Beading: Of all the creations you’ve made with these beads, which one is your favorite?
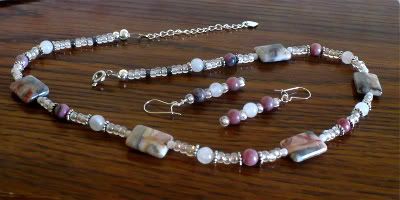
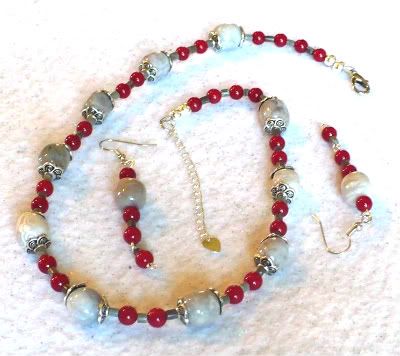
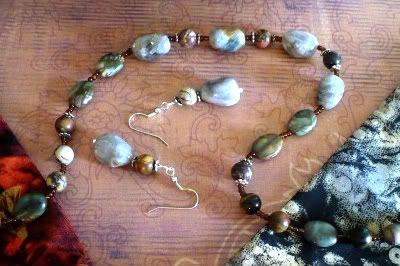
Scotti: My favorite creation so far using crazy lace agate is a necklace and earring set I called Roses and Lace. It sold within a day or two after I put it up for sale. My favorite creation so far using another type of agate is a necklace and earring set I called Cranberries and Clouds. That set used gray Brazil agate.
Inspirational Beading: Do you have any tips for making the most of these beads?
Scotti: Accent them with a bit of color but don't try to jazz them up too much. They are solid, basic stones that are quite attractive without a lot of fancy stuff all over them.
Inspirational Beading: What is your favorite bead or material to pair these with?
Scotti: I like to pair them with small, solid-color beads and silver accents and spacers. In Roses and Lace I used rose quartz and rhondite, and in Cranberries and Clouds I used red coral.
Inspirational Beading: If you were stranded on the moon, and you could have only one kind of bead with you, would you choose these?
Scotti: Yes. Agates are versatile and can express many different moods and tones -- and crazy lace agates can be both elegant and entertaining.
Inspirational Beading: In your opinion, what is the best source for these beads?
Scotti: I purchase agate and crazy lace agate from various sources, including my local bead shop. I also use Art Beads, Fusion Beads, Fire Mountain, and other online sources.
You can see even more jewelry creations and inspiration at Jewelry by Scotti.
Copyright 2011 Inspirational Beading and Jewelry by Scotti
Subscribe to Inspirational Beading
Saturday, January 29, 2011
A Bracelet a Week: Jewel Tones
My Necklace a Day challenge helped me make a big dent in my bead stash as I geared up for year-end inventory. Even though I’m all done counting stock, I still wanted to move out some older supplies. I was in the mood to use up the last of my cat’s eye rectangles, so I put them on deck for this week’s bracelet.
I didn’t want to use them for an ice-inspired design, which seemed a bit too obvious, so I tried to think of different a way to compliment them. As I was pondering, they started to remind me of the gemstone beads used in leather wrap bracelets. So, I went through my seed bead stash and selected colors that would look good with white, and that would resemble semi-precious stones.
I ended up with a palette of color lined wisteria, sea foam, jet, and gold lined amber. After all of the tube beads were complete, I stitched them to the rectangles, and added a button and square stitch trim. The bracelet turned out almost exactly as I had hoped. What a great way to finish the first month of the challenge!
Copyright 2011 Inspirational Beading
Subscribe to Inspirational Beading
Friday, January 28, 2011
Collections: Right Angles
The winner of the Circle Pendant tutorial giveaway is Robbie of Robbie’s Paw Prints and the fabulous Bead Journal Project. Like Robbie, most of the entries mentioned right angle weave as a tough stitch to crack. But once you learn it, it can become an essential element in your beading repertoire.
Congratulations to Robbie, and thank you so much to everyone who stopped by and entered the giveaway! All that talk about right angle weave inspired me to finally finish a tutorial that I’ve been working on for months.
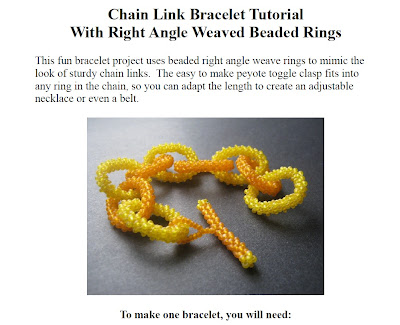
The secret behind my beaded chain link necklaces is now available in a bracelet project - fully adaptable to any length you desire! The technique is simple right angle weave, which is then zipped into sturdy, chunky rings. It’s a time consuming stitch, but so much fun.
Keep on beading!
Copyright 2011 Inspirational Beading
Subscribe to Inspirational Beading
Wednesday, January 26, 2011
Beading Tutorials: Peyote Tube Beads
These simple and versatile beaded beads are very easy to make once you get the hang of flat peyote stitch. The best thing about them is that you can adjust the size of your beads simply by increasing the number of peyote rows and columns. They are great for mixed media designs that use wide cords and fibers, like hemp macramé.
To make a basic peyote tube, start by weaving a panel of even-count peyote:
Cut a comfortable length of beading thread, and string on a stop bead, leaving a 6 inch tail. Stitch up through the bead again and pull the thread tight to lock the bead in place. Peyote stitch relies on a sturdy stop bead, so if it’s too slippery, try adding a second stitch.
Pick up an even number of seed beads, and slide them down to the stop bead. These beads will make up the length of your peyote tube.
Flip the thread so that the stop bead is facing away from you. Pick up one seed bead. With your off hand, hold the first strand of beads gently with your thumb and forefinger, with just enough room to needle through.
Skip over the last bead strung, and stitch through the next bead in the strand. Gently pull the thread snug, while holding the beadwork, until the new bead clicks into place. Your bead strand should now have a little ‘foot’ of two beads, side by side.
Pick up one seed bead. Skip the next bead in the stack, and stitch through the following bead. Pull the thread snug. Continue adding one bead at a time to every other base bead, until you exit the other end of the stack. Don’t worry if the beadwork seems to be curving a bit. It will straighten out as you complete the next two rows.
Flip the beadwork again, so both threads are facing you. Pick up one seed bead. Stitch up through the first raised bead - the last bead added in the previous row. Pull the thread snug, so the new bead clicks into place.
Continue adding a new bead between each raised bead, and exit from the other side of the beadwork. Add each new row with the same method, until your panel has reached the desired width. Periodically roll up the sides of the panel to see how wide your beaded bead is.
The sides of the panel must be even to continue. Your peyote strip is finished when the working thread exits from the opposite side as the tail thread.
To zip up the sides of the panel, hold the beadwork in your off hand, with the working thread facing your stitching hand. Gently fold up the sides of the panel so that the edges meet. You should be able to see how the “up” beads alternate on either side, like interlocking teeth.
Stitch through the first raised bead on the opposite side of the panel as the working thread, and needle through the following raised bead on the first side. Gently pull the thread snug.
This zipping motion follows the same thread path as your previous stitches, but instead of using loose beads, you are using those already in the beadwork.
Continue this zig-zag motion across the gap in the tube, two beads at a time, until you exit from the opposite end.
Flip the tube so that the threads are facing you. You should be able to see the gap between the last beads in the zipped rows. Stitch up through the bead next to your thread to close this gap, and retrace the thread path along the bead tube.
Weave in both threads, and trim them as close to the beadwork as possible.
Now you have a peyote beaded bead!
Peyote tubes can be made with any bead you would normally weave with. Both 11/o seed beads and Delicas can make fantastic tube beads. Try experimenting with different patterns and colors to make your own unique components.
Happy beading!
Copyright 2011 Inspirational Beading
Subscribe to Inspirational Beading
Monday, January 24, 2011
Giveaway: Peyote Pendant Tutorial
I started by pairing up different shades of yellow and brown - canary with terracotta, and rootbeer with lemon. I wanted hints of green for a background, so I added yellow-lined black diamond with it’s olive-y vibe, and transparent lemon lime cubes. A few fire polish beads in an earth tone mix offered some extra yellows and browns.
While I was working on this piece, I took some snaps and created a brand new beading tutorial. The project includes instructions for making all of the peyote rings, and weaving together the continuous chains to make a no-clasp necklace.
I also started a new tutorial feature - text only PDFs. So beaders can still study the project in full color, and have the option to print without images to save on ink and paper.
To celebrate a new year of beading, my first giveaway of 2011 will be a copy of my Circle Peyote Pendant Tutorial!
How to Enter:
For a chance to win, just leave a comment below, and answer this question:
Which beading technique have you yet to try or master?
This giveaway is open to everyone! If you do not have a Blogger profile with email enabled, make sure that you have included a contact method such as a shop or website, or a spam free email address (beadlover AT yourmail).
For an extra entry, leave a second comment with a link to a blog post about this giveaway!
One lucky winner will be drawn at random on Friday, January 28th.
Good luck, and happy beading!
Copyright 2011 Inspirational Beading
Subscribe to Inspirational Beading
Saturday, January 22, 2011
A Bracelet a Week: Spring Flowers
One of the first ideas that came to mind when I was jotting down possible bracelet styles, was an extra large variation of my herringbone rings. I thought it would be really fun to make a large flower focal, and an extra long herringbone band to go with it.
I borrowed the flowery design from my Oasis ring, and used sunny yellow seed beads for the petals. Then I had to choose a second color for the band. I went with some pretty light amethyst seed beads, and an earth tone mix for the increase rows.
After I started working, I realized that a two-color palette would look even better, so I ditched the mix and stuck with purple and yellow. I love the way this particular shade of yellow brings out the Easter in other primary colors.
As with many first designs, my measurements and estimates were a little off. This beaded corsage only came in at about 6 inches, even with the clasp. I definitely want to make another one later this year, if only to get the sizing right!
Copyright 2011 Inspirational Beading
Subscribe to Inspirational Beading
Friday, January 21, 2011
Bead Color Triads: Pantone Palettes
Whether you like to conform to trends, or just want a little boost of inspiration, Pantone color palettes provide a great starting point. Sometimes all it takes to get your creativity going is a fresh perspective or challenge.
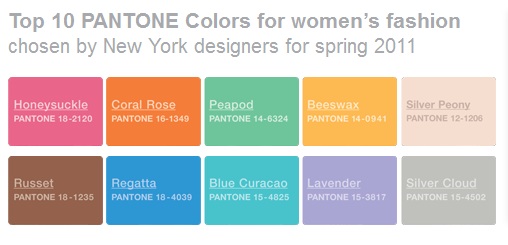
The Spring 2011 selection is called An Exotic Journey. Ten colors were chosen by top designers, inspired by exotic locations and travel destinations. I thought it would be fun to break up these swatches into three unique and vibrant bead sets.
The only color that didn’t make the cut was Silver Peony. I had to cut one of them, and this one was the hardest to match with my bead stash. Although an essential neutral for fashion wardrobes, here it seems to look weak and washed out against the rest of the colors. Today, I wanted triads that really pop!
Russet, Blue Curacao, Beeswax
The first palette was an almost automatic connection. The rich brown almost seems to stretch across the screen and link up with the deep yellow shade. After that, it was just a matter of finding the right contrast to make a pretty trio.
The three colors together have a beautiful, tropical vibe. I was thinking sunshine, golden sand, coconuts and blue waves. So, I gathered up some chocolate brown pearls, matte topaz pressed glass shells, and ceylon light aqua seed beads.
Coral Rose, Peapod, and Lavender
Orange is a tough color to create palettes with. It often dominates the other colors, and can at times be too loud to look elegant. To help keep things mellow, I decided to create a nice, but not too obvious, fall palette - one that could easily make it’s way through spring, and perhaps even add a bit of much needed warmth.
Once I started pulling beads for this triad, it changed from fall leaves to spring flowers almost instantly. Here we have hyacinth fire polish rounds, wisteria lined 11/o seed beads, and 15/o jonquil lined aqua. This palette has plenty of zing, thanks to the hyacinth orange. All it needs is some bees!
Honeysuckle, Regatta, Silver Cloud
The final trio features the 2011 It color, honeysuckle pink. This is the one that will dominate trends throughout the year. I like the carefree quality that these three colors have together. They have plenty of personality, without being pretentious.
To translate these colors into beadwork, I picked out some hot pink fire polish rounds, and 11/o seed beads in white lined aqua and ceylon black. This palette definitely has me wishing for warmer weather.
Which Spring 2011 color is your favorite?
Copyright 2011 Inspirational Beading
Pantone Color Institute and Nanette Lepore
Subscribe to Inspirational Beading
Wednesday, January 19, 2011
Wear It Twice: Peacock Princess
Bibs and collar necklaces look best when there is little else to compete with around the neckline, I think. So for the first outfit, I started with a strapless cocktail dress in a dusty teal. Because the necklace has so much texture, I wanted to keep things simple, but I couldn’t resist a Bottega Veneta clutch with frayed woven leather in bright teal. Gold Vera Wang ballet slippers add some shine, and an amethyst cabochon ring gives an extra hint of color.
The second outfit was one of the toughest ever to complete. I finally decided to build around a simple pair of denim jeans to avoid adding too many colors. It was that, or black and gold sequined jeans! A simple teal tank top provides a great base for the necklace, and green leopard print heels with purple trim add plenty of excitement. I topped it all off with a gold headband and pretty gold sequined handbag from Juicy Couture.
Next, I went on the hunt for some similar handmade and vintage pieces with their own unique personality.
I wasn’t ready to put fashion behind me until next month, so I thought it would be fun to share some of the other collages using pieces from “Peacock Princess”. Here are a few of my favorites:
One great necklace can really go a long way!
Copyright 2011 Inspirational Beading and Polyvore.com
Subscribe to Inspirational Beading
Monday, January 17, 2011
Bead Spotlight: Czech Fire Polish
These little beauties are faceted and heat polished for a remarkable shine and shimmer. They have the look of expensive crystal beads, but are much more affordable, even though each batch is still made by hand. And, like any great bead, the color selection is to die for!
Most projects that call for fire polish beads refer to the round style, which can usually be found at most well stocked bead shops and suppliers. There are also barrels, bicones, cubes, drops, ovals, and even cathedral beads, with a unique boxy shape.
Fire polish beads are a little more forgiving on threads, so they are perfect for bead weaving techniques where larger beads can be incorporated. They look great in between rows of St. Petersburg chain, as accents in cascades and multi-strand designs, and can even be worked into spiral ropes.
If you have a few fire polish beads in your stash that you’d like to use up, here are some fun projects to try:
Embellished Right Angle Weave Bracelet, from the Auntie's Beads video library
Green with Envy Multistrand Necklace, from Fire Mountain Gems
Chinese New Year Earrings, from Ben Franklin Crafts
Happy beading!
Copyright 2011 Inspirational Beading
Subscribe to Inspirational Beading
Saturday, January 15, 2011
A Bracelet a Week: My Valentine
This week’s bracelet started with a bit of a guilty pleasure - red velvet Chinese crystal rondelles. One of last year’s resolutions was to stick to buying beads from North America and Europe - with the exception of artisan lampwork and fair trade beads. My stash of accents has gotten considerably smaller - except for druks, which I am now hoarding like a squirrel!
When I discovered two strands of these rondelles in a grab bag from Auntie’s Beads, I had a moment of doubt. Words cannot describe the gorgeous color of these crystals. They’re bright and vibrant, with a deep inner glow. I see them and think of fresh, cold raspberry juice on a hot day. When combined with white ceylon, the red color becomes even more intense.
This bracelet reminds me so much of those classic valentines with the paper lace trim. Plus it was a lot of fun to make. It’s always a surprise to see right angle weave work up so quickly when you switch to large beads. I have a feeling I’ll be taking a lot more notice of my 6/o stash over the coming weeks.
Copyright 2011 Inspirational Beading
Subscribe to Inspirational Beading
Friday, January 14, 2011
A Flicker of Inspiration: Ancient Egypt
The interesting thing about the use of color in Ancient Egyptian art, is that most combinations were chosen for their spiritual significance, and not for their overall appearance. Symbolism was an important part of the design process.
Today I did some browsing through photographs of Egyptian artifacts and landmarks. Sadly, many of the unique pieces I found were photographed in museums far from their homeland. The Egpytian Supreme Council of Antiquities is constantly negotiating the return of many important artifacts, including the bust of Nefertiti.
Perhaps these images will inspire some enchanting beadwork!
1. Das Auge des Horus - The eye of the Horus, 2. Nefertiti, 3. tutankhamun, 4. Tutankhamun 2010,
5. Wadjet, 6. DSC_0604, 7. Egyptian_Statues_IMG_0763, 8. Egyptian pyramids,
9. Egypt-9B-020 - Amenhotep II, 10. Egypt,
11. Egypt Adventure your key to Egypt, 12. egypt, 13. Egypt
Copyright 2011 Inspirational Beading and BigHugeLabs.com
Subscribe to Inspirational Beading
Wednesday, January 12, 2011
Inspired Beader: Averilpam Design
At Averilpam, polymer clay artist Pam mixes her handmade beads with jewelry techniques for truly one of a kind designs.
Inspirational Beading: How did you first get into bead making?
Pam: I've been making jewellery for a couple of years and started to notice polymer clay jewellery in other shops, blogs etc. I really liked the look of it and started to look at books, then decided to jump in the deep end.
I bought a couple of books and researched some online tutorials, then bought myself a pasta machine and lots of clay and started to play! My main motivation was to make jewellery that was more original and not just with the same beads that lots of other makers could buy.
Inspirational Beading: Do you remember your first project? Where is it today?
Pam: I started off with a very simple jellyroll cane in turquoise and yellow which I reduced and sliced up into little beads. My first blog post was about making them: New Ideas. I sent the beads to my granddaughter in the USA. She loved them, but I don't think she made anything with them!
Inspirational Beading: Where do you like to look for new inspiration?
Pam: I'm not sure how to answer this as I don't use anything obvious for inspiration, taking it mostly from the materials I use. I do get inspired when I look through books and see other artists' work. I never copy but may get ideas for colour combinations, techniques etc.
I make a lot of canes from the techniques I learn, then see where they take me! I do have quite a few beads I've made but when I came to make something up with them the idea I had doesn't look as good as I'd hoped, so they are bagged up and sit waiting for inspiration to hit - or I may decide to just sell the beads.
Inspirational Beading: Do you have a favorite clay to work with?
Pam: No not really. I've more discovered what I don't like working with.
If clay is too hard I have trouble conditioning it even with a pasta machine - you have to get the clay softened up a bit before you can put it through the machine. My hands are pretty weak and I had to discard some Kato clay as it was crumbling up as I cut it.
I do really like Cernit's nature range, it is a lovely stone effect in several colours including a beautiful terracotta.
Inspirational Beading: What is your favorite color or color combo?
Pam: My favourites keep changing! I love black and white, and love metallics, especially copper. Colours I love at the moment are pinks and purples.
Inspirational Beading: Who would you like to inspire with your work?
Pam: I am very proud and pleased to have inspired my granddaughter (she's now 10).
Both my grandchildren took to playing with the polymer clay on my last visit and Emily showed wonderful ability to make mini sculptures. She created a range of little aliens - all shapes and colours, very inventive. I'd like to hope she'll continue with it.
Other than that I'd be delighted if I could inspire anyone to try something new and get pleasure from it.
More About Pam:
I have always been creative and loved to make things. I worked full or part time until 5 years ago when I retired, and since then have been able to concentrate on my creative efforts.
My given names are Averil Pamela though I've always been called Pam. I chose Averilpam for a username when I first went online and this seemed the ideal business name when I set up shop.
To begin with I sold handwoven scarves I made from my homespun wool and alpaca. I still sell some now and spinning remains one of my passions. I also make bags but since I discovered polymer clay it has become something of an obsession and scarves and bags have fallen by the wayside for now.
I live in Lancaster in the north west of England. As I now have chronic health problems I spend a lot of time at home so selling online is ideal for me. I enjoy my garden and feed the birds, and am fortunate there is a canal in close walking distance where I go to feed the ducks and take photos.
To see more unique creations, visit Averilpam on ArtFire and Folksy. You can also catch up with Pam’s latest inspirations on her blog, Averilpam, and on Facebook, or browse a gallery of her designs on Flickr.
Copyright 2011 Inspirational Beading and Averilpam Design
Subscribe to Inspirational Beading
Monday, January 10, 2011
Bead Wish List: New Additions
For this month’s bead wish list, I went on a fun stroll through the New Arrivals and New Additions sections of some favorite bead shops, and found a fantastic assortment of goodies to get excited about.
Camo Mix Swarovski Elements Bicones
from FusionBeads.com
Indicolite Helios Pendant by Swarovski Elements
From ArtBeads.com
Vintaj Natural Brass Harvest Grapes Pendant
from Rings & Things
Pink Resin Butterfly Cameo
from Beads Direct
Fruit Colors Glass Rondelles
from Auntie's Beads
Indian Pink Swarovski Elements Wild Heart Pendant
from BlueMud
Cobalt Blue AB 8/0 Delicas
from Fire Mountain Gems
Fire Agate Round Beads
from Happy Mango Beads
Retro Copper Pin Up Girl Beads
from Baubles and Beads
Golden Rod Yellow Lucite Scallop Shell Beads
from The Beadin' Path
Brown and Seafoam Handmade Lampwork Cylinder Beads
by Juliyamr on ArtFire.com
What's your favorite new bead product of the year?
Copyright 2011 Inspirational Beading and Friends
Subscribe to Inspirational Beading