The traditional stitch begins with a simple two-needle weave. The length of the base section isn’t altered much by the addition of the chevron stitches, so there’s no need to predict the finished length of the beadwork - it will closely match the length of the base that you create. When working the two-needle base, keep a mat or pin cushion nearby to hold your needles between stitches.
The basic steps are very straightforward, and become intuitive almost immediately. We’ll work with 2-color palettes for clarity, but once you understand the basic steps, using a single color or more complex pattern is easy.
To Weave a Traditional Russian Chevron Chain
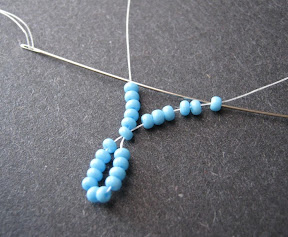
Cut a comfortable length of beading thread, about 2 yards, and thread a needle on each end. Pick up 12 color A seed beads, and center them on the thread. Use one needle to stitch up through the first bead added. Pull snug to form a small loop.

With one needle, pick up 6 A, then secure the needle on your bead mat or pin cushion. With the other needle, pick up 5 A, and stitch up through the last bead added on the other thread. When you pull snug, you should have a round cluster of seed beads, with five on each thread and a single shared bead on top.

Continue adding groups of 6 and 5 beads and connecting them this way, until the chain reaches the desired length. There is no need to use a specific needle for either the 5 or 6 bead pick-ups. In fact, it saves time if you alternate each time, using the needle that stitches through the shared bead to pick up the next set of six. Be careful not to tangle the threads as you work by keeping the resting thread secure and straight.

When you have added your last cluster in the chain, pick up 12 or more color A. If you are making a bracelet or necklace strap, you can make the final loop large enough to fit over a toggle clasp or button. Stitch through the last shared bead added and pull snug to form the final loop.

Stitch through the next 3 beads in the final cluster of the chain. Your thread should be exiting from the center-most bead of one side of the cluster. Pick up 7 Color B beads, and stitch through the 3rd A and the following A. Pull snug to form a little loop of new beads.

Stitch through the first 3 B pick up and pull snug. Pick up 1 B, and stitch through the 3rd (center) A bead of the next cluster in the chain. Pull tight, and the first chevron embellishment is complete. You are now in position to start the next one: pick up 7 B, and stitch through the 3rd and 4th A.

Continue working along the chain until you reach the end. Stitch the single B to the 3rd A of the final cluster, and weave in the thread.
Flip the beadwork, and pick up the second thread. Pass through the final loop, exit from the 3rd bead on the bare side of the chain, and pull snug. Add chevron stitches along this side of the chain and you’re done!


Single Needle Chevron Chain Base
The two-needle variation is incredibly fiddly and it takes a long time to work up the base. While the ease of the chevron stitches makes up for this, you can speed things up further by using a single-needle approach.
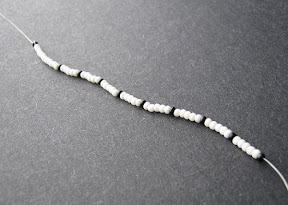
Cut a comfortable length of thread, and secure a needle on one end. Center a stop bead on the thread, and stitch through it again to lock it in place. Pick up 12 seed beads, followed by groups of 6 until you reach the desired length. (You can also use a pattern of 1 A and 5 B to make the second row easier).

Add the final loop of seed beads - making it clasp-sized if desired - then stitch back up through the last 4 beads added before the final loop. Pull snug, and attach stop bead if desired to prevent loss of tension.

Thread a needle on the tail and remove the stop bead. Skipping the first 12 beads, stitch through the first shared bead in the chain and pull snug to form the base loop.
Pick up 5 beads, and stitch through the 6th bead in the chain. Continue adding 5 beads at a time until you reach the end. Pass through the final loop, and exit from the 3rd (center) bead of the last cluster added, opposite from the first thread.

You’re now ready to add the chevron stitches as normal. The pattern repeats: pick up 7, stitch through 2, stitch through 3, pick up 1, stitch through 1.
To increase the size of the chevron chain, add more beads to the base loops - still sharing only one bead each, and so that the beads on either thread have an odd number. The first set of beads picked up for the chevron stitch should be equal to the non-shared beads in the chain, plus 2. For example, if the base chain has loops of 7 non-shared A beads, you should pick up 9 B for the chevron stitches.

Happy beading!
Copyright 2013 Inspirational Beading
Subscribe to Inspirational Beading
Get inspired on Facebook and Google+


thank you for sharing.. :)
ReplyDeleteI'm going to try it right now :) You've explained it so good that I'm eager to try it :) Thank You!
ReplyDeleteThat's a new one on me. Thank you for the great tutorial.
ReplyDeleteI love how you do you tutorials. Thank you so much.
ReplyDeleteThanks Jeneen!
DeleteSuch a great tutorial! This reminds me of Saraguro weave, which works in one step.
ReplyDeleteThanks, Diana! I'm glad that you like it. It's a fussy but totally worth it stitch.
Delete