

The mixture of opaque and transparent glass reminded me so much of vintage toys, especially those pictured in search-and-find books like I Spy. I wanted to capture those elements in a necklace, using little more than a handful of colorful druks. For this project you can use any found object or toy-themed focal that you like, such as a drilled die or domino tile. Since I didn’t have a suitable toy pendant, I made my own bead-covered bead with a classic rubber ball pattern.
For the druks I combined the most marble-like colors that I had including: opaque red, white, black, and yellow; transparent brown, purple, green, and blue. You’ll need about 48 druks. For the beadwork I used amber horn rondelles, lustered rootbeer 8/o’s, and transparent medium topaz 11/o’s - all for a golden look to represent old clockwork toys, but any metallic-looking hue will do. Last but not least you’ll need some beading thread and a button of your choice.

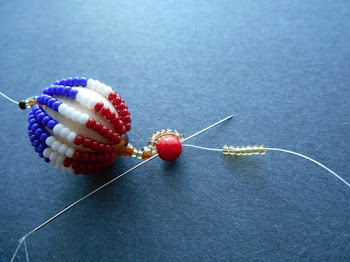
1. Attach a stop bead to a comfortable length of thread, leaving a 10 inch tail. Pick up one 11/o, one 8/o, one rondelle, your focal, one rondelle, one 8/o, and, two 11/o. Add one 8/o, one 11/o, one druk, and seven 11/o.

2. Stitch up through the druk bead again, and gently pull snug to wrap the last seven beads around the outside of the druk. Pick up seven 11/o, and stitch up through the druk again to add a second loop of beads around the outside.


3. Pick up one 11/o, one 8/o, one 11/o, and one druk. Repeat step 2, and continue the pattern to add a total of six druks with double loops of seed beads.

4. Pick up one 11/o, one 8/o, four rondelles, one 8/o, one 11/o, and one druk. Repeat the druk pattern again, adding seed bead loops and rondelles until the strand reaches half of your desired necklace length, less one inch. Be sure to add at least one druk with loops at the end of your strand to make a secure finish, ending with an 8/o seed bead.


5. Pick up enough 11/o seed beads to make a loop for you button. Stitch back down through the last 8/o added, and through the following beads to exit from the bottom of the last druk added. Weave up through one of the seed bead loops and back into the clasp area. Pass through the clasp loop at least once to add strength, then weave any remaining thread into the chain and trim.


6. Remove the stop bead from step one, and pass up through the 8/o, rondelle, and focal bead. Weave the thread into the chain and trim.


7. Attach a stop bead to a new length of thread, leaving a 10 inch tail. Skipping the 11/o, stitch up through the bottom beads and the focal, and exit from the topmost 8/o. Repeat the steps above to add a second chain of druks and rondelles. You can make a mirrored pattern, or go freeform –either way looks great! Attach your button with a few seed beads at the end, then weave in all remain thread and trim.

Though the palette would be a little less gold, you could also make this necklace with stringing wire and crimps for a super fast gift project. A single strand design would also allow for a side-drilled pendant. If you're working with a found object that can't be drilled, you could give it a wire-wrapped a bail.
Do you have a favorite found object theme for jewelry?
Mortira
Subscribe * Facebook * Google+
Send your beading questions to InspirationalBeading@gmail.com
Support Inspirational Beading for bonus tutorials and more!
Copyright 2015 Inspirational Beading
Love the burst of colors!!
ReplyDeleteThank you! It was so much fun searching for just the right druks to get the effect I wanted, though the design would work with just about any colors.
Delete