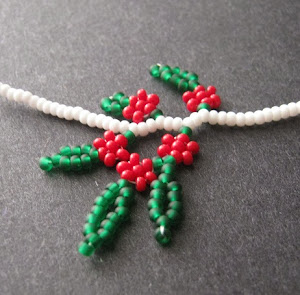
Today’s tutorial uses the same concept to create festive looks from simple techniques. The combination of daisy chain and leaf fringe provides an easy way to embellish holiday projects or dress up a Christmas necklace. You can start with a simple strand of seed beads or a beadwork base, such as a bracelet or necklace in your favorite rope stitch. Then all you need are size 11/o seed beads in bright red and dark green.
To Create Christmas Holly Fringe:
Attach a stop bead to a comfortable length of thread, and weave into your base, exiting from the point where you would like to begin adding berries. To start the simplest holly motif, pick up 1 green and 6 red beads, and slide them down to the work.
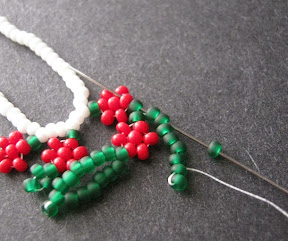
Stitch up through the first red bead added, and carefully pull snug to form the beginning of a daisy cluster, making sure that the beads are tight against the base. Pick up 1 red bead, and stitch through the fourth beaded added in the cluster, directly above the one your thread is exiting. Press the new bead into place at the center of the ‘berry’ and pull snug.


Pick up 6 green beads and slide them down to the work. Skipping the last bead added, pass down through the fifth bead and pull snug. Pick up 3 green beads, and stitch back through the first green added in the previous step, and the following red bead. Pull snug to form a leaf. Weave back through the first berry and into the base, exiting from the next start point.


You can create different looks by changing up the pattern and proportions of your berries. Add a picot instead of a leaf by picking up just 4 green beads, and stitching back through the first one again. Nudge the beads into the picot shape and pull the thread snug before weaving back through the work.
Make larger leaves simply by picking up more green beads in the first step. Subtract this number by three to get enough beads to form the other half of the leaf in the second stitch.


Create larger clusters of berries by adding them in a daisy chain, with 2 or more green beads in between for anchoring leaves to. You can extend these leaves away from the berries by adding 2 or more extra beads as a stem.
This combination of daisies and leaves works great for flower projects, naturally, as well as other inspirations. Try using yellow, orange, and green beads (with a contrasting leaf color) to make citrus trees!
Copyright 2013 Inspirational Beading
Subscribe to Inspirational Beading
Get inspired on Facebook and Google+


Very nice. Easy to do but would make a lot of texture to a piece. Thanks for sharing
ReplyDeleteNicole/Beadwright
That is adorable for my little granddaughters!!
ReplyDeleteLove this. Thank you for sharing. Thought process churning now. :)
ReplyDeleteUn diseño muy sencillo pero espectacular. Lo pongo en mis trabajos pendientes. Muchas gracias por compartir. Un saludo
ReplyDelete