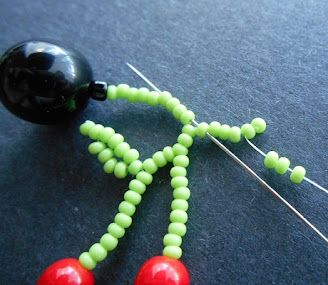
You will need:
2 black 8-10mm round beads
2 black 4mm heishi or spacers
4 black 8/o seed beads
4 or more red 6mm rounds
4 or more red 11/o seed beads to match
a few grams each green and black 11/o seed beads
2 jumprings and/or earwires
Size D beading thread such as Nymo
1. Attach a stop bead to 1 yard of stretched and conditioned thread, leaving a 6 inch (15 cm) tail. Pick up 1 8/o seed bead, 1 spacer, 1 8-10mm bead, and 1 8/o bead. Slide them down to the end.

2. Pick up green 11/o seed beads in multiples of three until the strand reaches the desired length for your earring – at least 30 beads are needed for the fringe base, but you can go as long as you like. Add 1 red 6mm round, and 1 red 11/o. Skipping the red 11/o, stitch back up through the round bead and the following 9 green seed beads. Pull snug, making sure there is no slack in the strand.
3. Pick up 7 green seed beads. Skipping the last bead added, stitch back through the 6th bead and pull snug.

4. Pick up 4 green seed beads, and stitch back through the first bead added in the previous step, plus the following three beads in the main strand, moving towards the black round. Pull snug to form a leaf stitch.
5. Pick up green seed beads in multiples of three until you have a second ‘stem’ of the desired length. You can make it longer or shorter than the first cherry stem – whatever looks good to you. Add a red round and seed bead. Skipping the red seed bead, stitch back through all of the beads just added, and the following 3 beads in the main strand. Pull snug.
6. Pick up 7 green seed beads and add a second leaf stitch (steps 3 and 4). Stitch back up through the remaining beads in the main strand, and all of the black beads. Pull snug.

7. Pick up 9 black seed beads. Stitch back down through all of the black beads in the base to form a loop at the top of the beadwork. If desired, string on an ear wire or soldered jump ring before securing the loop.

8. Pick up green seed beads in multiples of three to begin a second cherry fringe. Repeat steps 2-6, making your fringes as long or as short as you like. Weave through the black seed bead loop at least once more to add strength, then secure any remaining thread in the fringe and trim.
9. Add jump rings and ear wires as desired, then repeat all of the steps to make a second earring.
Happy beading!
Mortira
Subscribe * Facebook * Google+
Send your beading questions to InspirationalBeading@gmail.com
Support Inspirational Beading for bonus tutorials and more!
Copyright 2016 Inspirational Beading


No comments:
Post a Comment