
Circular peyote works in much the same way as flat peyote, but as the outer circumference of the beadwork increases with each round, adjustments to bead count are made throughout a piece to maintain a flat circle. It can take some practice to learn the best way to fill in the gaps in your 'up beads', and getting a feel for how the beadwork wants to form. One of the major differences between circular and flat peyote is that the stitching is continuous - there's no flipping the beadwork and adding a new row in a straight line. The rounds just keep growing and flowing.
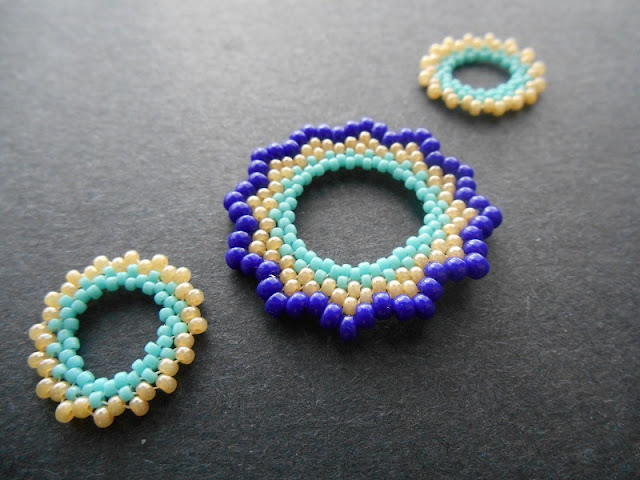
In this example piece, I’ve used size 11/o Japanese round seed beads to get a nice, neat beaded medallion. I definitely recommend using Japanese rounds to practice so that you’ll get stitches of equal size each time. Try using a different color for each round in your first practice piece to help you see your stitches more clearly. Working peyote stitch in the round with an even-count start requires a step-up, so it’s important to keep track of what you’ve stitched.
Basic Circular Peyote Stitch:
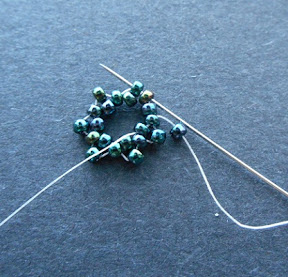
1. Thread a needle on about 1 yard of beading thread or line. Pick up 14 seed beads and slide them down to the end. Stitch up through the first few beads again and pull snug to form a ring, leaving about a 6 inch (15 cm) tail.
Many instructions will direct you to attach a stop bead before beginning circular or tubular peyote, or to tie the thread in a square knot to form the base loop. My personal preference (when working with size 11 seed beads or smaller) is to secure the thread in the beads without any knotting, so that there is some wiggle room. This greatly helps with tension and will prevent buckling as you add additional rounds. Alternatively, if you’re starting with size 8/o or larger, a knot can help maintain tension by preventing the beads from sliding around as you work.
2. Pass through all of the remaining beads, a few at a time, and continue through the first few beads again. Pull the thread snug after each stitch until you have a neat ring of beads.

3. Pick up 1 seed bead. Skipping the next bead in the round, stitch through the following bead, and pull snug. You may need to nudge the new bead into place so that it rests side-by-side with the corresponding bead in the ring. Pull the thread snug again before continuing.

4. Pick up 1 seed bead. Skipping the next bead in the ring, stitch through the following bead and pull snug. Repeat all the way around the ring, until you have added a total of 7 beads to this round.

When adding the final (7th) bead, you will need to step up to complete the round and bring the thread in place to start the next round: stitch through the appropriate bead in the ring to add the final bead, and continue through the first bead added in this round, which will be a raised ‘up bead’.
5. In order to maintain a flat piece of beadwork, rather than a tube, you will need to fill the gaps between the ‘up beads’ as much as possible. In any given project, the number of beads will vary depending on the type of beads that you are using, the number of beads used in the base ring, and the number of rounds already added. You can eyeball the gaps, then pick up a few beads with your needle and hold them up to the space. When in doubt, always go with fewer beads as they will fall into place naturally – more beads can give you bumpy or warped beadwork if the fit isn’t true.

For this round, pick up 2 seed beads, and stitch through the nearest raised bead (the 2nd bead added in the previous round). Pull the thread just snug enough to lock the beads in place.
6. Continue adding 2 beads per stitch for the rest of the round, passing through the raised beads. In the 7th stitch, you will need to step up: pass through the final raised bead of the previous round, and the 1st 2-bead stitch added in this round.
7. Add 1 bead per stitch in the next round, passing through the 2 raised up beads of the previous round. If you’ve been using a different color each time in your practice piece, they should stand out nicely for you.
Step up through 3 beads to finish the round.

8. In the next round, add 3 beads per stitch, passing through the raised up beads from the previous round. At the end of this round, you will need to step up through 4 beads.
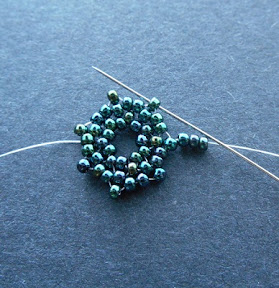
Be sure to maintain light, even tension as you work. Pulling too much on the thread can cause the beadwork to pucker as it tries to cinch up and form a tube.
9. In the next round, add 2 beads per stitch, passing through each set of 3 raised beads from the previous round.

Continue adding rounds as desired until you medallion has the desired size and shape. The number of beads needed to span each gap will increase as you work – remember to favor fewer beads when gauging each new round of stitches.
The number of rounds that you add will determine whether your beadwork has a rounded shape, or a star-like shape with the raised beads forming points. Once you’ve mastered the technique, you can experiment with the different patterns that form naturally in the beadwork.
You can also incorporate different bead sizes into circular peyote for a variety of effects. For our practice project, I’ve created a variation of the Red Stone Pendant from the Ancient Rome chapter of Ancient Worlds Modern Beads, and the Cherry Blossom Pendant from the cover of the UK edition of Jane Lock’s The Art of Beadwork. It is one of my all-time favorite designs because of the way that the circular peyote medallions create negative space, and the woven connectors provide a fun way to play with your seed beads.
To create our necklace you’ll need a few grams each of size 15/o, 11/o and 8/o seed beads in any colors you like. You’ll also need 4 round 6mm beads to match your 8/o seed beads, and a clasp or button of your choice.
Asymmetrical Medallion Necklace:
1. Thread a needle on 1 yard of beading thread , and pick up 32 size 15/o seed beads. Slide them down to the end, and stitch through the first few beads again, leaving about a 4 inch tail. Pass through all of the remaining beads and continue through the first few beads again to form a ring.

2. Work 1 round of circular peyote stitch, adding 1 size 15/o seed bead per stitch. Step up at the end of the round.

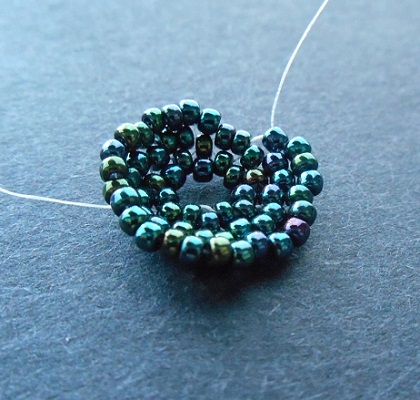
3. Work 1 round of circular peyote stitch using 1 size 11/o bead per stitch, and step up at the end of the round. (Disregard the dropped stitch in the photo – be sure to add an 11/o seed bead to each 15/o up bead of the previous round.)

4. Work a final round of circular peyote with 11/o seed beads. Weave around the outside rounds to secure the thread, then trim. Repeat steps 1-4 with the remaining thread to make a second medallion.
5. Thread a needle on a new 1 yard length of thread. Pick up 48 size 15/o seed beads and stitch them into a ring. Work 1 round of circular peyote stitch with size 15/o seed beads, followed by 2 rounds of size 11/o seed beads. Keep your tension even as you work, and flatten the beadwork with your fingers as necessary if it starts to curl.
6. In the next round, add 1 size 11/o seed bead in the first stitch. Add 1 size 8/o seed bead in the next stitch. Repeat around the ring, alternating between 11/o and 8/o beads for the remainder of the round. Step up through the first 11/o.

7. In the next round, add 1 size 8/o seed bead in each stitch, and step up through and 8/o, then pass through the following 2 size 8/o beads.

8. In the final round, you will only need to fill in the gaps between each set of three 8/o beads. Pick up 1 size 8/o seed bead, and pass through the following 3 8/o seed beads in the ring. Continue for the remainder of the round, then weave in any remaining thread and trim.

9. Using your size 11/o and 15/o seed beads, create 2 beaded chains – one 4 inches long, and one 10 inches long. Do not weave in the threads. I’ve used single St. Petersburg chain, but you could also use spiral rope or another favorite stitch.
10. Remove the stop bead from one of your beaded chains. Pick up 1 size 11/o, 1 size 8/o, 1 round bead, 1 size 8/o, 20 size 11/o, an 8/o, a round bead, and an 8/o. String on one of your small circular peyote medallions.
11. Pass through one of the outermost size 8/o seed beads on the edge of the large circular peyote medallion. Pull snug and pass through a few more 8/o beads in the edge.
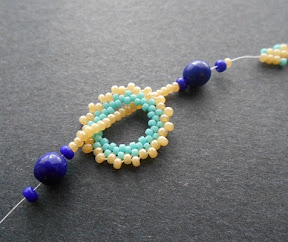
12. Turn the thread around by weaving back through the 11/o rounds, then turn again and weave through the 8/o beads to exit from the same bead you started from in the previous step. Your thread should be moving in the opposite direction. (Depending on the length of your threads, you could also weave all the way around the 8/o edge and skip the turnaround.)

13. Stitch up into the 8/o and round bead section again. Exit from the 2nd 8/o seed bead and pick up 20 size 11/o.

14. Lay your small medallion across the first set of 20 seed beads so that it passes under and over. Pass the needle through the medallion over and under so that the 2 strands capture the medallion between them.
15. Stitch through the 8/o beads and round bead, then continue into your beaded chain. Secure any remaining thread in the beadwork and trim.

16. Repeat steps 10-15 again with the second beaded chain, connecting your strand to the opposite side of the large medallion. Finish the chains and add a clasp as desired.
Once you’ve had a chance to play and experiment with circular peyote, you’ll have the necessary know-how to advance to even more complex peyote variations. One of the most popular ways to use circular peyote technique is for making gorgeous beaded bezels. We’ll cover this technique in an upcoming Master Class for further practice, then move on to tubes.
Mortira
Subscribe * Facebook * Google+
Send your beading questions to InspirationalBeading@gmail.com
Support Inspirational Beading for bonus tutorials and more!
Copyright 2016 Inspirational Beading








Thanks for the tutorial Mortira. Vanessa
ReplyDeleteWhat a super tutorial! I love your necklace designs too. There is a certain openness and lightness about them that I love! Will share on my blog!
ReplyDelete