Sunday, January 17, 2016

Jewelry Resolution Update

When I made my New Year’s resolution to wear more jewelry, I didn’t really think much about my methods for achieving that goal – so long as I was putting on a piece or two every day, I’d be winning. As I started to look at mixing and matching pieces in new ways, I decided it would be a fun challenge to quarantine everything I’d worn and work my way through the entire stash a bracelet and necklace at a time. Not only would this give me a chance to wear some of my oft-forgotten designs, but I would have to make some interesting choices in how to mix pieces with each other, and my wardrobe.

Jewelry Stash Out-box


So far things are going really well, and at this rate I’ll probably be through the stash in no time. It’s a bit difficult to set aside some of my favorite pieces – especially the ones that I already use to combine and bring together different designs. I can’t promise that I won’t cheat and pull out some essentials here and there when I need a dash of something or other.

Chevron Flowers and Fish Leather Pendant


The first combination that I wore was my new floral chevron bracelet and a fish leather pendant. Normally I don’t worry much about matching color in accessories, but I like the way the reds connect these two pieces together. I'm a little sad to be putting the pendant aside as it's one of my go-to pieces when I just want to throw something on and run out the door. It goes with basically everything and it's a really fun piece to wear.

Some days I kept it simple with just a cuff or a pendant. Other days I want to experiment. A few times I went with old stand-bys.

Stacking Bracelets Ensemble


I really like to wear a big stack of bracelets whenever I’m in a fun mood, or when I’m wearing a top that doesn’t work with a necklace. I always start with 3 or 4 simple stretch bracelets and an ombre crochet chain wrap. Then I layer on some petite bangles, and maybe a leather cord bracelet. I’ve already used this combo twice, so I’m running low on options. Soon I’ll have to discover new combinations from the bottom of my bracelet box.

Scarab and St. Petersburg Layered Necklaces


One of my favorite new combinations so far was a German glass scarab pendant with a super long St.Petersburg chain necklace. When doubled or trebled, the chain creates an awesome cascade look. With the scarab at the center it looks even better. Once again this combo has a few hints of similar hues, so it really comes together.


At some point I’ll have to transfer the ‘used’ jewelry to a new location, as my current out-box gets filled up. This will give me an opportunity to really reorganize my collection, so that’s a nice bonus.

Are you sticking to your creative resolutions? What’s your biggest success so far?

Mortira

Subscribe * Facebook * Google+
Send your beading questions to InspirationalBeading@gmail.com
Support Inspirational Beading for bonus tutorials and more!

Copyright 2016 Inspirational Beading


Saturday, January 16, 2016

Seed Bead Aught Size Comparisons

Seed Bead Aught Sizing

The aught sizing system is probably one of the things that frustrates new beaders the most, along with the first few rows of peyote stitch. Although it’s easy enough to remember that the larger the number, the smaller the bead, even seasoned beaders can get confused sometimes. After working with beads for a while, we start to associate their aught numbers to them and all is fine, until we come across a size that we don’t use very often. While I was putting this post together, I had a moment where I couldn’t remember if 7/o comes before or after 8/o.

The word aught – meaning null, or nothing – is sometimes used to size things that are smaller or larger than standard. A product might come in sizes with regular integers as well as aughts. Seed beads are always and – as far as we know – have always been sized entirely with aughts. Though it’s not completely confirmed, the general story is that each size refers to how many beads will fit into an inch when lined up side by side, with the holes facing up. If true, that rule was created many, many decades ago. Although the overall process for making seed beads hasn’t changed much, standards have, and there are a lot more seed bead makers in the world today.

I decided to test out the aught sizing theory, and compare how each bead size measures up to an inch, as well as each other. I gathered one color of each size in every brand I had available, and counted out the quantities to match each – fifteen 15/os, eight 8/os, etc.


TOHO 15/o


I wasn’t surprised that the 15/os didn’t quite measure up. To be honest, I wasn’t expecting any of the beads to match their size exactly. What’s interesting is just how close these beads came to making the full inch length. Spoiler alert: almost no other bead sizes came quite as close.


Preciosa 11/o and Toho 11/o


Another interesting development was that all of the 11/o seed beads came in at almost exactly the same length. The TOHOs are a little bit longer, which isn’t surprising since they tend to be a bit on the bulky side. Otherwise these seed beads were all pretty much the same when lined up this way, even though they can seem drastically different in actual beadwork.


Matsuno 11/o and Delica 11/o


I included 11/o Delicas in the test, even though they are sized by a completely different scale than round seed beads or rocailles. I thought it would be interesting to see the difference, and since I happen to have some, why not? It’s interesting to see just how diminutive they are next to round seed beads of the same size.


Vintage Czech 10/o and Matsuno Dyna-mites 8/o


I only had white-hearts in size 10/o, and I wish that I had a few more styles to test out. After only 3 sizes, a pattern seems to emerge. Except for the Delicas, each size seems to get progressively further away from the 1 inch length as we go up. What makes this very interesting is that these particular 10/o seed beads are vintage – which could mean that bead sizes haven’t changed much in the past 50 years or so. It makes one wonder just when the 1 inch standard fell by the wayside.


Preciosa 8/o and TOHO 8/o


The 8/o seed beads sort of smashed the reduction trend, as each brand came pretty close to the 1 inch mark. Unlike all of the other sizes so far, there was less than a full bead’s length left to fill. Once again, all 3 brands came in at almost exactly the same length.
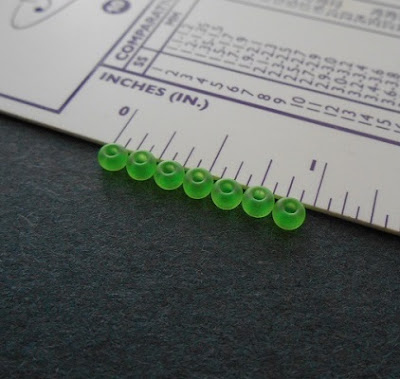

Preciosa 7/o and TOHO 6/o


The 7/o beads so far have the record for being the closest match. It almost seems that the shrinking trend in the smaller beads has reversed for the larger ones. The inconsistency seems to make the entire theory of aught sizing origins rather unusual. Imagine what our seed beads would look like if they all followed the 1-inch standard!

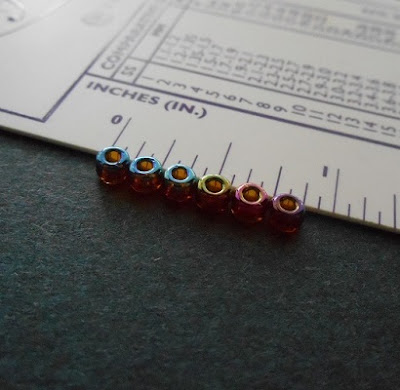
Preciosa 6/o and Matsuno Dyna-mites 6/o


Finally we have the 6/o seed beads. This group was the only one with a noticeable size difference between brands. It could be argued that accuracy is more important with the smaller bead sizes, as they tend to be used in large quantities at close quarters. On the other hand, it’s really hard to make a nice Cellini spiral if your 6/o beads are way too big.

How did you feel about aught sizing when you started beadweaving? Which size is your favorite?

Mortira

Subscribe * Facebook * Google+
Send your beading questions to InspirationalBeading@gmail.com
Support Inspirational Beading for bonus tutorials and more!

Copyright 2016 Inspirational Beading


Friday, January 15, 2016

Beading Tutorial: Daisy Chevron Chain

Chevron Chain Collar with Daisies

Chevron chain is a surprisingly versatile stitch, considering how simple and delicate that it can be. The unique way that the beads link up allow for lots of variation, including adding two-hole beads, or creating a floral pattern. One of my favorite ways to enhance a simple chevron chain is to incorporate daisy chain stitches. It’s also a reader favorite, and a tutorial for this technique has been requested many times. To get ahead of springtime inspirations, here at last is the method for adding daisies to a chevron collar.

You don't need to be familiar with chevron chain to try this technique, but some practice with classic daisy chain might be helpful. It's important to make sure that the daisy stitches are as snug as possible to get a smooth, cohesive look in the beadwork.

For this tutorial, we’re using 11/o seed beads in classic white and yellow for the daisies, and turquoise blue for the chain. Once you’ve mastered the basics of the stitch, you can add additional patterns to the chevron chain for a variety of looks. Don’t be afraid to mix up your floral colors, too!

1. Attach a stop bead to a comfortable length of beading thread, leaving about an 8 inch tail. Pick up 19 blue seed beads. Slide them down to the stop bead, and stitch down through the first 3 beads again. Pull snug to form a teardrop shape.


2. Pick up 11 blue seed beads. Skipping the 3 beads that you just stitched through, and the previous 3 beads in the teardrop, stitch up through the next set of 3 beads and pull snug. (These are beads 16-14 from the first step).

3. Pick up 10 blue seed beads. Stitch down through beads 6-8 from the previous step and pull snug.
With any variation of chevron chain, it helps to think of the pattern as having 6 segments. In the first stitch we set up these 6 segments, then add 3 more with each additional stitch. Every segment in this project contains 3 beads, except for the top and bottom edge, which contain 4 and 5 beads, respectively.


4. Pick up 1 blue and 6 white seed beads. Slide them down to the beadwork, then carefully stitch back up through the 1st white bead added. Pull as snug as you can to form a small loop of white seed beads.

5. Pick up 1 yellow seed bead. Carefully stitch up through the 4th white seed bead picked up in the previous step. As you pull the thread snug, let the yellow bead click into place in the center of the white ring.


6. Pick up 7 blue seed beads, and stitch up through the center 3 beads of the last downward stitch in the chain.

7. Repeat step 3 to add 10 beads in a downward stitch. Add 11 blue beads in an upward stitch, followed by another 10-bead stitch. Repeat steps 4 and 5 to add a new daisy.


8. Continue the pattern, adding a daisy on every second upward stitch, until your chain reaches the desired length.


The daisy chain segments roughly match the length of the plain 5-bead segments on the bottom row, because the center of each daisy contains 3 beads, and we're adding a blue on each side. With only 4 beads in each of the segments of the top row, this will create a gentle curve that is perfect for collars. To eliminate the curve, use 11 beads in every plain stitch – you could also alternate daisies on both sides of the chain for a pretty bracelet.

Mortira

Subscribe * Facebook * Google+
Send your beading questions to InspirationalBeading@gmail.com
Support Inspirational Beading for bonus tutorials and more!

Copyright 2016 Inspirational Beading


Thursday, January 14, 2016

Work in Progress: Interim RAW

It’s been a long week of not much beading here in my workspace. The two tutorial projects that I’ve been working on are stalled while I wait for time and sunlight to get the next round of photos in. So I’ve mostly been adding new rows to the culled bead RAW monstrosity.

The RAW is coming along really nicely, although I’ve barely made a dent in my collection of culled beads. Hopefully this means that I’ll be able to go forward with the design that I have planned. I’m hoping I’ll be able to add at least another 15 inches or so of beadwork before the next stage.

Culled Bead Right Angle Weave in Progress


I’ve been adding larger beads like 8/o’s and TOHO triangles to the edges here and there, but they’re starting to pile up nonetheless. I’ll probably end up having a bead cup to capture the larger beads as they start to take up too much space. I’ll be able to incorporate them into stage two when it’s time to add embellishments and such.

One thing that I’ve noticed during this project that hasn’t come up before is how much more obvious nylon tail threads are compared to Fireline. Because the thread is so much softer, it always seems to be in the way. As this swatch of right angle weave has grown, I’ve been stopping every few additions to weave in old tails. Normally I would just leave them all in place and weave everything in at the end, but that just isn’t an option here.

What are you working on this week?

Mortira

Subscribe * Facebook * Google+
Send your beading questions to InspirationalBeading@gmail.com
Support Inspirational Beading for bonus tutorials and more!

Copyright 2016 Inspirational Beading


Monday, January 11, 2016

Time Capsule: Beading Challenges

January is a time for looking forward, but it’s also a great opportunity to look back. Perhaps it’s best to just look over your shoulder as you move ahead to new things, but reflection is definitely a healthy exercise. When I looked back at what was happening three years ago this month on Inspirational Beading, I was surprised to discover that it was the start of the Egyptian Gods jewelry challenge.


Geb and Bast Egyptian Designs


Even though I could have done the math without looking and known that this challenge began 3 years ago, it was still a bit of a shock to discover just how long it’s been since I took on that exciting journey of inspiration. When I look back through some of my favorite designs from the series, I find that they are still inspiring me to this day.

One important thing I did discover is that I’m not feeling the same amount of excitement and inspiration for my current challenge theme. I’m having the hardest time trying to fit my favorite geek characters and ideas into the type of beadwork that I like to do. It’s just not working, and I think I’m going to pack in the Geekspiration challenge and look for something new to broaden my repertoire with. I might get an idea for the series here or there, but I'm going to focus most of my creativity elsewhere for now.


Donna and Aurra Designs


The good news is that I’ll probably be able to get new projects ready for the Master Class series even faster than I thought. I’ve been a bit limited by work schedules and the sun’s winter timetable, but I should have the first installment ready soon. After that, who knows what inspirations await?

Have you ever had a great beading idea fizzle out before completion? What did you take away from the experience?

Mortira

Subscribe * Facebook * Google+
Send your beading questions to InspirationalBeading@gmail.com
Support Inspirational Beading for bonus tutorials and more!

Copyright 2015 Inspirational Beading


Blog Widget by LinkWithin
Fire Mountain Gems and Beads

Inspiration Topics

accessories amulet Ancient Worlds Modern Beads animals April's Army art ArtFire astrology astronomy autumn awards awareness bangle beach Bead Inspired Bead Shops bead soup bead spotlight bead stash Bead Trays beaded beads beading theory beads belt bezel birthstones black blog spotlight blue boho bone book spotlight bracelet Bracelet A Week branch fringe brick stitch brown bugles buttons cabochon ceramic chain maille challenge charity chevron chain christmas collar Collections color Color Ideas color triads conservation craft shows crafts crochet crystals cuff Culled Beads current events Current Faves daggers Daily Sets daisy chain Delicas Destash drops Dutch spiral earrings Egypt Egyptian Gods embellishing embroidery environment etsy exotic fair trade fantasy fashion Favorite Beads Favorite Techniques feminine fibers film findings fire polish fixtures Flashback Test flickr inspiration flowers food found object free form fringe Geek Jewels geekery gemstones geography giveaway glass gold gray Greece green herringbone hex cuts history holiday home decor insects inspiration tip inspired beader Inspired by... Inspiring Links ivory Jewelry Stash knitting ladder stitch lampwork lariat leaf fringe leather lights literature loomwork macrame magatamas Master Class Medallions metal free metalwork Mini Collar a Week mixed media mixture Mood Board MOP multi-color multi-strand music natural beads nature necklace Necklace a Day Nepal chain netting New Beads ocean ombre orange paint paper patterns pearls pendant peyote photography Picasso finish pink Pinspiration PMC polymer clay poster sketch purple quick inspiration rainbow RAW red resin ring Ring a Day rivoli Rome Russian spiral scarf science seed beads shell silver soutache spiral rope spring square stitch St. Petersburg steampunk stringing stripes summer tagua TBT The Elements thread Tilas Time Capsule tools trade beads triangle weave tribal tropical turquoise tutorial two-hole beads Ugly vintage Wear it Twice weather white winter WIP wire wishlist wood World Beaders yellow
Blog Home * About * Beading Tutorials * Advertise

Learn About Sponsoring Inspirational Beading with Project Wonderful
Affiliated With ShareASale.com and Amazon.com