Showing posts with label square stitch. Show all posts

Tuesday, April 12, 2016

Sailing Away Earring Tutorial

Sailing Away Silhoutte Fringe Earring Tutorial

For many beaders, there are few things more fun and satisfying than whipping up a pair of fringed brick stitch earrings. The classic design is easy to make and offers lots of fun possibilities for pattern and color play. You can create all kinds of variation within the fringe by tapering, adding drop beads, or incorporating a pattern. This week I discovered that brick stitch earrings are also a great backdrop for silhouettes.

In the nautical-themed March bead box from Blueberry Cove Beads, subscribers got so many wonderful treasures, including a lovely packet of wooden cut-out charms with a sailboat motif. I was totally taken with these pretties instantly because they would go so well with my favorite tagua-slice-and-St.Petersburg necklace design. Front-drilled charms and pendants are great for layering as a unique focal. However, since the charms came in pairs – two each in white, pale blue, and navy – I decided to experiment with earring designs instead, and the Sailing Away earrings were born.

Lightweight wooden beads and charms are ideal for earrings, and are a great way to add oomph without making earrings too heavy. You could also use tagua nut slices, shell charms, or mini pendants.

To create these earrings you’ll need a few grams of 11/o seed beads in three colors, and one matching 8/o seed bead color. You’ll also need some lightweight front-drilled charms or pendants, like the sailboat cut-outs, jumprings, and earring findings. For the example project I used an ocean sunset palette of orange, purple, and navy blue, but any color trio would look great!


Sailing Away Silhouette Fringe Earrings

1. Attach a stop bead to 2 yards (1.8 m) of beading thread, leaving a 6 inch (15cm) tail. Pick up 6 seed beads and slide them down to the end.


2. Working in square stitch, add 6 rows of beadwork for a total of seven vertical columns of beads.

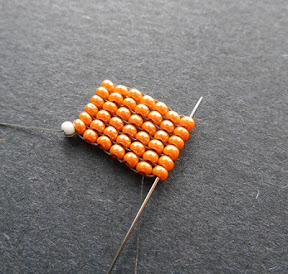
3. Anchor the thread by stitching down through the 6th column, and back up through the 7th column again.

4. Pick up 2 seed beads. Skipping the nearest bridge of thread between the top beads, needle under the following bridge, moving towards you. Gently pull the thread snug to bring the new beads into place along the top of the beadwork.


5. Stitch up through the 2nd bead just added and pull snug, being careful not to cross or splice the threads.

6. Pick up 1 seed bead. Pass the needle under the next thread bridge at the top of the beadwork and pull snug. Stitch up through the new bead.


7. Repeat step 6 until you reach the end of the beadwork and all of the bridge threads are covered. Stitch up through the last bead added. Flip the beadwork to start the new row.


8. Repeat steps 4-7 until you have a row with just 2 beads. Pick up 1 size 8/o seed bead, and 13 size 11/o seed beads.


9. Stitch back down through the 8/o and into the opposite brick-stitch bead in the final row to secure the loop.

10. Pass down through the beads at the edge of the brick stitch section and all of the beads in the outer square stitch column.


11. Anchor the thread by stitch up through a few beads in the next column, then back down through the same number of beads in the outer column to exit from the bottom. Leave the working thread for now.

12. Remove the stop bead from the tail thread and weave it into the beadwork, passing through the loop section at least once to add strength. Trim.

13. Pick up the working thread again. String about 3cm of size 11/o seed beads, 1 size 8/o seed bead, and a size 11/o.


14. Skipping the last bead picked up, stitch up through the 8/o seed bead and the rest of the strand. Stitch up through a few beads in the square stitch section, then down through the same number of beads in the next column. Check the tension on the fringe.


15. Continue adding strands of fringe, tapering as desired, until you have 7 strands.


16. Weave up into the center of the brick stitch section. Pick up a silhouette charm and 2 size 11/o seed beads. Skipping the 2nd bead added, pass back through the 1st seed bead and the charm, and needle through to the back of the beadwork. Pull snug.


17. Working from the back of the beadwork, stitch through the nearest seed bead. Weave around to retrace the thread path through the charm, then secure any remaining thread and trim.

18. Attach a jump ring and ear wire to the loop. Repeat to make a second matching earring.

Brick Stitch Silhouette Earring Tutorial


Happy beading!

Mortira

I would like to thank Blueberry Cove Beads for giving me the chance to try out the Nautical Bead Box. Inspiration Beading has not received compensation for including products in this post.

Subscribe * Facebook * Google+
Send your beading questions to InspirationalBeading@gmail.com
Support Inspirational Beading for bonus tutorials and more!

Copyright 2016 Inspirational Beading


Thursday, March 31, 2016

Square Stitch Patchwork Cuff Tutorial

Square Stitch Patchwork Cuff Tutorial

No matter how elaborate beadwork stitches become, or how many holes are added to seed beads, sometimes only simplicity will do. For this month’s project I wanted to do something that was super easy but with a bold look – a project that would be a fun way to play with color but also provide some meditative beadwork.

This square stitch cuff is a great way to practice one of beadweaving’s simplest techniques. Square stitch is very handy if you like the look of loomwork but don’t want to go to all the trouble of setting up a loom and then weaving in your warp threads. Once you've mastered the basics, the pattern possibilities are endless. You can easily create your own unique patterns using graph paper and colored pencils.

To make this cuff you’ll need some size D beading thread of your choice, a clasp or button, and about 30 (total) grams of seed beads in at least 8 colors. I recommend using Japanese round seed beads (preferably of similar make and finish) to get a nice, even bracelet. The boxiness of Japanese rounds is a great match for the patchwork pattern. Have fun choosing your palette. I went with a handful of similar shades in different finishes, but you could also use a chromatic palette with black and white, ROYGBIV +1, or whatever colors you have on hand.

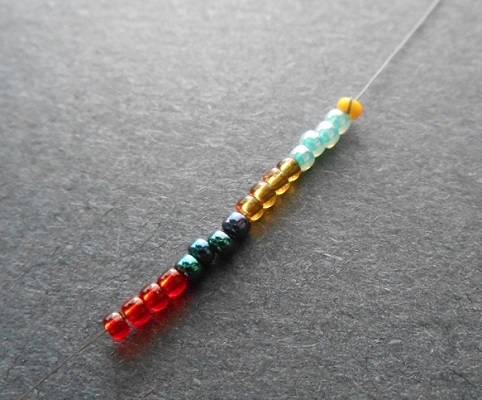
1. Attach a stop bead to a comfortable length of thread, leaving a 12 inch tail. Pick up 4 each of your first 4 seed bead colors (A, B, C, D) and slide them down to the end. Flip the work so that the stop bead is pointing away from you.


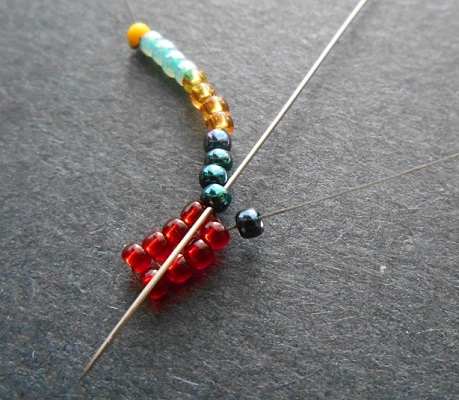
2. Pick up 1 color D bead. Stitch down through the last bead added in step one, and carefully pull the thread snug so that the new bead clicks into place beside it. Stitch up through the new bead again and pull snug.


3. Pick up 1 color D bead. Stitch down through the next color D bead in the first row and pull snug to click the new bead into place. Stitch up through the new bead and pull snug.


4. Continue adding one bead at a time with square stitch, matching the color of bead picked up to the bead you will stitch it to in the previous row.


5. To start the next row, flip the beadwork and pick up 1 color A bead. Stitch down through the last bead added in the previous row, and up through the new bead again.


6. Continue adding beads with square stitch until you have 4 rows in the A, B, C, D color pattern, creating a ‘set’ of 4 colored blocks. In the fifth row, add 4 new colors and add 3 more rows to create a second set of blocks in the new colors.


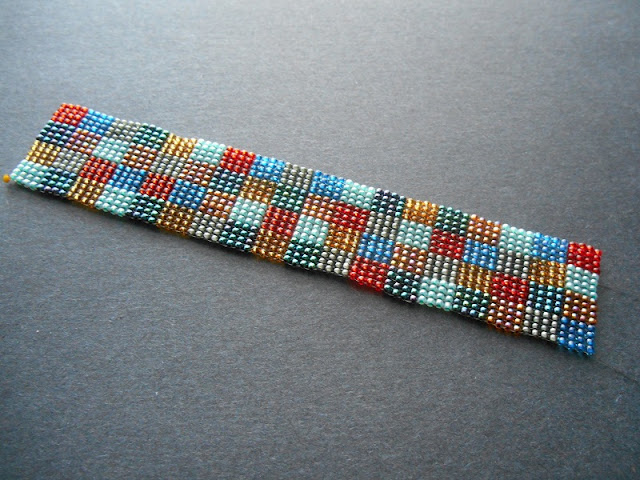
7. Continue weaving with square stitch, adding thread as needed, until the cuff is about 1 cm short of the desired length. To get the random look for my cuff, I staggered the colors after the first 2 sets. In the second set, I used three new colors, and one color from the previous set. I repeated this method for the remaining sets of blocks.

Square Stitch Patchwork Cuff Project


Before starting each set, I selected one bead each from the colors that I wanted to use, and placed them next to the beadwork so that I could map out their placement beforehand. No two blocks of the same color touch at the sides or corners, and I tried to avoid letting similar colors touch at the sides, top, or bottom. For example, topaz never touches red-lined topaz, and metallic blue never touches black-lined blue or metallic green.

8. To finish the cuff with a button or toggle, weave back through the second-to-last row to anchor the thread, then pass through the first 6 beads of the third row.


9. Pick up 5 seed beads to match the block that your thread is exiting. String on your clasp, and add 5 beads to match the next block in the set. Enter the beadwork, passing through the last 6 beads of the row and pull snug. Weave back through the clasp at least once more to add strength, then secure any remaining thread in the beadwork and trim.


10. Remove the stop bead from the original thread and repeat step 9 to position the thread four rows back. Add a loop of seed beads just big enough to wrap around your button or toggle. Use two colors to match the corresponding blocks.


The cuff looks fabulous as is, but there’s plenty of room for embellishing. Try sewing heishi beads to the center of blocks at random or in a pattern. You can also add a trim to the bridge threads at the cuff edges.

How to Weave a Square Stitch Cuff


Happy beading!

Mortira

Subscribe * Facebook * Google+
Send your beading questions to InspirationalBeading@gmail.com
Support Inspirational Beading for bonus tutorials and more!

Copyright 2016 Inspirational Beading


Tuesday, March 22, 2016

Work in Progress: All the Things

My bead tray looks like an absolute disaster this week as I juggle multiple tutorial projects and a few designs on the side. The new medallion took a back seat over the weekend so that I could get started on some new tutorials while I had time for photography. I decided to go ahead and start a bunch of upcoming projects at once, and now they’re taking over my workspace. I’m so close to finishing one of them that I don’t want to bother putting away all of the beads only to take them all out again. The trouble with tutorials is that I can only work on them so much during nighttime beading. When it’s time to take the next step-by-step photo, everything gets paused.

Square Stitch and Herringbone Tutorials in Progress


Hopefully I’ll be able to finish one of these projects in time to share the instructions with you next week. One is going to be a new PDF tutorial, and there’s a third project that I didn’t include here because it’s a big surprise. After that, it’ll be time to start on the next installment of our peyote stitch Master Class – circular peyote.

What are you making right now?

Mortira

Subscribe * Facebook * Google+
Send your beading questions to InspirationalBeading@gmail.com
Support Inspirational Beading for bonus tutorials and more!

Copyright 2016 Inspirational Beading


Monday, January 20, 2014

Work in Progress: A Million Tail Threads

I’m only one or two beading sessions away from completing the beadwork on Thoth’s collar. Normally I would have stopped to weave in a few threads by now, but I want to make sure that all of the rows get a chance for extra thread, so I’ve been saving them all until the end. This technique eats up thread so quickly that I almost can’t see the beads through all the tails.

Egyptian Stripe Collar in Progress


Converting the simple and structured wavy bracelet into a collar proved to be much more difficult than I originally thought it would be. I started out with a template that I traced from an existing collar, and diligently measured and checked to make sure that I was using the right quantities of beads to get the shape that I wanted. Even with all of that fussing things still went sideways, but I think it’s all going to work out anyway.

What are you working on this week?

Copyright 2014 Inspirational Beading
Subscribe to Inspirational Beading
Get inspired on Facebook and Google+


Monday, September 10, 2012

Beading Tutorial: Square Stitch Trim

Bead Embroidery Pendant with Square Stitch Trim

For every beading stitch and project style, there is a variety of finishing techniques that give a piece a professional look, while also providing extra durability. Protecting beadwork with an appropriate trim adds a little personality, and covers up the exposed threads.

One of my favorite techniques for finishing beadwork is a variation of square stitch. Although it takes a little extra time to weave, square stitch trim uses fewer beads than picots or fringe, and provides a nice, smooth edge. You can add this finishing technique to any beadwork with bridge threads along the edge, like peyote or herringbone, but I find it looks best with curved beadwork such as circular brick stitch. Square stitch worked in the round this way is very compact and strong - it also creates a base for extra embellishing, or seed bead bails for pendants.

Because it works so well on curves, I love to use square stitch to finish bead embroidery projects as well. This stitch is perfect for simultaneously zipping up two or more pieces of embroidery material, while adding a clean edge to the design. It can be worked with any seed bead size, and nearly any project shape, so long as there are no tight turns.

To Add Square Stitch Trim to Embroidery Projects:

Secure a comfortable length of thread at the back of the embroidery, and exit from the edge of the beadwork. Gluing your backing to the embroidery piece is a personal preference, but make sure to leave a bit of space along the edge for securing new threads as needed.

Adding Trim to Bead Embroidery Square Stitch Trim Tutorial How to Finish Bead Embroidery with Square Stitch


Pick up one seed bead, and bring the needle through the backing and embroidery from back to front. Pull the thread snug, and stitch up through the bead just added.

Pick up one seed bead, and stitch through the material from back to front, just above the previous bead. Pull snug, and stitch up through the bead just added. Spacing is key - if your latest stitch is too close or far away from the previous bead, remove the needle from the thread and pull out the stitch, then try again.

Square Stitch Trim Tutorial Embellishing with Square Stitch Bead Embroidery Finishing Technique


Continue adding one bead at a time with square stitch, all the way around the edge. You can alternate bead sizes, or create patterns as you go. Always make sure that you stitch close to the edge, but with plenty of room to keep the thread secure - check the work from both sides.

Adding Trim to Bead Embroidery Securing Embroidery Thread with Travelling Stitch


When you come around to the first bead again, pass through all of the edge beads to secure them. You can trim the thread here, or use traveling stitch to enter the embroidery and secure the thread within the main beadwork. Adding a small additional row of square stitch provides the perfect base to string the embroidery as a pendant. You can also add a loop of seed beads to a single edge bead for a basic bail.

What’s your favorite way to finish embroidery projects?

Copyright 2012 Inspirational Beading
Subscribe to Inspirational Beading
Get inspired on Facebook and Google+


Blog Widget by LinkWithin
Fire Mountain Gems and Beads

Inspiration Topics

accessories amulet Ancient Worlds Modern Beads animals April's Army art ArtFire astrology astronomy autumn awards awareness bangle beach Bead Inspired Bead Shops bead soup bead spotlight bead stash Bead Trays beaded beads beading theory beads belt bezel birthstones black blog spotlight blue boho bone book spotlight bracelet Bracelet A Week branch fringe brick stitch brown bugles buttons cabochon ceramic chain maille challenge charity chevron chain christmas collar Collections color Color Ideas color triads conservation craft shows crafts crochet crystals cuff Culled Beads current events Current Faves daggers Daily Sets daisy chain Delicas Destash drops Dutch spiral earrings Egypt Egyptian Gods embellishing embroidery environment etsy exotic fair trade fantasy fashion Favorite Beads Favorite Techniques feminine fibers film findings fire polish fixtures Flashback Test flickr inspiration flowers food found object free form fringe Geek Jewels geekery gemstones geography giveaway glass gold gray Greece green herringbone hex cuts history holiday home decor insects inspiration tip inspired beader Inspired by... Inspiring Links ivory Jewelry Stash knitting ladder stitch lampwork lariat leaf fringe leather lights literature loomwork macrame magatamas Master Class Medallions metal free metalwork Mini Collar a Week mixed media mixture Mood Board MOP multi-color multi-strand music natural beads nature necklace Necklace a Day Nepal chain netting New Beads ocean ombre orange paint paper patterns pearls pendant peyote photography Picasso finish pink Pinspiration PMC polymer clay poster sketch purple quick inspiration rainbow RAW red resin ring Ring a Day rivoli Rome Russian spiral scarf science seed beads shell silver soutache spiral rope spring square stitch St. Petersburg steampunk stringing stripes summer tagua TBT The Elements thread Tilas Time Capsule tools trade beads triangle weave tribal tropical turquoise tutorial two-hole beads Ugly vintage Wear it Twice weather white winter WIP wire wishlist wood World Beaders yellow
Blog Home * About * Beading Tutorials * Advertise

Learn About Sponsoring Inspirational Beading with Project Wonderful
Affiliated With ShareASale.com and Amazon.com