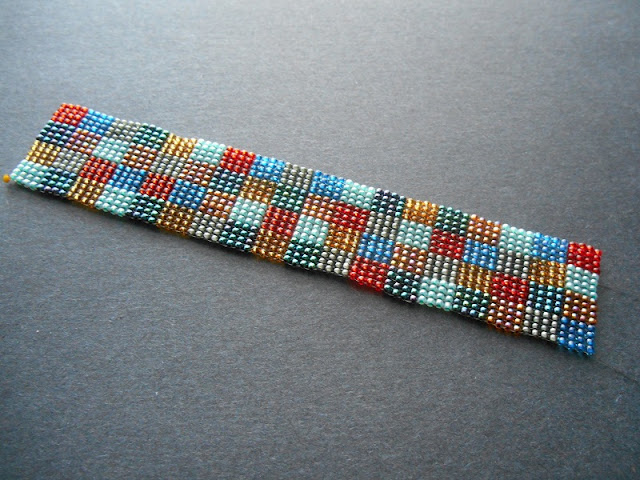
This square stitch cuff is a great way to practice one of beadweaving’s simplest techniques. Square stitch is very handy if you like the look of loomwork but don’t want to go to all the trouble of setting up a loom and then weaving in your warp threads. Once you've mastered the basics, the pattern possibilities are endless. You can easily create your own unique patterns using graph paper and colored pencils.
To make this cuff you’ll need some size D beading thread of your choice, a clasp or button, and about 30 (total) grams of seed beads in at least 8 colors. I recommend using Japanese round seed beads (preferably of similar make and finish) to get a nice, even bracelet. The boxiness of Japanese rounds is a great match for the patchwork pattern. Have fun choosing your palette. I went with a handful of similar shades in different finishes, but you could also use a chromatic palette with black and white, ROYGBIV +1, or whatever colors you have on hand.
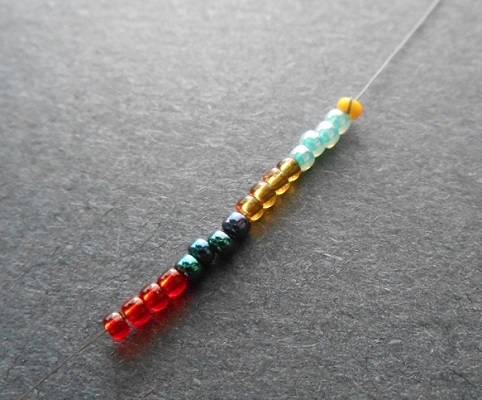
1. Attach a stop bead to a comfortable length of thread, leaving a 12 inch tail. Pick up 4 each of your first 4 seed bead colors (A, B, C, D) and slide them down to the end. Flip the work so that the stop bead is pointing away from you.
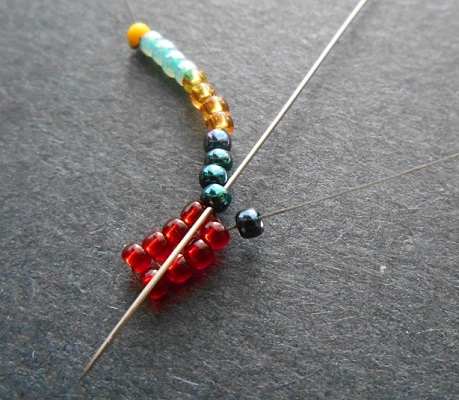
2. Pick up 1 color D bead. Stitch down through the last bead added in step one, and carefully pull the thread snug so that the new bead clicks into place beside it. Stitch up through the new bead again and pull snug.

3. Pick up 1 color D bead. Stitch down through the next color D bead in the first row and pull snug to click the new bead into place. Stitch up through the new bead and pull snug.

4. Continue adding one bead at a time with square stitch, matching the color of bead picked up to the bead you will stitch it to in the previous row.
5. To start the next row, flip the beadwork and pick up 1 color A bead. Stitch down through the last bead added in the previous row, and up through the new bead again.

6. Continue adding beads with square stitch until you have 4 rows in the A, B, C, D color pattern, creating a ‘set’ of 4 colored blocks. In the fifth row, add 4 new colors and add 3 more rows to create a second set of blocks in the new colors.

7. Continue weaving with square stitch, adding thread as needed, until the cuff is about 1 cm short of the desired length. To get the random look for my cuff, I staggered the colors after the first 2 sets. In the second set, I used three new colors, and one color from the previous set. I repeated this method for the remaining sets of blocks.
Before starting each set, I selected one bead each from the colors that I wanted to use, and placed them next to the beadwork so that I could map out their placement beforehand. No two blocks of the same color touch at the sides or corners, and I tried to avoid letting similar colors touch at the sides, top, or bottom. For example, topaz never touches red-lined topaz, and metallic blue never touches black-lined blue or metallic green.
8. To finish the cuff with a button or toggle, weave back through the second-to-last row to anchor the thread, then pass through the first 6 beads of the third row.

9. Pick up 5 seed beads to match the block that your thread is exiting. String on your clasp, and add 5 beads to match the next block in the set. Enter the beadwork, passing through the last 6 beads of the row and pull snug. Weave back through the clasp at least once more to add strength, then secure any remaining thread in the beadwork and trim.

10. Remove the stop bead from the original thread and repeat step 9 to position the thread four rows back. Add a loop of seed beads just big enough to wrap around your button or toggle. Use two colors to match the corresponding blocks.

The cuff looks fabulous as is, but there’s plenty of room for embellishing. Try sewing heishi beads to the center of blocks at random or in a pattern. You can also add a trim to the bridge threads at the cuff edges.
Happy beading!
Mortira
Subscribe * Facebook * Google+
Send your beading questions to InspirationalBeading@gmail.com
Support Inspirational Beading for bonus tutorials and more!
Copyright 2016 Inspirational Beading


Beautiful........rhythmic, meditative, and peaceful. Thank you.
ReplyDeleteThis is really pretty. Light and summery.
ReplyDeleteLove this!!!! I would wear it for sure!! I need to bookmark this one as well!!! Thanks for sharing again!!!
ReplyDeleteWhat a fun tutorial and design! I love how other crafts inspire jewelry makers! Will definitely share on my blog so others can come visit!!
ReplyDeleteThanks, Pearl! It's a very fun project when all you wanna do is play with color.
Delete