Showing posts with label ombre. Show all posts

Sunday, January 31, 2016

How to Mix and Use Bead Soups

How to Mix Bead Soups

There’s something wonderfully enticing about a mixture of beads. The combination of colors and shapes all playing together before the beadwork has even begun can be so much more inspiring than a single seed bead color. Bead soups are an excellent source of creative juice, not to mention a great way to experiment with new colors, or use up leftover beads.

One of the best ways to create a gorgeous bead soup is to hand select colors and shapes that work well together, as well as with your favorite techniques. A lot of bead sellers create their own custom mixes and blends, so the work of building a palette is done for you. If you want to experiment with concocting your own bead soup recipes, leftover beads are a great way to play with colors.

Starting with a single color is a good way to play it safe and see what your beads can do. You can mix together similar hues and shades to get a wonderful monochrome palette of ready-to-use seed beads. It’s a good idea to keep track of how much you’re adding with each new color, especially if you already have a project in mind. This way you can get a good balance of shades and be sure you’ll have enough beads to complete your design. If you’re not sure how your mix will turn out, start with a few grams of each color and add a dash of this-and-that until you get the perfect blend.

Blue Seed Bead Soup
Mix together seed beads of different sizes for texture.


Blue is a great color for bead soups because you can combine almost any number of shades together and they’ll still look great. Turquoise, aqua, cobalt, indigo…they all play well together. When planning your soup, try placing the beads you want to use together before mixing, to see how different finishes will look. Sometimes transparent, lined, or matte looks great when mingled, but different finishes can dramatically affect how other colors look.

Green Seed Bead Soup
Shaped seed beads are great in soups.


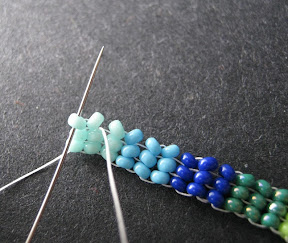
This green mix is a great example of too many shades. The mint and lime beads would look wonderful paired with the emerald. When all three come together, they clash. One way to salvage this soup would be to add some yellow or blue. This would allow either the mint or lime to attach itself visually to the new color, leaving the other to pair off with emerald.

Red Bead Soup
Try adding accents of similar sizes and shapes to start.


You can add accent beads directly to your bead soups. This is a great way to build a palette for freeform peyote, multistrand pieces, or bead embroidery. Depending on your project, you may want to go for a small range of sizes (from 3 to 6 mm), or add a handful of chunkier pieces. This is another great way to use up odds and ends in your bead stash.

Sandy Bead Soup Bead Soup Herringbone Stitch
Bead soups look great with freeform stitches and motifs.


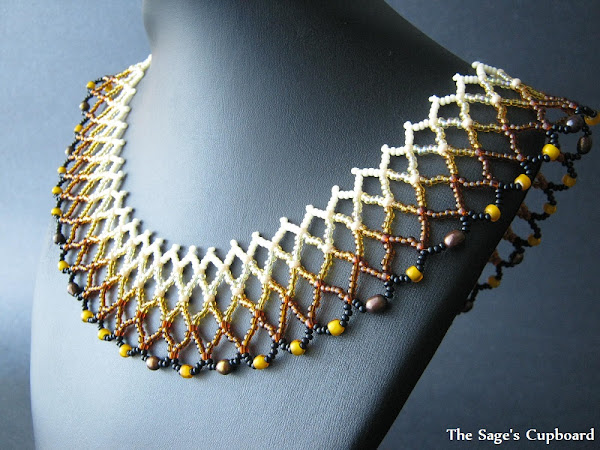
Blending similar hues together can work out really well. This mix combines neutrals and a variety of warm tones for a sandy look. Starting with a base of neutrals (white, black, grey or beige) and then adding a few highlights is a great way to experiment with mixing colors.

Ombre Bead Soup Palette Ombre Multistrand Design
Bead soups are great for multistrand and fringe projects.


You can also use multiple bead soups in a single design. To create an ombré effect, create two bead soups with colors that are close together on the color wheel, or use one all-neutral palette. Remove one third of each soup and mix those thirds together to create an additional blend. Alternate between the three soups to gradually change the look and color of your beadwork.

If you're not using a bead spinner or stringing multiple beads at once, it can be tricky to find a truly random groove. When working with mixes, I like to pour out a portion of soup onto my workspace, then pinch a few grams into a line that I can choose from. By moving steadily through this row of beads, I can be sure that I'm not favoring a color or creating a pattern instinctively.

Do you like to mix your beads together? What’s your favorite bead soup palette?

Mortira

Subscribe * Facebook * Google+
Send your beading questions to InspirationalBeading@gmail.com
Support Inspirational Beading for bonus tutorials and more!

Copyright 2016 Inspirational Beading


Thursday, September 10, 2015

Work in Progress: Medallion and Ombre

Things are happening in my workspace this week, although there are a lot of them all at once and they’re all going really slowly so it feels like not much is happening at all. I’ve finished the new cuff and make a pretty big dent in my leftover seed beads, but I still have to weave in all the tails. The new medallion is started, but I still haven’t passed the first two color choices yet. Once I’ve finished added the green triangles we’ll add another layer.

Medallion and Ombre Bracelet in Progress


I’m also working on a couple of special tutorial projects with fall themes, including some veggie-inspired ombré and something candy inspired. More on those later!

What are you making right now?

Copyright 2015 Inspirational Beading
Subscribe to Inspirational Beading
Get inspired on Facebook and Google+


Thursday, July 10, 2014

Work in Progress: Ocean Ombre

Is there anything more lovely than a bunch of seed bead hanks all in a row? This week I’m starting a new blue-green ombre project, this time with all transparent colors. It was a little tricky putting the palette together, because I wanted seed beads of the same make, and I was under a bit of a timeline for sourcing the supplies. I’ve had to make up the palette with only 8 colors, although I would have preferred at least ten. In any case, I’ll be able to create a pattern that flows seamlessly back and forth from blue to green, and that will do just fine.

Ombre Seed Bead Jewelry in Progress


The new pharaoh pendant way in the background is a few rounds in. After all the fussing we had over making sure to save enough hot pink seed beads, they might not have ended up in the design at all if I hadn’t given a little nudge. Sometimes it’s difficult not to give any input on my helper’s choices, because I have to take the overall design into consideration - how well the beads will fit in smaller curves, or how many more rounds a design can take before getting too large. We’re both pretty happy with this design so far, even if it’s a lot different from what we imagined in the beginning.

What are you working on this week?

Copyright 2014 Inspirational Beading
Subscribe to Inspirational Beading
Get inspired on Facebook and Google+


Wednesday, January 8, 2014

Spring Jewelry Colors: Part One

Pantone Colors by Jackie Fraser-Swan

One of the best things about changing seasons is the abundance of inspiration that comes along with it. With spring just around the corner, now is a great time to start planning fun summer jewelry designs and color palettes. Before too long, butterflies and flowers will be our muses again!

This year I want to try something a little different with jewelry and fashion collages inspired by the spring color picks from Pantone. I’m always really intrigued by the designers’ sketches using the signature colors for women’s fashion, and this time around I’ll be using them as a springboard for jewelry ensembles, rather than dividing the season’s palette into separate trios.

To start things off right, this week I’m working with a palette including the Color of the Year, Radiant Orchid. This trio and sketch was created by Jackie Fraser-Swan, and also includes 2014 colors Hemlock and Violet Tulip. I was instantly drawn to the print dress with hints of lime green, not to mention the challenge of blending these three colors together for two different outfits with the same jewels.

A gorgeous multistrand necklace is perfect for just about any outfit, and I couldn’t resist going with the Hemlock hues of green opal. I didn’t find a dress that was quite as stunning as Jackie’s, but the purple print crepe dress I came across was a great substitute. On the other side of the scale I chose jeans and a simple top with a really fun orchid jacket. It was difficult to locate pieces with the same dusty blue as Violet Tulip, and I found the palette was really calling out for more blues. A few splashes here and there really helped to ground the very airy greens and purples.

Spring Radiant


Here are some fun jewelry tutorials to try for a similar look:

Pastel Braid Bracelet Tutorial


Pastel Braid Bracelet Tutorial by Into Mind

Tahitian Blue Café Romance Necklace Project by FusionBeads.com

Three Strand Stone Necklace by Crafts Unleashed

DIY Pastel Neon Crystal Bib Necklace by A Girl, A Style

Multilayer Spring Necklace Project by Runway Hippie

Timeless Turquoise Bracelet Tutorial by Artbeads.com

Swarovski Elements Butterfly Earrings by Fire Mountain Gems

And my favorite Polyvore collages featuring this week’s picks:

Demeter


Untitled #7


Something Quick For a Breezy Tuesday


Are you getting ready for spring designs? Which colors do you turn to for pretty pastel jewelry?

Copyright 2014 Inspirational Beading
Pantone and Jackie Fraser-Swan
Collages Hosted by Polyvore.com
Subscribe to Inspirational Beading
Get inspired on Facebook and Google+


Wednesday, December 11, 2013

Work in Progress: Breezy Lariat

The ombre project for the Egyptian God Shu is coming along slowly but surely. Beading time is always pinched down to a minimum at this time of year, but I’m getting in as much as I can. After choosing colors for this piece last week, I decided to go with simplicity and make a lariat for Shu. I concluded that the extra long beadwork allow the palette to really shine, and I could use the striped beads for fringe.

Ombre Lariat in Progress


It took six or seven attempts to get the pattern just right. I tried several different ways of blending the colors, and even switched from Capri blue Czech beads to cobalt Miyukis, but there was far too much contrast between them and the aqua. I finally had to give up and work the pattern without dark blue, but it may still make an appearance in the tassels.

The previous Egyptian Gods piece, Sekhmet turned out fabulous. I’ll need to set aside some time to get her posted as well!

Sekhmet the Lioness Collar


What are you working on this week?

Copyright 2013 Inspirational Beading
Subscribe to Inspirational Beading
Get inspired on Facebook and Google+


Wednesday, December 4, 2013

Work in Progress: Ombre Air

This week’s bead tray is covered in beads, as I’m just starting the planning stages for a new Egyptian Gods design. So far all I know is that it will be ombre, and that the seed bead palette will come as close as I can get it to match a strand of deliciously striped Indonesian glass beads. I can’t wait to get started!

The palette of whites, blues, and creams is inspired by Shu, the Egyptian god of air. I actually started with the seed beads, and realized that if I added a touch of topaz, the palette would be perfect for my striped beads. How could I resist?

Pale Ombre Beadwork in Progress


What are you working on this week?

Copyright 2013 Inspirational Beading
Subscribe to Inspirational Beading
Get inspired on Facebook and Google+


Monday, September 2, 2013

Embellished Ombre Herringbone Cuff Tutorial

Embellished Ombre Herringbone Cuff

There’s nothing quite like a beaded cuff to show off the marvel of tiny seed beads. With the right combination of colors and stitches, you can have a bold and beautiful bracelet that fits like fabric. The only thing that can make a beadwork cuff even better is the addition of some choice accent beads.

This project combines the visual appeal of an ombre palette with the added texture and delight of disc bead accents. We’ll also explore an easy way to attach clasps to beadwork that can be applied to a variety of stitches.

Materials:

11/o seed beads in 6 colors
4 or more 6-8 mm disc beads
4 or more flat heishi beads or 8/o seed beads
Beading thread
A button or toggle (beaded or purchased)

To make an ombre herringbone cuff:

Start by arranging your seed bead colors from dark to light, or warm to cool. You can use 6 different shades of one color, or blend from one color to another. Try placing your bead packages in different positions until you get a pattern that is has a pleasing ombre look.

Two Bead Ladder Herringbone Weave Start


I like to start herringbone weave with a two-bead ladder, but you can also start with a single-bead ladder, or use the Ndebele technique. Check out the Twisted Tubular Herringbone Tutorial for full instructions on making a two-bead ladder.

Begin with 3 columns of each color in your chosen pattern, so that you have 18 columns in all. Step up to begin the first row of herringbone weave: stitch up through the bead next to where your thread is exiting, and up through the last bead in the top of the ladder.


Pick up two seed beads - making sure that they match the first and second columns below - and stitch down into the first bead next to where you thread is exiting. Pull snug so that the beads lock into place side-by-side. Stitch up through the next bead in the row below and pull tight.

Continue adding two beads at a time, matching them to the pattern, until you reach the end of the row. Remember to step up through the following base bead at the end of each stitch. You can work in whichever direction is most comfortable for you.

Ombre Herringbone Cuff Tutorial


After adding the final bead pair, pull the thread snug, and then step up to start the next row: Stitch up through the bead next to the one that your thread is exiting, then up through the last bead added in the previous row. Pull tight, and flip the beadwork over.

Flat Herringbone Step Up Technique


Continue adding rows of herringbone weave until the beadwork reaches the desired length, adding new thread as needed. You’ll need to allow a bit of length for the clasp - about half an inch or 1.5 cm. The clasp will overlap, so the final length is adjustable.

Once the final row is added, you can cinch up the beadwork so that both ends match: stitch a dummy row by following the herringbone thread path, but without picking up any beads. Step up through the second column from the end, and stitch up and down the top two rows to connect the remaining columns together. There should now be threads between each of the beads along the edge. Weave in your threads and trim.

Herringbone Dummy Stitch Technique


Add the bracelet clasp:

Secure a new length of thread in the beadwork, near one end. (If desired, add straight fringes to the edge of the beadwork using two or more beads of matching colors.) Exit from the 8th column, and pick up enough seed beads to form a loop that will fit your clasp. Stitch down into the beadwork through the 11th column and pull snug.

Retrace the thread path through the seed bead loop at least once more to strengthen. Continue adding fringes to the edge is desired, then weave in your thread and trim.

Finishing Flat Herringbone Weave How to Add a Seed Bead Clasp


Secure a new length of thread at the opposite end. Test the length of the bracelet, and determine where you would like the second half of your clasp to rest. Count back 3 beads, and exit from one of the center 2 columns at this point.

Pick up 3 matching seed beads, your clasp, and 3 beads to match the corresponding column in the cuff. Stitch into the beadwork, then retrace the thread path at least once more to secure the clasp. Add fringes to this side of the cuff, then weave in your thread and trim.

Adding a Clasp to Herringbone Weave Attaching a Clasp to a Beadwork Cuff


Embellish the cuff:

Arrange your disc beads on the cuff in a pattern you like. Take a picture or make a quick sketch if necessary. You can also add embellishments freeform for an organic look.

Secure a new length of thread near the point where you would like to add the first disc. Make sure that you are working from the same side as your button or toggle, so that the accents will face out! Weave through the beadwork and exit from your start point. Pick up one disc bead, one heishi or 8/o bead, and one seed bead to match the closest row in the cuff.

Embellished Herringbone Cuff Tutorial


Skipping the seed bead, pass through the larger two beads, and through the cuff below. Pull snug, making sure that there is no slack thread in the stack of accent beads. Pass through 2 seed beads from the underside of the beadwork, then two beads in an adjoining row - follow the herringbone thread path.

How to Embellish a Herringbone Cuff


Pass the needle between the beads, being careful not to snag any threads, and pass up through your accents. Stitch through the top seed bead, then back through the accents and into the beadwork again. Continue reinforcing the stitch until the accent beads are secure, then weave through the cuff until you’ve reached the next area where you would like to place a disc

Continue adding your accents, adding thread as needed. Weave in your threads, and you’re done!

There are so many fun color and pattern possibilities for this project. If you make a variation, share it on Facebook - I’d love to see what you come up with!


Copyright 2013 Inspirational Beading
Subscribe to Inspirational Beading
Get inspired on Facebook and Google+


Thursday, June 20, 2013

Blue Green Infinity Lariat

Often when we discover a new technique or material that we enjoy working with, it sticks. All of our ideas seem to steer towards this one concept, and the best thing is to embrace the inspiration and let it run its course. Right now, I’m hopelessly drawn to ombre. There’s something incredibly satisfying about the blending of colors with seed beads.

It took a long time to finally decide on the right technique for the Egyptian god of infinity, but I was certain early on the ombre had to be included. A blending of blues and greens was the perfect way to represent the frog god of eternity. I pulled out lots of colors, mixed them and arranged them, and eventually found a pattern that would allow the colors to flow continuously while repeating through a chevron chain lariat. Some of the colors are used more than once in the pattern, while others stand out from the crowd.

Heh Egyptian Infinity God Blue Green Ombre Palette


The fringe was another long time in the making. Originally I had wanted to use transparent lime and black, to make strands of frog spawn, but it didn’t seem to fit the rest of the design. Then I tried several different patterns and accents, all of them beginning with some Czech glass ovals in lime and turquoise Picasso. Once I had chosen some bright blue white hearts - in a pattern of threes to imitate the ovals’ spots - I still needed to figure out what I was going to do with the strands. Solid colors were too stark against the blended chevron chain, and it was clear that adding a new color wasn’t going to work. At last I decided to go with a default, and used four shades of existing blues and greens to make striped tassels.

Blue Green Ombre Lariat


I can’t decide if I’m finished with this obsession just yet, but I certainly wouldn’t mind trying out some different ombre palettes in the near future.

Copyright 2013 Inspirational Beading
Subscribe to Inspirational Beading
Get inspired on Facebook and Google+


Tuesday, June 11, 2013

Work in Progress: Ombre Lariat

The project underway on my bead tray this week took a long time to come together. I’m finally starting to move down the alphabet of Egyptian gods; when I got to H, for some lucky reason, I decided to do a little research on the god Heh, before starting in on the Nile deity Hapi. There are so many similarities in the characteristics of these gods, and I couldn’t decide which of the ideas floating through my head to use with each deity. Both have blues and greens, and natural elements. Heh is a frog, and Hapi is made of river plants. Any of the stitches and necklace styles I was thinking of would work for both.

Blue Green Ombre Chevron Lariat in Progress


When I thought of using a continuous ombre palette for Heh, things started to click together. This deity is the embodiment of infinity, so a pattern of blues and greens blending endlessly together seemed perfect. At first I wanted to do a necklace with no clasp, just one continuous chain of beadwork. Netting was my first choice, but then I wouldn’t be able to connect the ends for a seamless piece. So I started with a double spiral rope, with one side a color behind the other in the pattern. It was hideous. I took the beadwork apart and tried a plain spiral rope with a repeating pattern of accents at the center of each row. Terrible.

I finally had to give up on a piece that was connected end-to-end, and as soon as I did, the perfect idea came forward. A chevron chain lariat would provide the length I needed to really showcase the ombre palette, without using up outrageous amounts of each bead color. And I can finish the ends with some fun fringe. It’s taking a little longer than usual as I constantly rotate bead colors into my little cups and then replace them for the next color, but things are finally moving along.

Last week’s cuff bracelet came out really well. I had a long debate about whether I wanted to do a double clasp with such a wide edge to close, but I really didn’t want to go that route. I finally decided to add some extra heavy fringe to the ends and make them a little stiffer, so that they could support a single toggle.

Cobalt Lime Stripe Cuff


What are you working on this week?

Copyright 2013 Inspirational Beading
Subscribe to Inspirational Beading
Get inspired on Facebook and Google+


Wednesday, June 5, 2013

Lion Ombre Collar

One of the goals that I had when starting the Egyptian Gods series was to focus my designs, and cultivate a selection of pieces that had an Egyptian style. While it is difficult to mimic real Egyptian jewelry without using any metals, I’ve managed to find a sort of balance between the beadwork techniques that I like and the subjects I want to explore. Many of the Egyptian gods necklaces don’t look distinctly Egyptian, but they are starting to look very ‘me’.

Whenever I come across a deity that is difficult to dissect and reassemble as a necklace, I get to fall back on a design style that is rather Egyptian - the collar. This is the direction I took for the household god Bes. He’s a rather unusual character with lots of interesting attributes, most of which don’t translate well into beadwork. I finally decided to try and mimic his beard and lion features in a collar.

Bes the Dwarf-Lion God Bes the Lion Bead Palette


I chose an ombre palette of warm browns, then gathered up a selection of complementary accents. I was hoping to get an eclectic look, to represent the spirit that dances around the room to scare away demons and entertain babies. After I started stitching, I realized that the wooden beads were just to clunky for this design, so I stuck to the orange white-hearts and freshwater pearls.

Many of my recent collars have been very wide, and for this piece I wanted to shrink the netting a bit, so I reduced my usual pattern by one row. The ombre effect of the beiges and browns came out perfectly, although I was a little worried at first that the opaques would clash with the transparents. I’m also relieved that I decided against the wood beads, but I’m hoping a project idea will appear for them soon.

Bes the Lion Broad Collar


Copyright 2013 Inspirational Beading
Subscribe to Inspirational Beading
Get inspired on Facebook and Google+


Wednesday, March 20, 2013

Wear It Twice: Ombre

I’ve been working on a little side project using a blue-green ombre palette, and it has me craving more blends. Ombre is by far one of my favorite trends of late, because it works with any color, shape, or material you can think of. If you’re not familiar with it, ombre is the gradual blending of two colors. Think polymer clay Skinner blends, or dip-dyed silk. It can be one color blending into black or white, or a neighboring hue on the color wheel. No matter which combinations are used, it’s always gorgeous.

Fly Me Away


I started with a fun statement necklace using several shades of sea green, then added a dash of orange. A little lime to dance with the orange, and some browns to balance it all out, equals the perfect backdrop for colorful ombre jewelry.

If you want to give ombre palettes a try, here are some fun projects and tutorials.

Pearl and Mesh Ombre Necklace Tutorial by lemmemakeit

Pearl and Mesh Ombre Necklace Project by lemmemakeit


Ombre Drop Necklace Tutorial by Miss Lovie

DIY Ombre Fringe Necklace by Syl and Sam


Ombre - which comes from a romance word meaning "shaded" - is a big trend with DIY and fashion bloggers, but here are a few more ombre jewelry inspirations from fantastic jewelry artists. These pieces are great examples of how you can blend colors using your favorite materials, from seed beads to wire. Three or more colors is all you need - the more hues, the smoother the blend.

Silk Embroidery Blue Ombre Pendant by bstudio

Silk Embroidery Ombre Pendant by bstudio


African Violet Earrings by Design by JSG

Teal Crochet Ombre Necklace by boorashka

Waterfall Ombre Earrings by Intealect

Ombre Pleated Collar by tropicalkaren


Do you have a favorite variation of ombre? What types of beads do you use to create it?

Copyright 2013 Inspirational Beading and Friends
Subscribe to Inspirational Beading
Get inspired on Facebook and Google+


Blog Widget by LinkWithin
Fire Mountain Gems and Beads

Inspiration Topics

accessories amulet Ancient Worlds Modern Beads animals April's Army art ArtFire astrology astronomy autumn awards awareness bangle beach Bead Inspired Bead Shops bead soup bead spotlight bead stash Bead Trays beaded beads beading theory beads belt bezel birthstones black blog spotlight blue boho bone book spotlight bracelet Bracelet A Week branch fringe brick stitch brown bugles buttons cabochon ceramic chain maille challenge charity chevron chain christmas collar Collections color Color Ideas color triads conservation craft shows crafts crochet crystals cuff Culled Beads current events Current Faves daggers Daily Sets daisy chain Delicas Destash drops Dutch spiral earrings Egypt Egyptian Gods embellishing embroidery environment etsy exotic fair trade fantasy fashion Favorite Beads Favorite Techniques feminine fibers film findings fire polish fixtures Flashback Test flickr inspiration flowers food found object free form fringe Geek Jewels geekery gemstones geography giveaway glass gold gray Greece green herringbone hex cuts history holiday home decor insects inspiration tip inspired beader Inspired by... Inspiring Links ivory Jewelry Stash knitting ladder stitch lampwork lariat leaf fringe leather lights literature loomwork macrame magatamas Master Class Medallions metal free metalwork Mini Collar a Week mixed media mixture Mood Board MOP multi-color multi-strand music natural beads nature necklace Necklace a Day Nepal chain netting New Beads ocean ombre orange paint paper patterns pearls pendant peyote photography Picasso finish pink Pinspiration PMC polymer clay poster sketch purple quick inspiration rainbow RAW red resin ring Ring a Day rivoli Rome Russian spiral scarf science seed beads shell silver soutache spiral rope spring square stitch St. Petersburg steampunk stringing stripes summer tagua TBT The Elements thread Tilas Time Capsule tools trade beads triangle weave tribal tropical turquoise tutorial two-hole beads Ugly vintage Wear it Twice weather white winter WIP wire wishlist wood World Beaders yellow
Blog Home * About * Beading Tutorials * Advertise

Learn About Sponsoring Inspirational Beading with Project Wonderful
Affiliated With ShareASale.com and Amazon.com