Showing posts with label food. Show all posts

Thursday, September 1, 2016

Bees Heart Honey Necklace Tutorial

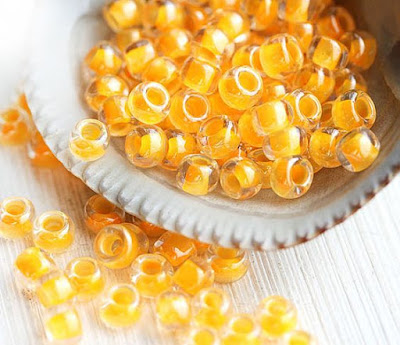
It’s the first day of September, which means that no matter how many more sunny days we may have to look forward to, it’s officially time to say goodbye to summer. With help from the Monochrome Bead Box from Blueberry Cove Beads, I decided to create a pretty necklace with a hint of summer colors, inspired by bees and honey.

Bees Heart Honey Necklace Tutorial

This asymmetrical design is super easy to stitch, and you can create it with just about anything that you’ve got in your stash. You’ll need two focal beads of similar shape and size to get the effect – otherwise you can mix and match any seed beads and round beads that you’ve got on hand. I’m using a pair of faux lava rock hearts from the Monochrome Box in black and white; accents of yellow and topaz bring out the summery honey bee vibe. Have fun experimenting with different palettes of your own!

Materials:

About 4 yards of Fireline or your favorite beading thread
2 x 18-25 mm focal beads
2 8mm rose beads
11 6mm druks
22 5mm howlite beads
44 size 8 seed beads (yellow)
26 size 8 seed beads (black)
4 grams size 11 seed beads
Button clasp of your choice


Bees Heart Honey Necklace:

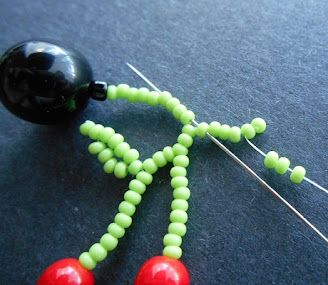
1. Attach a stop bead to a 2 yard (1.8 m) length of thread, leaving a 10 inch (25 cm) tail. String on one 11/o, one 8/o, one 5mm, one 8/o, and repeat. Add one 11/o, one 8/o, one 11/o and one druk. Slide all of the beads down to the stop bead.


2. Pick up 7 size 11/o seed beads, and pass back up through the druk again. Pull snug to form a loop of seed beads around the druk. Repeat to add a second loop.

3. String on one 11/o, and one 8/o, followed by the same pattern from step 1. Repeat until you have 4 looped druks.


4. String on one 11/o, one 8/o, one focal bead, one 8/o, one 11/o, and one rose bead. Add two loops of seven seed beads around the rose.

5. Repeat the pattern from steps 1-3 until you have added 3 druks. Add one 11/o, one 8/o, one 11/o and the second rose bead. Add seed bead loops to the rose.


6. String on one 11/o, one 8/o, and the second focal bead. Add one 8/o bead, then repeat the pattern again until you’ve added 4 more looped druks.


8. Pass back through the first 2 seed beads from the set of 10. Continue through the 8/o, 11/o, and druk and pull snug. Weave around the loops in the druk and retrace the thread path to secure the button. Weave any remaining thread into the beadwork, tying 2 half-hitch knots, and trim.


9. Remove the stop bead from the start of the necklace. Pick up enough seed beads to form a loop around your button. Pass back through the first seed bead again, and through the following beads to the nearest druk. Retrace the thread path to add strength to the loop, then weave in any remaining thread and trim.


Happy beading!

Mortira

Subscribe * Facebook * Google+
Send your beading questions to InspirationalBeading@gmail.com
Support Inspirational Beading for bonus tutorials and more! Powered by Patreon

Copyright 2016 Inspirational Beading


Saturday, May 14, 2016

A Collar a Week: Berry Salad

For this week’s mini collar, I couldn’t resist using one of the palette ideas to go with a quartet of pretty glass petal drops in marbled blue that we explored last week. The combination of transparent ruby and gel sol pink just needed a little bit of Montana blue sapphire for backup, and I had everything I needed for a cute collar.

Berry Salad Mini Chevron Collar


For this piece, I worked out a new palette with angled rows of pink set into the chevron chain. At the center of the piece, between pairs of the petal drops, I reversed the angle of the pink rows to get a symmetrical look. The results look pretty good, and I think that the pattern is worth trying again in a future project. I’d like to see how it would look with more than two colors, though I like the lattice effect that it has here.

Berry Salad Bead Palette


I haven’t yet chosen my accents and colors, but I am hoping to get a little more daytime beading in next week so that I can have the next collar completed just as quickly.

Mortira

Subscribe * Facebook * Google+
Send your beading questions to InspirationalBeading@gmail.com
Support Inspirational Beading for bonus tutorials and more! Powered by Patreon

Copyright 2016 Inspirational Beading


Monday, April 25, 2016

Bead Color Ideas: Tropical Delights

What with my latest blue coconut dagger project and the cool spring weather we’ve been having in my area, I’ve really been in the mood for warm colors and anything that will make it feel like summer. Tropical themes are always great for adding a little spice, and offer plenty of options for inspiration. There are colorful flowers and fruits, and gorgeous blue waters to draw on – everything looks better and brighter when it’s illuminated with bright sunlight. This week I wanted to capture that warmth with seed bead palettes.

Tropical Island Lei Bead Color Idea


To start I went with florals, using three sweet, saturated colors. To make Island Lei I combined a most cheerful shade of purple - wisteria lined crystal – and aqua white-hearts for that touch of intense light and ocean blue. Gel sol pink topped everything off with just the right amount of sugariness.

Tropical Passion Fruits Bead Color Idea


Naturally, I had to start at least one palette with intense yellow, so I grabbed some opaque canary 8/o’s. I wanted some equally bold hues to go with it, so next came opaque vermillion red. I haven’t really had a chance to use this color yet, but it’s a perfect match for the yellow. Passion Fruits is finished with lustered orange sherbet, though I would have preferred a more peachy or pumpkin-y orange.

Tropical Coconut Lime Bead Color Idea


Finally, I had to go with a palette to represent my favorite tropical flavors. Coconut Lime includes some transparent lime green long magatamas, and opaque white 8/o’s. The lovely brown of transparent dark topaz seed beads looks gorgeous with the green and definitely brings out the coconut in the white beads. Delicious!

What’s your favorite tropical inspiration?

Mortira

Subscribe * Facebook * Google+
Send your beading questions to InspirationalBeading@gmail.com
Support Inspirational Beading for bonus tutorials and more!

Copyright 2016 Inspirational Beading


Thursday, April 14, 2016

Wardrobe Inspiration: Summer Berry

While putting together our Pantone inspired fashion picks last month, I came across this fabulous chunky bead necklace and bookmarked it for later. It has an amazing palette of deep raspberry, orange currant, cream, and black. The contrast between the neutrals and the incredibly juicy colors was very inspiring, and I couldn’t resist using it for this month’s fashion picks.

Summer Berry


I considered going with a colorblocking theme for this collage, and started with a colorful geometric frock with hints of orange. I loved the purple that it added to the mix, and things just started rolling along from there. I found lots of fun accessories to go with a palette of red, orange, purple, and cream. The damask bangle in bright purple is definitely a favorite.

I wasn’t able to find any tutorials for such a chunky beaded necklace, and that’s okay. Assuming you could locate (or make) the big beads, all you’d have to do is string them. Instead, I found some other chunky necklace projects that are great for summer outfits, and a lovely damask pendant project with an easy painted patina.


I love the ingenuity of DIY jewelry designers.
The magpie in me can’t stop looking at this wrapped stone necklace project by Trinkets in Bloom.


The custom clay beads in this chunky necklace project by Katie at Crafts Unleashed make it really adaptable.
I’d love to see it in lime and turquoise!


The floating glass pearls in Beadaholique’s Sea Treasures Earrings have
the same dew-drop effect as our red leaf ones. Very pretty!


These super-easy stamped polymer clay pendants from Doodle Craft are so pretty
they make me want to drop everything and get out my paints.

What’s your favorite berry-inspired palette?

Mortira

Subscribe * Facebook * Google+
Send your beading questions to InspirationalBeading@gmail.com
Support Inspirational Beading for bonus tutorials and more!

Copyright 2016 Inspirational Beading


Tuesday, March 1, 2016

Bead Wish List: Spring Candy

With two very kid-friendly holidays to enjoy, this time of year is full of candy and brightly colored treats. There’s a lot of inspiration to be had in spring confections, like the rainbow appeal of a bowl of jelly beans, or the soft pastels of sweet-hearts. I’m really excited about the return of certain chocolate eggs, but the colors are really the best part of spring. With Valentine’s behind us and Easter ahead, I went on a hunt for beads in candy colors, and those that just look good enough to eat. These are my favorites!


These unusual Czech glass ovals from Maya Honey definitely look like they’re made with tasty flavors, with a mix like rock candy or salt water taffy. The pink patina even adds an additional layer of frosted appeal. I’d definitely want to pair these treats with some luminous orange-lined seed beads for an extra pop of color to bring everything together. This shade is a near-perfect match for the filling in fondant eggs. I think the combination would be great in a chunky multistrand necklace.


There’s something really special about the candy-coated look of these epoxy resin charms from Fire Mountain Gems. The mix of colors and the smooth finish can definitely cause a sweet craving. The round shape was absolutely my favorite, which brings to mind all kinds of classic sweets. I also found some delicious glass bead strands, although it was tough to choose just one. I like this jewel tone mix, which looks a bit like gourmet gummies or fancy jelly beans. With a great neutral backdrop, this duo would make a pretty memory bracelet.


More rock candy inspirations can be found in Czech glass, especially when it comes in a gorgeous pastel palette like this Spring Fling rondelle mix from Lima Beads. The Picasso finish is gorgeous anywhere, but in this case I think it makes these beads look a little like malted robin’s eggs. All the rondelles need is a nest, and the sour-sweet of apple green sliced seed beads is perfect for the part. I’d probably want to use this combination in a fringe design, or perhaps something minimalist and asymmetrical.


Pearls of any kind are wonderful when you want to create food themed jewelry. These shiny glass pearls from Fusion Beads have a tasty lustered finish that is perfect for spring jewelry. I particularly like the pink, but they also come in pumpkin, yellow squash, pea green, and light plum. Yummy! Toho seed beads in cotton candy-lined crystal would make a great backdrop for any combination of glass pearls. I’d love to use them in a freeform design or a cluster of circular brick stitch medallions.


Not all treats are candy-colored, so for my next duo I started with lovely chocolate howlite rounds from Auntie’s Beads. The color is delicious, and the perfect companion for sweet hues. To complete this set I picked a pretty mix of pastel Super Duos with hints of pink, green, and blue – all great colors to pair with chocolate. This combo would make a great cuff bracelet or perhaps a chunky collar.


Clearly mixes are so ideal for candy theme, and it was impossible to resist this Carnival Candy seed bead blend from ArtBeads.com. The darker purple really pops with the other soft colors. I finished this duo with some Czech glass coins featuring a cute bird motif. Though they might not look tasty, they’d definitely be at home in a basket of goodies. I think this pair would look great in some simple earrings or a bead embroidered cuff.


Finally, I fell in love with these confetti jade rounds from Beadholique, which look so much like a birthday cake-flavored treat. The hints of pink and blue in the buttery jade is adorable and a great way to add just a bit of color. Since the bird coins had looked so great, I decided to finish this combo with a pretty lavender hummingbird focal in vintage style Lucite. This mix would make a great pendant, perhaps with some white seed beads to match the hummingbird and round out the palette.

Do you have a favorite candy color or tasty bead shape?

Mortira

Subscribe * Facebook * Google+
Send your beading questions to InspirationalBeading@gmail.com
Support Inspirational Beading for bonus tutorials and more!

Copyright 2016 Inspirational Beading and Friends
Some actions you take from this page can result in a commission for Inspirational Beading.


Saturday, February 13, 2016

Cherry Bomb Fringe Earrings Tutorial

Cherry Bomb Beaded Earring Tutorial

It’s kind of amazing what you can recreate with just a little fringe in the right colors. The idea for this super-easy cherry fringe design popped into my head when I was creating earring projects for Ancient Worlds Modern Beads, and it was just too fun not to make. These cherry bomb earrings look great in opaque or transparent colors, but I do recommend going with a bright green to avoid any resemblance to holly berries. On the other hand, you could modify the design a bit to get a cute holiday earring as well!

You will need:

2 black 8-10mm round beads
2 black 4mm heishi or spacers
4 black 8/o seed beads
4 or more red 6mm rounds
4 or more red 11/o seed beads to match
a few grams each green and black 11/o seed beads
2 jumprings and/or earwires
Size D beading thread such as Nymo

1. Attach a stop bead to 1 yard of stretched and conditioned thread, leaving a 6 inch (15 cm) tail. Pick up 1 8/o seed bead, 1 spacer, 1 8-10mm bead, and 1 8/o bead. Slide them down to the end.


2. Pick up green 11/o seed beads in multiples of three until the strand reaches the desired length for your earring – at least 30 beads are needed for the fringe base, but you can go as long as you like. Add 1 red 6mm round, and 1 red 11/o. Skipping the red 11/o, stitch back up through the round bead and the following 9 green seed beads. Pull snug, making sure there is no slack in the strand.

3. Pick up 7 green seed beads. Skipping the last bead added, stitch back through the 6th bead and pull snug.


4. Pick up 4 green seed beads, and stitch back through the first bead added in the previous step, plus the following three beads in the main strand, moving towards the black round. Pull snug to form a leaf stitch.

5. Pick up green seed beads in multiples of three until you have a second ‘stem’ of the desired length. You can make it longer or shorter than the first cherry stem – whatever looks good to you. Add a red round and seed bead. Skipping the red seed bead, stitch back through all of the beads just added, and the following 3 beads in the main strand. Pull snug.


6. Pick up 7 green seed beads and add a second leaf stitch (steps 3 and 4). Stitch back up through the remaining beads in the main strand, and all of the black beads. Pull snug.


7. Pick up 9 black seed beads. Stitch back down through all of the black beads in the base to form a loop at the top of the beadwork. If desired, string on an ear wire or soldered jump ring before securing the loop.


8. Pick up green seed beads in multiples of three to begin a second cherry fringe. Repeat steps 2-6, making your fringes as long or as short as you like. Weave through the black seed bead loop at least once more to add strength, then secure any remaining thread in the fringe and trim.

9. Add jump rings and ear wires as desired, then repeat all of the steps to make a second earring.

Happy beading!

Mortira

Subscribe * Facebook * Google+
Send your beading questions to InspirationalBeading@gmail.com
Support Inspirational Beading for bonus tutorials and more!

Copyright 2016 Inspirational Beading


Friday, December 4, 2015

Tutorial: Holiday Candy Cane Bangle Project

Holiday Candy Cane Bangle Tutorial

One of the best things about dressing for the holidays is getting the chance to wear kitschy things like ugly Christmas sweaters and incredibly literal jewelry. Though there’s something sort of wonderful about Christmas light earrings and charm bracelets – especially ones that light up – edible inspirations have to be the best. Luckily for beadweavers, there are a lot of stitches and bead shapes the lend themselves well to food themes, especially for the holidays.

This easy to make bangle puts seed beads and herringbone stitch to good use recreating the look of a tasty candy cane. All you need are size 11 seed beads in opaque white and transparent red or green, plus some thread and a clasp of your choice. Although you can use basic twisted tubular herringbone to make this bangle, we’re going to use a variation that creates an even tighter spiral for the classic candy cane stripe look.

Another advantage of this super twisted stitch is that it makes the rope much sturdier, allowing us to add multiple rows of color without losing the tubular shape when the bracelet is brought into a curve. If you want to add even more stability, you could string your herringbone tube over a core of beads or rubber tubing, and add a clasp with crimps. For added strength, I highly recommend weaving this bracelet with Fireline or another braided beading line.


1. On a comfortable length of beading thread, pick up 4 white seed beads. Slide them down to the end, leaving a 10 inch tail. Stitch up through the first 2 seed beads again, and pull snug to form a ladder. Pass down through the second pair of beads.


2. Pick up 2 red seed beads and stitch down through the same 2 white beads again – moving in the same direction as the thread. Pull snug, and stitch up through the 2 red beads. Continue weaving with ladder stitch, adding 2 beads at a time until you have a strip that is 10 beads wide, with the pattern shown.


3. Bring the ends of the ladder together and stitch the first and last rows together twice. Exit from the nearest red row at top of the ring, opposite from the tail thread.


4. Pick up 1 red and 1 white seed bead. Stitch down through the topmost white bead in the ladder below, and pull snug to bring the new beads in place along the ring. Stitch up through the topmost white bead in the next row.


5. Continue adding 2 beads at a time around the ring, matching them to the rows below until you have added 5 pairs total. To step up for the next round, stitch up through the top 2 red beads in the next row and exit from the top of the ring.


6. Repeat step 4 and 5 to add another round of tubular herringbone, but this time, stitch up through 3 beads to step up.


7. Add the first 2 beads of the new round as usual, but stitch up through the top 2 beads of the next row to exit the ring, instead of just one. Continue around the ring, stitch up through 2 beads in each stitch, and stepping up through 3 at the end.

8. Continue weaving with twisted herringbone until your rope is about 1 inch short of the desired length. Be sure to test the fit, as thicker ropes will fit a little bit differently than more flexible bracelets.


9. To close the final stitches and match both end of the beadwork, you’ll need to do a dummy stitch. Work one row of twisted herringbone without picking up any beads, stitching up through 2 beads at a time. Work a second row without any new beads, stitching up through 1 bead in each row. (Look carefully at the beadwork, and follow the natural thread path until all of the beads have the same connections.) Finally, work a round of ladder stitch in the opposite direction, moving 2 beads at a time, to flatten the edge of the rope.


10. Once you’ve woven in all of your tail threads, you can finish your bracelet as desired. My favorite technique is the crown picot finish for herringbone tubes. You could also string the bangle on stretch cord with a focal between the ends for a true bangle look.

Herringbone Candy Cane Bangle Project


Happy holidays!

Mortira

Subscribe * Facebook * Google+
Send your beading questions to InspirationalBeading@gmail.com
Support Inspirational Beading for bonus tutorials and more!

Copyright 2015 Inspirational Beading


Blog Widget by LinkWithin
Fire Mountain Gems and Beads

Inspiration Topics

accessories amulet Ancient Worlds Modern Beads animals April's Army art ArtFire astrology astronomy autumn awards awareness bangle beach Bead Inspired Bead Shops bead soup bead spotlight bead stash Bead Trays beaded beads beading theory beads belt bezel birthstones black blog spotlight blue boho bone book spotlight bracelet Bracelet A Week branch fringe brick stitch brown bugles buttons cabochon ceramic chain maille challenge charity chevron chain christmas collar Collections color Color Ideas color triads conservation craft shows crafts crochet crystals cuff Culled Beads current events Current Faves daggers Daily Sets daisy chain Delicas Destash drops Dutch spiral earrings Egypt Egyptian Gods embellishing embroidery environment etsy exotic fair trade fantasy fashion Favorite Beads Favorite Techniques feminine fibers film findings fire polish fixtures Flashback Test flickr inspiration flowers food found object free form fringe Geek Jewels geekery gemstones geography giveaway glass gold gray Greece green herringbone hex cuts history holiday home decor insects inspiration tip inspired beader Inspired by... Inspiring Links ivory Jewelry Stash knitting ladder stitch lampwork lariat leaf fringe leather lights literature loomwork macrame magatamas Master Class Medallions metal free metalwork Mini Collar a Week mixed media mixture Mood Board MOP multi-color multi-strand music natural beads nature necklace Necklace a Day Nepal chain netting New Beads ocean ombre orange paint paper patterns pearls pendant peyote photography Picasso finish pink Pinspiration PMC polymer clay poster sketch purple quick inspiration rainbow RAW red resin ring Ring a Day rivoli Rome Russian spiral scarf science seed beads shell silver soutache spiral rope spring square stitch St. Petersburg steampunk stringing stripes summer tagua TBT The Elements thread Tilas Time Capsule tools trade beads triangle weave tribal tropical turquoise tutorial two-hole beads Ugly vintage Wear it Twice weather white winter WIP wire wishlist wood World Beaders yellow
Blog Home * About * Beading Tutorials * Advertise

Learn About Sponsoring Inspirational Beading with Project Wonderful
Affiliated With ShareASale.com and Amazon.com