Showing posts with label collar. Show all posts

Monday, November 7, 2016

Work in Progress: Daggers and Spirals

Greetings, beaders! I hope that you've had a fantastic transition into fall. I am still struggling with finding the right work-life balance, and fitting creative time in where I can. Things seemed to be going smoothly for awhile: I had some projects lined up that I was really excited about and the first one turned out great. I was working on a new spiral rope lariat with lots of different daisy patterns, and I decided to go ahead and make a second one, thinking that since I was on a roll, I might as well keep going. This was a huge mistake. I got bored with the new rope pretty quickly, and then a string of graveyard shifts threw off my whole routine and I never got around to finishing it.


Daisy Fringe Lariat

I picked up a new project a few weeks ago, and found myself something new to binge-watch while I worked on it. It took some time to decide what kind of project I could really fall into, when I remembered that I had some new peacock daggers to use. Not only is black with silver polka-dots an easy finish to work with, but the size and shape of the daggers are perfect for a wide-net collar. Rather than come up with a whole new project, I recreated my last successful dagger collar and had a pretty good time with the simple pattern. The colors are pretty similar to the previous design as well, although I had a little fun adding a hint of purplish cobalt iris.

Spiral Lariat in Progress

I still haven't made or added a button to the new collar. A few late nights working on Hallowe'en costume elements derailed my beading plans yet again, but I'm determined to get back on the horse and hopefully have some nice winter projects to keep me occupied. I know that if I can get back into the zone with making again, more writing will follow as well. A little extra inspiration is all I need to come up with some new tutorial ideas for you!

Dagger Collar in Progress

What kinds of projects have you been working on?

Mortira

Subscribe * Facebook * Google+
Send your beading questions to InspirationalBeading@gmail.com
Support Inspirational Beading for bonus tutorials and more! Powered by Patreon

Copyright 2016 Inspirational Beading


Wednesday, June 8, 2016

Work in Progress: Lazy Collar

It is taking quite a bit longer than I expected to get back on track after my recent hiatus. There’s something about a long to-do list that’s easier to put off than a short one. Plus I’ve really been enjoying some quiet time for reading and other hobbies. It was nice to take a break, even if I did feel things looming in the background most of the time. We’ve missed one week of the mini collar challenge, but I did manage to get one started for this week.

Easy Mini Collar in Progress


I really want to take things slow and get back to something resembling my old routine a bit at a time. For this week’s collar I’m going with a super simple design in some favorite colors. I have been saving the Autumn Tucson Gold for an upcoming peyote stitch tutorial, but I think I can spare enough to make this quick collar.

What have you been making lately?

Mortira

Subscribe * Facebook * Google+
Send your beading questions to InspirationalBeading@gmail.com
Support Inspirational Beading for bonus tutorials and more! Powered by Patreon

Copyright 2016 Inspirational Beading


Sunday, May 8, 2016

Collar a Week: Petal Pink

The latest collar in my weekly challenge is technically last week’s, but since it’s only Sunday I’m going to say that it’s still pretty much on time. Although I haven’t yet added the button, the collar is otherwise complete and turned out fairly well. It took a little longer than I would have liked, and that’s entirely my fault. I decided to use some old black and white seed beads, rather than cutting into fresh hanks, so I spent just as much time culling as I did on the actual beadwork.

Pink Magatama Mini Collar


I’m not completely thrilled with how the pink looks in the design. As with many lined finishes, the magatamas look a lot darker lumped together in the package than they do spaced out in a design. I intentionally used all-black for the outer edge of the chevron chain in anticipation of this, but I was still hoping for a bit more color. Still, there’s something about the very pale pink set into the totally neutral beading that works. I think it will look even better when worn than it does in photos.

Capri Blue Mini Collar


The previous week’s collar with a trio of daggers at the center also turned out really well. I’m definitely going to keep the design in mind for future projects where I want to incorporate larger accent beads. The long magatamas are not my favorite accent for the collar edge, though. I do still have quite a few that I could use, but I think they’ll be passed over for a while until I’ve explored other possibilities.

Mortira

Subscribe * Facebook * Google+
Send your beading questions to InspirationalBeading@gmail.com
Support Inspirational Beading for bonus tutorials and more! Powered by Patreon

Copyright 2016 Inspirational Beading


Friday, May 6, 2016

Beading Tutorial: Star-Shaped Netted Collar

Star Shaped Netted Collar Tutorial

This stunning, seed-bead heavy netting project is not for the faint-hearted beader. If you’re already familiar with netting, then you’ll love the tricky increases and decreases used to create the star shaped outer edge in this collar. The traditional edging on the inner portion of the necklace is cinched together at the very end to create a smooth finish. The extra step makes a complicated project even lengthier, but it’s totally worth it.

For clarity, I’ve listed every new step in the process, but if you can do netting in your sleep you’ll be able to do most of these steps without thinking. To help break up the netting and make it easier to see the increases and decreases taking shape, I’ve added a pattern to the beadwork. Once you’ve mastered the steps you can experiment with different motifs. I highly recommend sketching out some ideas and then trying them out!

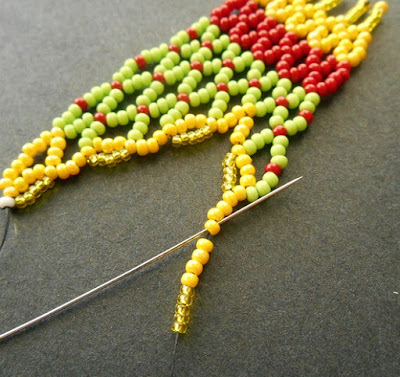
For best results, I recommend using Czech size 11/o seed beads. They fit together very nicely in the closer stitches near the inner edge. For the best overall shape, save the skinniest beads that you come across in your seed bead batches to use in the cinching steps. I’ve used a different color at the end for clarity, but using the same color at the tips of your netting gives a very smooth look.

The amount of beads you’ll need for a full collar will vary depending on the pattern that you create. It’s a good idea to have a full hank or at least 20 grams of each color to be safe. You’ll also need your favorite size D beading thread and about 5 grams of size 15/o seed beads.

How to Weave Netted Star Collar

1. Attach a stop bead to a comfortable length of beading thread, leaving an 8 inch tail. Pick up: 9 yellow; 3 green and 1 red, 4 times; 2 green and 1 red, 2 times; 5 red; 6 yellow; 4 size 15/o; 1 yellow. Slide all of the beads down to the stop bead.


2. Skipping the last yellow bead added, stitch back down through the 15/o beads and the following yellow bead. Pull snug to lock the final yellow bead in place at the top of the row.


3. Pick up 4 yellow. Stitch down through the first yellow bead added to this section in the previous row (the yellow nearest the set of 5 red). Pull snug.


4. Pick up 5 red. Stitch down through the first red of the section in the previous row and pull snug.


5. Pick up 2 green, 1 red, and 2 green. Skipping 1 red in the previous row, stitch down through the following red bead.


6. Pick up 3 green, 1 red, and 3 green. Skip 1 red in the previous row and stitch down through the following red.


7. Pick up 3 green, 1 red, and 3 green. Stitch down through the topmost yellow bead in the previous row.


8. Pick up 7 yellow. Stitch down through the first yellow bead added in the previous row.


9. Pick up 5 size 15/o beads. Stitch up through the 4th (center) yellow bead added in the previous step.


10. Pick up 4 yellow and 3 green. Stitch up through the nearest red bead in the previous row.


11. Pick up 3 green, 1 red, and 3 green. Stitch up through the next red bead from the previous row.


12. Pick up 3 green, 1 red, and 2 green. Stitch up through the next red bead from the previous row.


13. Pick up 2 green and 3 red. Stitch up through the center red bead of the all-red section in the previous row.


14. Pick up 2 red and 3 yellow. Stitch up through the 3rd bead in the all-yellow section of the previous row.


15. Pick up 2 yellow, 4 size 15/o, and 1 yellow. Stitch back down through the 15/o beads and the 1st yellow pick up. Pull snug.


16. Repeat steps 3-6 to work a new downward row of netting to match the pattern.

17. In the next stitch, pick up 3 green and 4 yellow. Stitch down through the topmost yellow bead of the adjacent section in the previous row.


18. Pick up 5 size 15/o seed beads. Stitch up through the center yellow bead just added, and pull snug.


19. Pick up 4 yellow and 3 green. Stitch up through the next red bead in the previous row.


20. Continue the usual pattern upwards for the rest of the row, add the 15/o turn, and the 1st three stitches of the next downward row. Repeat steps 17 and 18 to turn at the end of the row.


21. Pick up 4 yellow and 2 green. Stitch up through the nearest red bead of the previous row. Finish the row and make the 15/o turn.


22. Add the all-yellow and all-red stitches, then add a set of 2 green, 1 red, and 2 green.


23. Pick up 8 yellow and 5 size 15/o beads. Stitch up through the 4th yellow bead added and pull snug. Don’t worry too much about the shape of the stitch for now. As long as the tension is good, it will take shape as other stitches are built around it.


24. Add a set of 3 green, 1 red, and 2 green. Finish the row and turn.


25. Add the yellow and red stitches, and two green/red stitches. In the last stitch, pass down through the last yellow bead added in step 23.


26. Repeat step 23 to turn and lengthen the netting again. Add 3 green, 1 red, and 3 green. Finish the row and turn.


27. Complete the downward row, finishing with 3 green, 1 red, and 3 green. Pass through the last yellow bead added in the adjacent section.


28. Add another increase/turn with 15/o beads. Pick up 4 yellow and 3 green. Stitch up through the nearest red bead of the previous row.


29. Add 3 green, 1 red, 3 green. Finish the rest of the row and turn.

30. Complete the entire downward row, following the pattern. In the final stitch, add 7 yellow seed beads, passing down through the last yellow bead of the previous row.


31. Pick up 5 size 15/o beads. Stitch up through the center yellow bead of the previous row and pull snug.


32. Repeat from step 10 until the netting has reached the desired length. Weave in any remaining tails and trim.


33. Attach a stop bead to a comfortable length of thread, leaving a 6 inch (15 cm) tail. Enter the beadwork at the bottom, and weave up through the netting to exit from the last stack of size 15/o seed beads at the top. Pass through the yellow bead so that the thread is pointing away from the beadwork.

34. Pick up 4 yellow seed beads. Pass back through the 1st bead added, and the same yellow seed bead again. Pull snug to form a picot.


35. Pick up 2 seed beads. Pass through the next yellow seed bead in the netting. Repeat 5-10 times.


36. To help maintain tension and strengthen the beadwork, add 5-10 seed bead pairs to the edge, then pass down into the netting. Weave back up to exit from one of the previously worked 15/o stacks. Pass through the seed bead pairs already added and exit from the last yellow bead worked at the edge.


37. Repeat steps 35 and 36 until you reach the first 15/o stack added to the netting.


38. Pick up 4 seed beads. Stitch back through the 1st bead added and the yellow seed bead. Pull snug to form a picot. Weave the remaining thread into the edge then secure in the netting and trim. Begin new threads to add a clasp as desired.


For variation, try adding some accents to the turns at the outer edge, like small drops or a contrasting size 11/o bead. If you feel lost at any time, remember that with basic netting your stitches should always match the adjacent section of the previous row. If you follow all of the steps here, you should be able to refer to your work for hints on how to proceed if you get stuck.

Happy beading!

Mortira

Subscribe * Facebook * Google+
Send your beading questions to InspirationalBeading@gmail.com
Support Inspirational Beading for bonus tutorials and more! Powered by Patreon

Copyright 2016 Inspirational Beading


Saturday, April 16, 2016

Mini Collar a Week Challenge

For many months now I’ve been saying that I have to use up some of my accent beads. Over the last couple of years I have amassed a pretty great collection of beads that I love and love to use, but I recently reached a point where I just didn’t know where to begin. I’ve long since passed the hoarding stage and am ready to see what my beads can do. I just never have an idea that I think is good enough. I’ve been taking beads out, trying them on different palettes, imagining what they can do, but never really getting down to making something with them. I’ve also been busy with tutorial projects and other pursuits, so I haven’t been concentrating on just making jewelry for fun. I decided it was time to do something about it.

Destash Challenge Mini Collar


I was looking through old photos for something or other when I started reminiscing about some of my favorite creative challenges. Although the Egyptian Gods challenge was by far the most rewarding for me, the early marathons like A Ring a Day and A Bracelet a Week were the ones that taught me the most overall. Like the Destash Challenge, they also helped me to stretch out my limits and use up things in my bead stash. I did try out a new challenge at the start of this year, but it fizzled out. I thought that I would end up going without for the rest of 2016, but a marvelous idea finally emerged.

Destash Challenge Mini Collar


For the remainder of 2016, or until I’ve used all of my small accent beads at least once, I’m going to make a mini collar every week. I chose mini collars because they stitch up quickly, and I’d really love to have a few more of them for my shop, which I’ve been neglecting lately. Although the chevron chain design that I use for them is pretty simple, there are lots of different ways to add patterns and highlight exciting beads. I can’t wait to start experimenting!

Blue Lime Mini Collar


To kick off the challenge I used a couple of old favorites – lime green and cobalt blue Indonesian glass spacers. In order to include these large-hole beads in the design, I ended up increasing the stitches quite a bit to make room for 8/o bumpers. The netting is roomier and the collar is much bigger overall than my usual designs. I’m really happy with results, because it means that I can take more chances with other accents as well. Plus I love the palette with rainbow patriot blue for the netting.

Next I’m going to try out some drops or magatamas, and perhaps a new pattern. Wish me luck!

Mortira

Subscribe * Facebook * Google+
Send your beading questions to InspirationalBeading@gmail.com
Support Inspirational Beading for bonus tutorials and more!

Copyright 2016 Inspirational Beading


Blog Widget by LinkWithin
Fire Mountain Gems and Beads

Inspiration Topics

accessories amulet Ancient Worlds Modern Beads animals April's Army art ArtFire astrology astronomy autumn awards awareness bangle beach Bead Inspired Bead Shops bead soup bead spotlight bead stash Bead Trays beaded beads beading theory beads belt bezel birthstones black blog spotlight blue boho bone book spotlight bracelet Bracelet A Week branch fringe brick stitch brown bugles buttons cabochon ceramic chain maille challenge charity chevron chain christmas collar Collections color Color Ideas color triads conservation craft shows crafts crochet crystals cuff Culled Beads current events Current Faves daggers Daily Sets daisy chain Delicas Destash drops Dutch spiral earrings Egypt Egyptian Gods embellishing embroidery environment etsy exotic fair trade fantasy fashion Favorite Beads Favorite Techniques feminine fibers film findings fire polish fixtures Flashback Test flickr inspiration flowers food found object free form fringe Geek Jewels geekery gemstones geography giveaway glass gold gray Greece green herringbone hex cuts history holiday home decor insects inspiration tip inspired beader Inspired by... Inspiring Links ivory Jewelry Stash knitting ladder stitch lampwork lariat leaf fringe leather lights literature loomwork macrame magatamas Master Class Medallions metal free metalwork Mini Collar a Week mixed media mixture Mood Board MOP multi-color multi-strand music natural beads nature necklace Necklace a Day Nepal chain netting New Beads ocean ombre orange paint paper patterns pearls pendant peyote photography Picasso finish pink Pinspiration PMC polymer clay poster sketch purple quick inspiration rainbow RAW red resin ring Ring a Day rivoli Rome Russian spiral scarf science seed beads shell silver soutache spiral rope spring square stitch St. Petersburg steampunk stringing stripes summer tagua TBT The Elements thread Tilas Time Capsule tools trade beads triangle weave tribal tropical turquoise tutorial two-hole beads Ugly vintage Wear it Twice weather white winter WIP wire wishlist wood World Beaders yellow
Blog Home * About * Beading Tutorials * Advertise

Learn About Sponsoring Inspirational Beading with Project Wonderful
Affiliated With ShareASale.com and Amazon.com