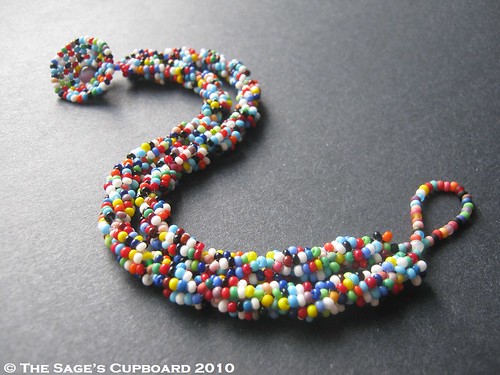
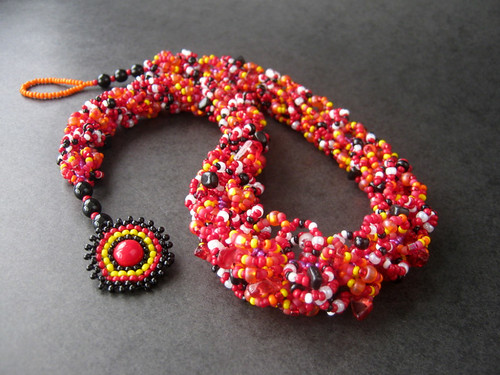
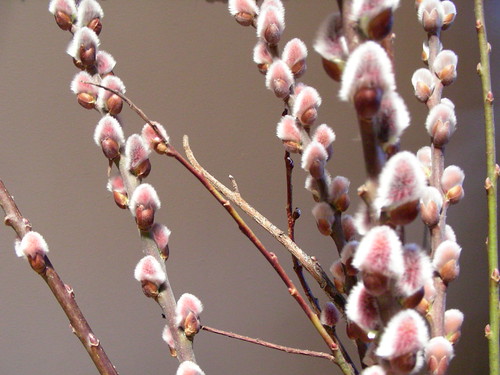
My new ideas and inspirations are on the back burner for the next couple of weeks as I work furiously on some top-secret Christmas presents. I have several projects on the go this year, including a lot of sewing and painting that will be keeping me up late at night. When I do get a little time to bead, I'm planning to add a stitch or two to the spiral rope necklace that I started and gave up on a while back. I've almost run out of the cobalt blue seed beads, so hopefully the rope will finish up at just the right length. If all else fails I can make the fringe on this one extra long.
Now that I have two bead trays on the go, it's a lot easier to just set something aside for later, rather than go to all the trouble of packing things up and then hauling them out again when I decide to finish a piece. Right now I'm grateful for the option! Of course, I haven't been keeping up with my commitment to put away beads and materials when I'm finished with a project, although I have been able to keep packages of beads contained to one area of my workspace so that I'm not drowning in them. It will be time for a big clean-up very soon or I'll start to have trouble finding what I need - perhaps I'll get around to it when the paper mache stage of my holiday projects comes around. Otherwise I might just stuff everything into a space in the closet until January.
My number one bead tray is looking pretty tidy at the moment. I just put the finishing touches on a new collar with a double mythology inspiration, which I will unveil very soon. In the meantime I'm doing some research on all-new icons for inspiration in the new year.
What are you making right now?
Mortira
Subscribe * Facebook * Google+
Send your beading questions to InspirationalBeading@gmail.com
Support Inspirational Beading for bonus tutorials and more! Powered by Patreon
Copyright 2016 Inspirational Beading
Showing posts with label spiral rope. Show all posts
Saturday, December 10, 2016
Tuesday, September 6, 2016
Work in Progress: Spiral Daisies
As promised I have moved on from herringbone fringe necklaces, but I wasn’t quite ready to give up on fringe yet. Not only is it really satisfying to make fringe, but I’ve been in the mood to use up not just my favorite accent beads, but some of the less-than-versatile Czech seed beads as well. One of my goals for this year was to be a little less picky about culling Czech beads, and fringe gives me the freedom to just go ahead and use seed beads that are just a little bit wonky.
I really wanted to try out some of the millefiori beads that I picked up at a thrift store about a year ago, so I started with a strand of black rounds with a daisy motif and worked up from there. A spiral rope lariat would allow me to incorporate a daisy pattern while also using up a hank of green seed beads that has been sitting in my stash since making the blue-green ombre project from Ancient Worlds Modern Beads. So far things are going really well, and I can’t wait to get started on the tassels.
The Egyptian stripe necklace from last week turned out really nice. I was worried about the pattern being a bit much, but once it was complete and the accents added on, things really came together. I tried something new for the fringe this time around, and matched the top of each loop to the beadwork base. I’m not sure if I love it completely, but it may come in handy for future projects without so many colors in play.
What are you making right now?
Mortira
Subscribe * Facebook * Google+
Send your beading questions to InspirationalBeading@gmail.com
Support Inspirational Beading for bonus tutorials and more! Powered by Patreon
Copyright 2016 Inspirational Beading
Tweet
Topics:
Bead Trays,
flowers,
green,
lariat,
spiral rope,
WIP
Thursday, October 1, 2015
Work in Progress: Ocean Pendant
Greetings to my fellow beaders after a much too long absence! My work schedule has been scrambled around quite a bit these past few weeks, and it’s has totally derailed all of my other schedules like sleeping, beading, and writing. I’m going to have to work out a new way of planning out my free time, but for now I’ll just have to play a little catch-up.
Although I didn’t have time to write anything special to celebrate the official release of Ancient Worlds Modern Beads today, I have been able to do a smidge of beading here and there. I’m almost finished a new spiral rope pendant featuring one of the carved bone shells that I added to my stash a while back. Originally, I was just going to go with a plain rope, but I found that the combination of colors made the rope look too naked, so I added some fringe beads and magatamas to bulk it up a bit. All that’s left is to construct the various components and then I can move on to something new!
What are you making right now?
Copyright 2015 Inspirational Beading
Subscribe to Inspirational Beading
Get inspired on Facebook and Google+
Tweet
Topics:
Bead Trays,
bone,
green,
ocean,
pendant,
spiral rope,
WIP
Friday, January 16, 2015
Floral Spiral Rope Bracelet Tutorial
To make this spring spiral bracelet you will need:
3 yards of Fireline or Nymo
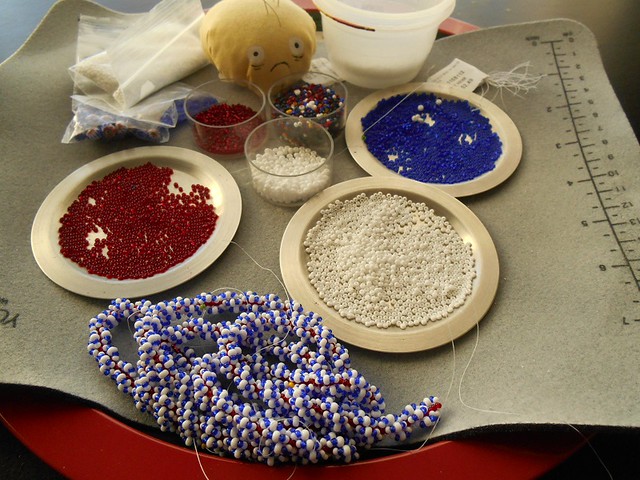
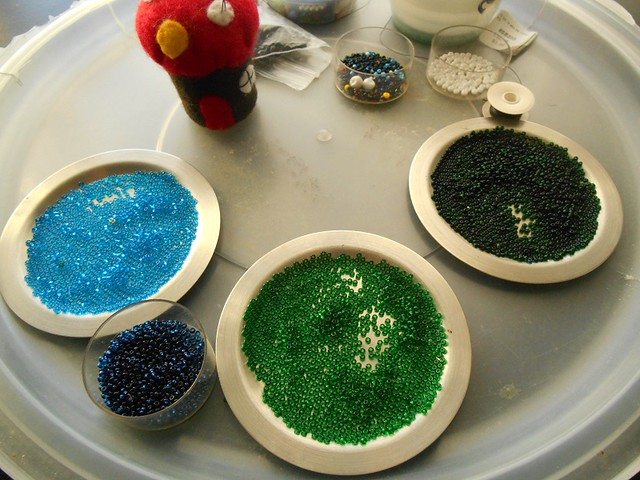
Czech seed beads in 3 colors (5 grams base color, 4 grams petal color, 2 grams pollen color)
Japanese seed beads in 1 color (about 2 grams)
1 clasp or button of your choice
For the spiral rope, I’ve layered Czech seed beads over Japanese round seed beads, both to get a nice rounded shape for the spirals, and ensure that there is plenty of room for thread in the spiral core. Whatever palette you choose, you want to make sure that your base colors contrast with your flower colors, so that the motif stands out nicely.
How to weave floral spiral rope stitch:
Pick up 4 Japanese (core) seed beads, and 5 Czech seed beads in your base color. Pass up through the core beads again and pull snug.
Pick up 1 core bead, 1 base, 2 petal, and 2 base color beads. Stitch up through the top 3 core beads from the previous stitch and pull snug. Pass up through the core bead just added, and roll the new beads to the side.
Pick up 1 core, 1 base, 1 petal, 1 pollen, 1 petal, and 1 base color bead. Stitch up through the top 3 core beads and pull snug. Pass up through the core bead just added.
Pick up 1 core, 2 base, 2 petal, and 1 base color bead. Stitch up through the top 3 beads and the new core bead as before.
Repeat the entire pattern, including a row of 5 base color beads between each flower, until you have a rope that is about 2 cm short of your desired length. Remember to start with just 1 core bead at the beginning of each flower motif.
After the final stitch, pick up 7 core beads, one half of your clasp, and 6 core beads. Pass back through the first core bead picked up, and the top 3 core beads in the beadwork.
Pick up 4 base color beads, stitch down through the top 2 core beads in the rope, and pull snug. Add 3 base color beads, and pass through the top 4 beads in the core.
Stitch up through the nearest spiral row and weave around the new loop twice to add strength. Weave in any remaining thread and trim.
Repeat on the other end of the rope to add the second half of the clasp (or a bead loop for your button) and taper the rope.
This pretty flower pattern is perfect for spring bracelets and necklaces, and a great way to use up small amounts of seed beads leftover in your stash. You can also combine 2 or more ropes in a single bracelet for a beautiful wrist-garden!
Copyright 2015 Inspirational Beading
Subscribe to Inspirational Beading
Get inspired on Facebook and Google+
Tweet
Topics:
flowers,
spiral rope,
spring,
tutorial
Tuesday, June 25, 2013
Work in Progress: Nile Lariat
Ever since entering a UFO necklace in the last Ugly Necklace Contest, I’ve found that it’s much easier to let go of designs that aren’t working, even if I’ve already invested a lot of time and thread. Before, it was difficult to admit that it was time to start over, especially with the idea of frogging something - or rather the guilt of not frogging it - looming over the project. Now I almost look forward to having a lot of beadwork scraps to fuse together at the end of the year. It's a rather refreshing retreat.
This week I’m way behind on a new Egyptian Gods necklace, because after giving my original idea a fair shot it didn't really deserve, I had to start over.
I created a custom mix of 8/o seed beads specifically for accents in a spiral rope, mixing up the dregs of several blue, green, brown, and black packets. There are far too many colors to bother sorting them back out, so I was pretty determined to make my idea work and use up the mix. I tried switching the rope colors to get a color blocked look and see how it worked, but the fact remained that the beadwork was very…inelegant. I stewed and pondered for awhile, and finally decided on double St. Petersburg chain with stripes, which would make use of the 'river' mix and the other seed bead colors I’d chosen.
The new necklace chain not only looks better, but it has a more water-inspired appearance, which is perfect. When finished, it will also include some beaded flowers and papyrus reeds in tribute to the Egyptian god of inundation. All of the components are already complete, although I may have to go back and replace the lime green papyrus with emerald - I think the color may look too cute against the opaque blues of the chain.
Last week’s jewelry projects are complete - although the pendants are still waiting for their cords. I would like to keep taking these short ring and pendant breaks whenever possible, assuming that I can catch up on my gods list and leave a little room in my schedule. I’m about half way to my deadline, but still have a lot of deities to go.
Copyright 2013 Inspirational Beading
Subscribe to Inspirational Beading
Get inspired on Facebook and Google+
Tweet
Topics:
Bead Trays,
blue,
nature,
spiral rope,
St. Petersburg,
WIP
Thursday, May 16, 2013
Sacred Bull Necklace
It’s always gratifying when a design idea turns out the way we planned, but it’s an even rarer treat for a finished piece to greatly exceed our expectations. There was a rather long period when I thought that my latest Egyptian gods necklace was going to be a dud, and it wasn’t until the last minute that I realized it turned out perfectly.
My subject was Apis, the black bull of Memphis. Priests of the cult of Apis worshipped an actual bull, believed to be the reincarnation of the god Ptah. It was identified by several white markings, and treated like a king, including a lavish Egyptian burial.
I decided to blend a little from both gods, and included both black seed beads with beige, white, and real bone. For a hint of Ptah, I included some African trade beads in a dark lapis blue. Happily, I also had one more spiral bone pendant left, which would make the perfect focal for a bull necklace.
I was really eager to use the trade beads, but they aren’t as regular as new seed beads. I decided to go with spiral rope to give them a place to shine. The beadwork came out rather chunky thanks to the extra large beads. To mimic the white triangle on the forehead of the Apis bull, I switched from black and blue to white at the center of the rope. I added some natural bone heishi to replace the trade beads and provide a backdrop for the pendant.
I wasn’t at all thrilled with how the rope was looking at first, and I was sure that I had made a mistake. I was already committed, so I decided to see how the rope would turn out, and perhaps make another use for it. It wasn’t until everything was assembled that I realized how well the pattern and colors work together. The shock of white at the center of the necklace creates a great contrast.
Copyright 2013 Inspirational Beading
Subscribe to Inspirational Beading
Get inspired on Facebook and Google+
Tweet
Topics:
black,
blue,
bone,
Egypt,
Egyptian Gods,
spiral rope,
trade beads,
white
Thursday, September 22, 2011
New Beads: Cowry Shells
Unfortunately, I had a hard time finding anything but sawed cowry shells, which are often used in hemp jewelry and other pieces as charms and dangles. I wanted the full effect, especially the smooth shell backs with their pretty, organic designs.
I had almost given up my search for whole, preferably drilled, cowries, when I got lucky. I was out doing some thrifting, and spotted a long, luxurious shell necklace made almost entirely from whole cowries. I didn’t even hesitate to scoop up this treasure, and took it home to disassemble it and see just how lucky I was.
Sure enough, the necklace design relied on the cowries being drilled once, allowing the strings to be fed through the inside of the shell, and out through the spout on the opposite side. Pairs of cowries were then anchored together by a single shell, hiding all of the strings and making a nice, neat necklace.
All I had to do was come up with a beadweaving design that would make the best use of the cowry shape. Dangles and fringe would likely be askew and not very pretty. I finally decided on spiral rope, which would allow the shells to hug the beadwork, and show off their pretty backs.
Weaving with cowries isn’t the most fun I’ve ever had. Most of the time, I was able to feed Fireline through the tiny, curved spaces by hand. Occasionally, I needed a little help from a twisted wire needle, which is now hopelessly kinked and mangled from the job.
Although I was happy to be able to use up the blue and white bead mixture I accidentally created this summer, and I like the ocean theme, I sort of wish I had gone with an earthier palette. I don’t have quite enough shells left to make another necklace like this, but there are enough for a few bracelets. I’d like to give them another try in a more tribal design.
Copyright 2011 Inspirational Beading
Subscribe to Inspirational Beading
Get inspired on Facebook
Tweet
Tuesday, November 9, 2010
A Necklace a Day - Nine
I was searching through my bead stash for suitable colors to use, and came across a few packets of pastel colored peanut seed beads. I’ve used them in spiral ropes before, as accent beads, but I didn’t want to do the same old pattern again. Then it occurred to me that they might look nice as the main beads in the spiral rows, so I grabbed all three colors - purple and green Ceylon, and pink lined crystal.
Along with cream and white round seed beads, I made a spiral rope with three peanuts at the center of each row. I was so thrilled with the way the beadwork took shape! The peanuts lock together perfectly, sometimes alternating their position from vertical to horizontal. Because they’re just slightly larger than the round seed beads, they add a bit of bulk to the spiral rows, making them tighter and a little puffy-looking.
With the peanut seed beads in the rows, the spiral has a nice bubbly texture, but has the same drape and flexibility as a regular rope. I added a simple looped bail to the tagua slice, and that’s one more necklace down - only 21 more to go!
Copyright 2010 Inspirational Beading
Tweet
Topics:
necklace,
Necklace a Day,
pendant,
pink,
spiral rope
Friday, July 30, 2010
Beading Tutorial: Double Spiral
Flutterby Double Spiral Necklace
One of my favorite stitches is the double spiral. Although it’s easy to do, and looks fantastic, double spiral isn’t as common as some other rope stitches like tubular herringbone. Because it uses up a lot of beads, it can be a great way to finish off mixtures or use up that collection of spilled beads you’ll never get around to sorting.
The steps are almost identical to traditional spiral rope, with one extra row chasing the other. Because there are so many thread passes, it’s important to use large seed beads for the core - size 8/o or larger. It’s also best to use a sturdy needle. Though a small needle makes a better fit when plenty of thread is used, the limited space between the core and spirals requires a lot of angled stitches.
The spiral rows can be made up of just about anything, though average sized beads (from 10/o to 12/o) are best at the ends, so that the rows fit together snugly. Just like a basic spiral rope, you can increase or decrease the length of the rows, add accents, or create patterns for different looks.
To stitch a basic double spiral rope:
On a comfortable length of beading thread, pick up 4 core beads and 7 Color A beads. Slide them down until you have about an 8 inch tail, and stitch back up through the core beads. Pull tight to form a pair of side-by-side stacks.
Pick up 1 core bead and 7 Color B beads. Stitch up through the first 4 core beads again, and pull snug until the new row slides into place. Stitch up through the new core bead and pull tight.
Hold the beadwork so that the Color A row is to the left. Pick up 7 Color A beads, and stitch up through the top 4 core beads. Pull the thread snug, and push the new row to the left, up against the first.
Flip the beadwork so that the Color B row is to the left. Pick up 1 core bead, and 7 Color B beads. Stitch up through the top 4 core beads and pull tight. Stitch up through the new core beads. Push the new row to the left. Flip the beadwork to begin the next row of A.
These are the basic steps for creating the spiral. Continue adding new rows, flipping the beadwork between stitches. Often with really simple techniques, once the steps become too familiar, we can loose track of them. If you can’t remember which row was just added, check the top core bead. If there are 2 bead stacks exiting from the top of the core, it’s time to add a new core bead and a row of B. If there’s just one stack, it’s time to add a row of A.
You don’t need to use completely different colors for the two spirals, but it is a good idea to make each one a bit unique. When stitching my Flutterby necklace, I used a single bead soup, but picked a contrasting accent bead for either row - pale blue on one side, and dark blue on the other. This helps keep track of which row is which, and makes stitching more intuitive.
Happy beading!
Copyright 2010 Inspirational Beading and The Sage's Cupboard
Tweet
Monday, June 21, 2010
One Ring Circus
Ring # 21 - Kaleidoscope Clown
The Inspiration:
I have had these multicolored seed bead mixtures for what seems like an eternity. They’re so pretty, but I never know what to do with them because they don’t really go with anything. And although they look great in the vial, they’re not all that sophisticated, so I’m always stuck for inspiration.
Finally, I decided that no epiphany was needed to use them. I would just make something with them and not worry about what it could look like, or what the name of the piece would be. This would be necessary beadwork!
Once I had put my foot down about not keeping these beads around, I felt totally free to just go with it and use them up. I didn’t have any doubts about combining them into one project - whatever would be would be.
One of the mixes is made up of matte Czech seed beads - some opaque and some transparent. The colors are very muted, with shades like peach, thyme, and cranberry. The other mixture is all shiny opaque seed beads. It includes all the classic colors like black, white, red, and blue… plus a few zingers like turquoise, pink and brown.
The Beadwork:
With two such chaotic bead palettes to work with, I decided to keep it simple and use spiral rope to make a pretty bracelet. It’s an ideal technique not only because it would look nice with the beads, but it would allow me to use them all up quickly. I started with the clasp, then just stitched spirals until I ran out of beads. I had hoped to get three ropes, but two was all I could get out of the mixes.
Today’s Ring a Day design was created with the last of the leftovers. I used the matte finished beads and a red druk to make a button focal, then added it to a black herringbone band. I like the playful, circus-like quality of the colors. And now I have two more empty spaces in my bead stash. Only several dozen more to go!
Copyright 2010 Inspirational Beading and The Sage's Cupboard
Tweet
Topics:
bead stash,
beads,
bracelet,
mixture,
multi-color,
Ring a Day,
spiral rope
Tuesday, April 27, 2010
Spiral Ladybug Necklace
Lady Bug Cluster
Photo Credit: LaVeta Jude.
The ladybug is a favorite because it is so cute, with it’s pretty wings and round body. They are also treasured among gardeners, because they eat smaller, unwanted pests. Luring and encouraging ladybugs is an important part of organic gardening. Usually, ladybugs are depicted with bright, cherry red wings and perfectly round spots.
The Inspiration:
In nature, most ladybugs have a tomato-like coloring, ranging from under ripe yellows, to deep summer reds. Their markings are far from uniform, with many interesting shapes in black and white. I wanted to create a piece that would include all of the colors of ladybugs in nature, while avoiding the classic round shape of a cartoon beetle.
I started by creating two bead soups. The first contained assorted seed beads and accents in black, white and crimson. I combined two pre-made black and white mixtures with other beads from my stash until it looked just right. The second bead soup contained oranges, yellows, and natural reds. There were a few green seed beads in the mix, which I would have to ignore, though I did end up using many of them as stop beads.
The Beadwork:
I considered many free form beadwork designs before finally deciding on double spiral, which would allow me to showcase the ladybug palettes evenly. I can only assume that the two color mixtures have the desired effect, because at one point my husband asked why I was making a cluster of ladybugs.
I increased the spiral rows gradually as I stitched, and at random. When it came time to start decreasing, I started to wish I had used some sort of system to count increases, but I was able to make the second half of the rope fairly even with the first. I finished it off with a few black druks - like bugs on a log - and a button clasp.
The Etsy BeadWeavers “Insects” Challenge opens May 9th. Visitors can vote for their favorite entry until May 15th. Stop by the EBW Team blog to see all of the amazing beadwork creations.
Copyright 2010 Inspirational Beading and The Sage's Cupboard
Tweet
Tuesday, March 16, 2010
Pussy Willow Bracelet
As adults, we often take the beauty of nature for granted. A blue sky with big white clouds, wild flowers along the side of the road, and birds singing in the trees are so much a part of our lives that we don’t always notice them.
Once in awhile, nature gives us something that is so wonderful, we can’t help but think of it fondly. Tropical fish and brightly colored butterflies are some things that come to mind. Because we don’t see them every day, their charm does not wear off over time.
Some of nature’s gifts can only be enjoyed at certain times of year, and because of this, we treasure them even more. They are often most valuable to us as children, which is the case with pussy willows. To a young heart, there are few things more wonderful than the fuzzy little buds that pop up in the spring.
The Inspiration:
I recently took the opportunity to try out the new peanut seed beads. I remembered seeing an announcement for them awhile back, so when I was shopping for new needles I scooped some up. I had no idea what I was going to do with them at the time, so I grabbed some in pink, hoping that a fun color would spark some inspiration.
After much pondering, I decided to play it safe and use the peanut beads as accents. I paired them with some pretty gray seed beads at first. The gray-lined black color has been one of my favorites ever since I first learned about the existence of seed beads. I have used them several times to imitate pussy willows, because the two-tone color is perfect for the task. To complete the look, I made a mixture of assorted brown 11/0 seed beads.
The Beadwork:
Instead of trying to make actual buds, I simply used the colors I had chosen to mimic a pussy willow tree. The brown beads make up the base of the spiral rope, with the peanut beads adding texture within the rows. To make it a little more interesting, I increased and decreased the number of beads every five rows.
I really like the way the bracelet turned out, but I’m still not satisfied. I’m anxious to really put the peanut beads to work. I still have them sitting out on my work space, waiting for just the right project. I’m afraid to put them away until inspiration strikes!
Copyright 2010 Inspirational Beading
Tweet
Thursday, February 11, 2010
Beading Tutorial: Spiral Rope Chain
I often recommend this technique for new beaders. It’s not a difficult stitch to master, and once the basic concept is understood, the possibilities are endless. It can be done with seed beads of any size. It can be increased, decreased and embellished with ease.
A basic spiral rope is made up of two sections - the core, and the outer spiral rows which wrap around the core. Many how-to’s for spiral rope use an equal number of beads for each. Although the results are pretty, there is usually a fair amount of thread peeking out between the core and the spirals. To make a really polished looking rope, I like to make the outer rows one bead longer than the core.
How to Make a Basic Spiral Rope:
To make a rope with hidden thread, select two colors of seed beads in the same size. One color will be used for the core, and one for the outside of the spiral. Thread a needle with a comfortable length of beading thread, and pick up 5 core beads, and 5 outer beads.
Slide the beads down until there is a six inch tail. Holding the beads in place on the thread, stitch up through the core beads again, and gently pull the thread snug until the beads form two side-by-side stacks. Hold the beadwork so that the spiral beads are to the left.
Stitch up through the new core bead and pull the thread tight. Repeat these steps, adding 1 core bead and 5 spiral beads. Stitch up through 4 core beads and so on. Remember to stitch the new core bead into place at the end of each new addition.
Basic spiral rope is wonderful for lariats or to dress up an art glass focal. You can also create different textures by increasing the number of beads in the outer rows, or adding different types and sizes of beads.
To make my “Peppermint Pixie” bracelet, I started with 5 pink beads in the spiral, then increased gradually to 13 beads per row, and back down to five to finish the rope. The accent beads replace seed beads that are equal to their length.
For instance, the cat’s eye ovals are about 6 seed beads wide, so I would omit 6 seed beads each time I added an oval to a row. The Czech glass leaves take up about 3 seed beads, but I only omitted 2 for each leaf, because their weight and size adds a little more length to the row. Try out different combinations of beads with spiral rope chain for different textures!
Copyright 2010 Inspirational Beading
I would like to thank Artbeads.com for providing the Cat’s Eye beads used in this piece. Inspirational Beading has not received paid compensation for including Artbeads.com products or reviews in this blog post. I have shared my honest opinions about the products used in this design.
Tweet
Subscribe to:
Posts (Atom)
Inspiration Topics
accessories
amulet
Ancient Worlds Modern Beads
animals
April's Army
art
ArtFire
astrology
astronomy
autumn
awards
awareness
bangle
beach
Bead Inspired
Bead Shops
bead soup
bead spotlight
bead stash
Bead Trays
beaded beads
beading theory
beads
belt
bezel
birthstones
black
blog spotlight
blue
boho
bone
book spotlight
bracelet
Bracelet A Week
branch fringe
brick stitch
brown
bugles
buttons
cabochon
ceramic
chain maille
challenge
charity
chevron chain
christmas
collar
Collections
color
Color Ideas
color triads
conservation
craft shows
crafts
crochet
crystals
cuff
Culled Beads
current events
Current Faves
daggers
Daily Sets
daisy chain
Delicas
Destash
drops
Dutch spiral
earrings
Egypt
Egyptian Gods
embellishing
embroidery
environment
etsy
exotic
fair trade
fantasy
fashion
Favorite Beads
Favorite Techniques
feminine
fibers
film
findings
fire polish
fixtures
Flashback Test
flickr inspiration
flowers
food
found object
free form
fringe
Geek Jewels
geekery
gemstones
geography
giveaway
glass
gold
gray
Greece
green
herringbone
hex cuts
history
holiday
home decor
insects
inspiration tip
inspired beader
Inspired by...
Inspiring Links
ivory
Jewelry Stash
knitting
ladder stitch
lampwork
lariat
leaf fringe
leather
lights
literature
loomwork
macrame
magatamas
Master Class
Medallions
metal free
metalwork
Mini Collar a Week
mixed media
mixture
Mood Board
MOP
multi-color
multi-strand
music
natural beads
nature
necklace
Necklace a Day
Nepal chain
netting
New Beads
ocean
ombre
orange
paint
paper
patterns
pearls
pendant
peyote
photography
Picasso finish
pink
Pinspiration
PMC
polymer clay
poster sketch
purple
quick inspiration
rainbow
RAW
red
resin
ring
Ring a Day
rivoli
Rome
Russian spiral
scarf
science
seed beads
shell
silver
soutache
spiral rope
spring
square stitch
St. Petersburg
steampunk
stringing
stripes
summer
tagua
TBT
The Elements
thread
Tilas
Time Capsule
tools
trade beads
triangle weave
tribal
tropical
turquoise
tutorial
two-hole beads
Ugly
vintage
Wear it Twice
weather
white
winter
WIP
wire
wishlist
wood
World Beaders
yellow
Blog Home * About * Beading Tutorials * Advertise
Learn About Sponsoring Inspirational Beading with Project Wonderful
Affiliated With ShareASale.com and Amazon.com
Learn About Sponsoring Inspirational Beading with Project Wonderful
Affiliated With ShareASale.com and Amazon.com