Showing posts with label fringe. Show all posts

Friday, December 2, 2016

The Lady of the House

Ask anyone who their favorite Egyptian goddess is, and most people would probably say Isis or Hathor. These dieties known for motherhood, healing, love, and protection long outlasted their original culture and continue to be an important part of spirituality and feminity to this day. This is an impressive achievement when you consider that they were competing with hundreds of other gods and goddesses. Throughout 4000 years of Ancient Egyptian culture, many religions, cults, and legends were incorporated into the pantheon and worshipped in the home, alongside the same dieties that we can still see depicted on the walls of ancient tombs. The names and identities of many Egyptian goddesses have been lost to time, but the daughters of Ra, and the children of Nut and Geb continue to thrive in their own way.


My favorite goddess is Nephthys - sister of Isis and wife of Set. Her name means "Lady of the Mansion" and she was the Ancient Egyptian goddess of death. Not to be confused with Anubis, the god of embalming, or other death gods with morbid and shadowy backstories, Nephthys was as much a goddess of healing and protection as her sister. In Ancient Egypt, life, death, and rebirth were all linked; Nephthys represented the realm were all things living and dead are one. This concept can be very comforting, especially when one feels disconnected from their peers or the world around them. We are all made from the same atoms, and Nephthys embodies that notion perfectly.

The Inspiration:

The realm of Nephthys was the place where the fertile waters and silt of the Nile met the harsh and inhospitable desert - a margin between abundant life and bleak death. She was the place were bodies become soil, and soil nourishes bodies in a neverending circle. When I picture Nephthys I always think of a goddess that is poised and regal, while also having a smoldering vitality. She is the combination of solemn death and the never ending resilience of life. She is birth, death, regeneration, and evolution all rolled into one.

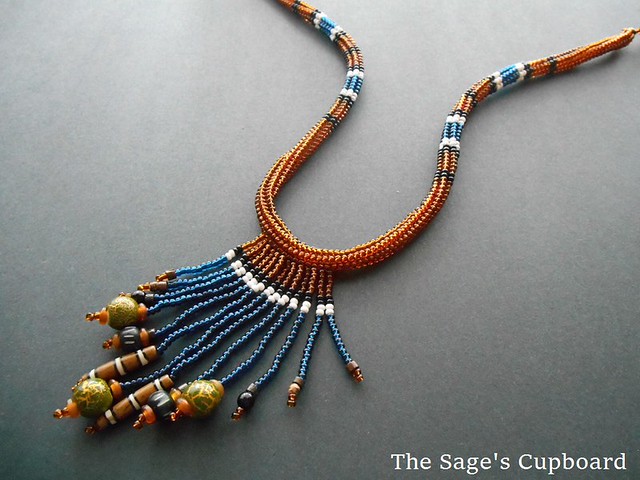
In making a new tribute piece to Nephthys, I wanted to incorprate the earthy colors of biomass such as greens, browns, and black. This time I also wanted some rich blue to represent the water that connects all living things. For this project I started by combing through my stash to find pieces that had the right look to represent the lady of death, and tried to picture them together until a design took shape. I also wanted to be sure that the piece would turn out right on the first try, so I decided to go with my favorite fringe. This would allow me to pull lots of different accents together, and add some stripe patterns to keep things looking Egyptian.
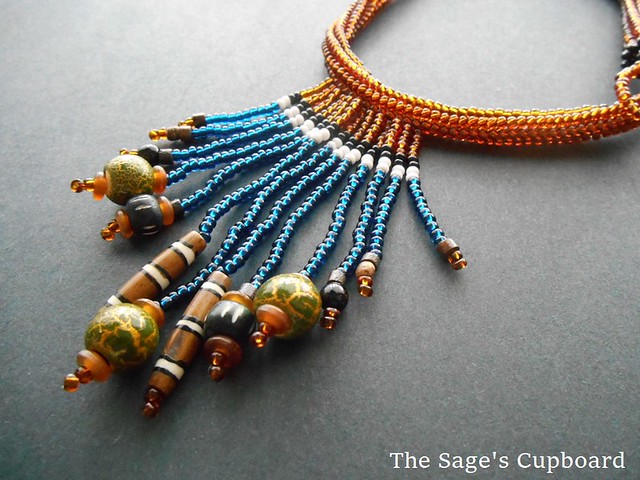
Nephthys Beads


The Beads:

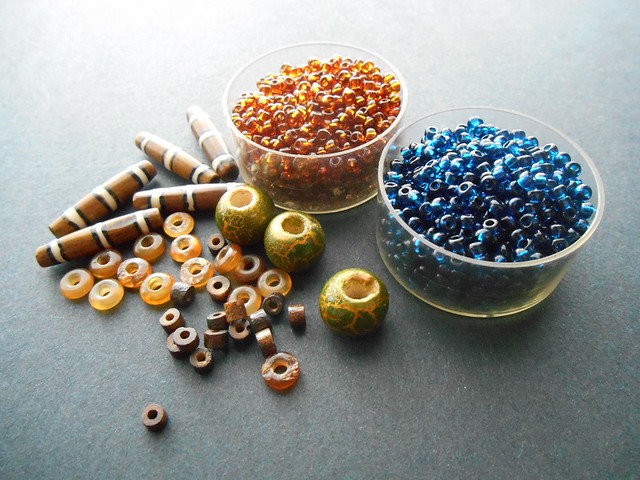
For the base beadwork I chose transparent dark topaz and Montana blue sapphire seed beads in size 8/o. These were my earth and water elements, and they contrast each other with perfect sophistication. I also included some black and white seed beads for borders and stripes, though I hadn't yet decided what type of pattern I wanted to use.

For accents I had so many wonderful choices, but in the end I went with bone tubes, crackle finish wood, amber horn heishi beads, and sono wood tubes. These beads all had the color, texture, and light that I wanted in this piece. I was particlarly exited to use the green wood beads from Blueberry Cove, which so perfectly represented Nephthys' home on the Nile. I was in the mood for even more texture, so I later added batik bone beads in black, jet black druks, and some tiny natural coconut rounds to the mix.
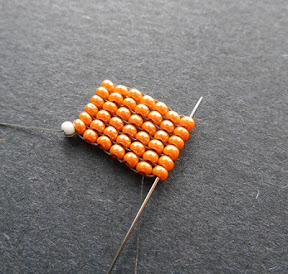
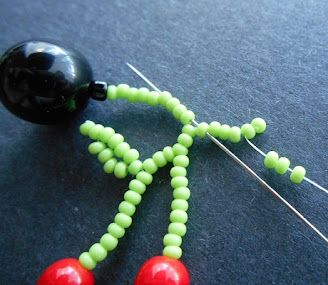
Nephthys Necklace 1


The Beadwork:

Few things are easier than creating something from your favorite inspiration, and this project certainly fits that description. The pattern and the fringe just came together, and the work seemed to go by in a flash.

For the rope, I used black to border the brown sections, and white to border the slightly darker blue portions. To break up the rope a little, I added smaller blocks of brown between each of the striped sections. This is a little bit different from any of the patterns that I've used before, and not exactly traditional, but I love how it turned out. I repeated the pattern somewhat for the fringe, connecting it at the edge with brown, then finishing with a cascade of more Montanta blue sapphire. I really love working with this color in any type of bead, and it never disappoints.

Nephthys Necklace 2


Do you have a favorite figure from mythology? How do they inspire your work?

Mortira

Subscribe * Facebook * Google+
Send your beading questions to InspirationalBeading@gmail.com
Support Inspirational Beading for bonus tutorials and more! Powered by Patreon

Copyright 2016 Inspirational Beading


Monday, November 7, 2016

Work in Progress: Daggers and Spirals

Greetings, beaders! I hope that you've had a fantastic transition into fall. I am still struggling with finding the right work-life balance, and fitting creative time in where I can. Things seemed to be going smoothly for awhile: I had some projects lined up that I was really excited about and the first one turned out great. I was working on a new spiral rope lariat with lots of different daisy patterns, and I decided to go ahead and make a second one, thinking that since I was on a roll, I might as well keep going. This was a huge mistake. I got bored with the new rope pretty quickly, and then a string of graveyard shifts threw off my whole routine and I never got around to finishing it.


Daisy Fringe Lariat

I picked up a new project a few weeks ago, and found myself something new to binge-watch while I worked on it. It took some time to decide what kind of project I could really fall into, when I remembered that I had some new peacock daggers to use. Not only is black with silver polka-dots an easy finish to work with, but the size and shape of the daggers are perfect for a wide-net collar. Rather than come up with a whole new project, I recreated my last successful dagger collar and had a pretty good time with the simple pattern. The colors are pretty similar to the previous design as well, although I had a little fun adding a hint of purplish cobalt iris.

Spiral Lariat in Progress

I still haven't made or added a button to the new collar. A few late nights working on Hallowe'en costume elements derailed my beading plans yet again, but I'm determined to get back on the horse and hopefully have some nice winter projects to keep me occupied. I know that if I can get back into the zone with making again, more writing will follow as well. A little extra inspiration is all I need to come up with some new tutorial ideas for you!

Dagger Collar in Progress

What kinds of projects have you been working on?

Mortira

Subscribe * Facebook * Google+
Send your beading questions to InspirationalBeading@gmail.com
Support Inspirational Beading for bonus tutorials and more! Powered by Patreon

Copyright 2016 Inspirational Beading


Friday, August 26, 2016

Work in Progress: Nefertiti Stripes

My adventures with stripes and fringe are still going strong, and projects are chugging along at a much better pace. I had thought that I would want to try a new project once the latest necklace was complete, but I was still really in the mood for fringe, and herringbone necklaces are just the most satisfying way to use it right now. For the new necklace, I had a craving to do something a little more Egyptian, so I put together a jeweled palette. I was a little worried at first that the pattern would end up being too busy. I think once the entire piece is complete and the fringe is added it will come together just fine.


The last necklace turned out great. I hadn’t given any thought to accent beads when I chose my palette, and it turns out that the only thing I had in my stash that would match with the opaque colors was African Christmas beads. This is perfectly fine by me! I had fun picking out just the right beads to use and putting on the final touches.


What are you making right now?

Mortira

Subscribe * Facebook * Google+
Send your beading questions to InspirationalBeading@gmail.com
Support Inspirational Beading for bonus tutorials and more! Powered by Patreon

Copyright 2016 Inspirational Beading


Wednesday, May 11, 2016

Work in Progress: Getting Ahead

I am very happy to report that this week’s mini collar is already finished, and we’re only halfway through the week! This means that I’ll be able to make a little progress on the blue coconut necklace, but probably not enough to finish it just yet. Adding the fringe is extremely time consuming, especially when they just keep getting longer as I go. I would like to get as far as adding the daggers and finding out if it’s all been worth it.

Coconut Fringe Necklace in Progress


Meanwhile, I also have the practice project for our next Peyote Stitch Master Class on the go. Our next lesson will cover tubular peyote and spiral peyote, though the Cellini spiral will get its own lesson and project after we touch on bezels. We’re getting very close to the end of this series, and I’m thinking we should follow with a Right Angle Weave Master Class. A lot of the principles are the same for both stitches, and there are just as many variations to explore.

Spiral Peyote Project in Progress


What are you making this week?

Mortira

Subscribe * Facebook * Google+
Send your beading questions to InspirationalBeading@gmail.com
Support Inspirational Beading for bonus tutorials and more! Powered by Patreon

Copyright 2016 Inspirational Beading


Friday, April 22, 2016

Giveaway: Chunky Herringbone Necklace Tutorial

For the past several weeks I’ve been puttering away at a brand new PDF tutorial for one of my favorite herringbone necklace designs. This project is great for showcasing larger accent beads and heavy fringe. I’ve used it to display everything from lampwork beads to beaded flowers, and it is the basis for some of my all time favorite designs. Even after many fun projects using this design, I've only just begun to explore the fun possibilities in dressing up the fringe. It's a great stash-busting project and a fun way to display a variety of beads.

Chunky Herringbone Fringe Rope Necklace Tutorial


The PDF tutorial for the Chunky Herringbone Fringe Necklace is finally complete, and is now available in my shop for instant download. The tutorial project features a striking colorblocked rope and bold wood bead accents. To celebrate the first of many new tutorials this year, I’m giving away one copy to a lucky reader!

How to Enter

To win a free copy of the Chunky Herringbone Fringe Necklace tutorial, simply leave a comment on this post letting us know what kinds of beads you would use in the fringe. I’d love to hear your ideas!

Important: Please make sure to include an email address in your comment so that I can contact you if you win!


One winner will be drawn on Friday, April 29th. This giveaway is open to all international readers.

Good luck, and happy beading!

Update: This draw has closed.

Mortira

Subscribe * Facebook * Google+
Send your beading questions to InspirationalBeading@gmail.com
Support Inspirational Beading for bonus tutorials and more!

Copyright 2016 Inspirational Beading


Tuesday, April 12, 2016

Sailing Away Earring Tutorial

Sailing Away Silhoutte Fringe Earring Tutorial

For many beaders, there are few things more fun and satisfying than whipping up a pair of fringed brick stitch earrings. The classic design is easy to make and offers lots of fun possibilities for pattern and color play. You can create all kinds of variation within the fringe by tapering, adding drop beads, or incorporating a pattern. This week I discovered that brick stitch earrings are also a great backdrop for silhouettes.

In the nautical-themed March bead box from Blueberry Cove Beads, subscribers got so many wonderful treasures, including a lovely packet of wooden cut-out charms with a sailboat motif. I was totally taken with these pretties instantly because they would go so well with my favorite tagua-slice-and-St.Petersburg necklace design. Front-drilled charms and pendants are great for layering as a unique focal. However, since the charms came in pairs – two each in white, pale blue, and navy – I decided to experiment with earring designs instead, and the Sailing Away earrings were born.

Lightweight wooden beads and charms are ideal for earrings, and are a great way to add oomph without making earrings too heavy. You could also use tagua nut slices, shell charms, or mini pendants.

To create these earrings you’ll need a few grams of 11/o seed beads in three colors, and one matching 8/o seed bead color. You’ll also need some lightweight front-drilled charms or pendants, like the sailboat cut-outs, jumprings, and earring findings. For the example project I used an ocean sunset palette of orange, purple, and navy blue, but any color trio would look great!


Sailing Away Silhouette Fringe Earrings

1. Attach a stop bead to 2 yards (1.8 m) of beading thread, leaving a 6 inch (15cm) tail. Pick up 6 seed beads and slide them down to the end.


2. Working in square stitch, add 6 rows of beadwork for a total of seven vertical columns of beads.


3. Anchor the thread by stitching down through the 6th column, and back up through the 7th column again.

4. Pick up 2 seed beads. Skipping the nearest bridge of thread between the top beads, needle under the following bridge, moving towards you. Gently pull the thread snug to bring the new beads into place along the top of the beadwork.


5. Stitch up through the 2nd bead just added and pull snug, being careful not to cross or splice the threads.

6. Pick up 1 seed bead. Pass the needle under the next thread bridge at the top of the beadwork and pull snug. Stitch up through the new bead.


7. Repeat step 6 until you reach the end of the beadwork and all of the bridge threads are covered. Stitch up through the last bead added. Flip the beadwork to start the new row.


8. Repeat steps 4-7 until you have a row with just 2 beads. Pick up 1 size 8/o seed bead, and 13 size 11/o seed beads.


9. Stitch back down through the 8/o and into the opposite brick-stitch bead in the final row to secure the loop.

10. Pass down through the beads at the edge of the brick stitch section and all of the beads in the outer square stitch column.


11. Anchor the thread by stitch up through a few beads in the next column, then back down through the same number of beads in the outer column to exit from the bottom. Leave the working thread for now.

12. Remove the stop bead from the tail thread and weave it into the beadwork, passing through the loop section at least once to add strength. Trim.

13. Pick up the working thread again. String about 3cm of size 11/o seed beads, 1 size 8/o seed bead, and a size 11/o.


14. Skipping the last bead picked up, stitch up through the 8/o seed bead and the rest of the strand. Stitch up through a few beads in the square stitch section, then down through the same number of beads in the next column. Check the tension on the fringe.


15. Continue adding strands of fringe, tapering as desired, until you have 7 strands.


16. Weave up into the center of the brick stitch section. Pick up a silhouette charm and 2 size 11/o seed beads. Skipping the 2nd bead added, pass back through the 1st seed bead and the charm, and needle through to the back of the beadwork. Pull snug.


17. Working from the back of the beadwork, stitch through the nearest seed bead. Weave around to retrace the thread path through the charm, then secure any remaining thread and trim.

18. Attach a jump ring and ear wire to the loop. Repeat to make a second matching earring.

Brick Stitch Silhouette Earring Tutorial


Happy beading!

Mortira

I would like to thank Blueberry Cove Beads for giving me the chance to try out the Nautical Bead Box. Inspiration Beading has not received compensation for including products in this post.

Subscribe * Facebook * Google+
Send your beading questions to InspirationalBeading@gmail.com
Support Inspirational Beading for bonus tutorials and more!

Copyright 2016 Inspirational Beading


Saturday, February 13, 2016

Cherry Bomb Fringe Earrings Tutorial

Cherry Bomb Beaded Earring Tutorial

It’s kind of amazing what you can recreate with just a little fringe in the right colors. The idea for this super-easy cherry fringe design popped into my head when I was creating earring projects for Ancient Worlds Modern Beads, and it was just too fun not to make. These cherry bomb earrings look great in opaque or transparent colors, but I do recommend going with a bright green to avoid any resemblance to holly berries. On the other hand, you could modify the design a bit to get a cute holiday earring as well!

You will need:

2 black 8-10mm round beads
2 black 4mm heishi or spacers
4 black 8/o seed beads
4 or more red 6mm rounds
4 or more red 11/o seed beads to match
a few grams each green and black 11/o seed beads
2 jumprings and/or earwires
Size D beading thread such as Nymo

1. Attach a stop bead to 1 yard of stretched and conditioned thread, leaving a 6 inch (15 cm) tail. Pick up 1 8/o seed bead, 1 spacer, 1 8-10mm bead, and 1 8/o bead. Slide them down to the end.


2. Pick up green 11/o seed beads in multiples of three until the strand reaches the desired length for your earring – at least 30 beads are needed for the fringe base, but you can go as long as you like. Add 1 red 6mm round, and 1 red 11/o. Skipping the red 11/o, stitch back up through the round bead and the following 9 green seed beads. Pull snug, making sure there is no slack in the strand.

3. Pick up 7 green seed beads. Skipping the last bead added, stitch back through the 6th bead and pull snug.


4. Pick up 4 green seed beads, and stitch back through the first bead added in the previous step, plus the following three beads in the main strand, moving towards the black round. Pull snug to form a leaf stitch.

5. Pick up green seed beads in multiples of three until you have a second ‘stem’ of the desired length. You can make it longer or shorter than the first cherry stem – whatever looks good to you. Add a red round and seed bead. Skipping the red seed bead, stitch back through all of the beads just added, and the following 3 beads in the main strand. Pull snug.


6. Pick up 7 green seed beads and add a second leaf stitch (steps 3 and 4). Stitch back up through the remaining beads in the main strand, and all of the black beads. Pull snug.


7. Pick up 9 black seed beads. Stitch back down through all of the black beads in the base to form a loop at the top of the beadwork. If desired, string on an ear wire or soldered jump ring before securing the loop.


8. Pick up green seed beads in multiples of three to begin a second cherry fringe. Repeat steps 2-6, making your fringes as long or as short as you like. Weave through the black seed bead loop at least once more to add strength, then secure any remaining thread in the fringe and trim.

9. Add jump rings and ear wires as desired, then repeat all of the steps to make a second earring.

Happy beading!

Mortira

Subscribe * Facebook * Google+
Send your beading questions to InspirationalBeading@gmail.com
Support Inspirational Beading for bonus tutorials and more!

Copyright 2016 Inspirational Beading


Wednesday, June 24, 2015

Work in Progress: Final Fringe

I am very happy to report that the new fringe necklace is just minutes away from completion. All it needs is one final strand – and some tying off of tails – and then it will be finished! The rope turned out really great, and it my favorite part of the piece. I’m definitely going to keep the stripe pattern in mind for future designs.

Striped Necklaces in Progress


I decided at the last minute not to include any yellow mother of pearl chips, and just put in a few blue ones for a pop of color and texture. The fringe itself sort of took shape as I went. After about 3 strands with chips and bone beads, I decided to add a second layer with just glass beads. The pattern is brand new – the plain strands are slightly longer than those at either side, which gives the fringe a really full shape, but still doesn’t interfere with the tapered look.

As soon as I’m finished with this piece, I’m going to work on a new multistrand necklace with lots of primary colors. I’ve got some white-hearts already set aside, and I’m hoping that the mulistrand design will allow me to be a little less choosy with the red vintage beads, which tend to be pretty wonky.

What are you making right now?

Copyright 2015 Inspirational Beading
Subscribe to Inspirational Beading
Get inspired on Facebook and Google+


Wednesday, February 4, 2015

Work in Progress: Delayed Fringe

For the past few weeks I felt like I was chugging along at a good pace, and then everything seemed to get derailed all at once. My workspace right now looks much the same as it did last week, but hopefully it will be changing very soon.

I had added the first few strands of fringe to the new cobalt necklace when I realized I had started them much too short, and they looked a bit weird. I got as far as snipping them all off and then didn’t get a chance to sit down and restart until today. Luckily, I had plenty of time to think it over, and I finally came up with a solution that I like. If all goes well, the fringe will be complete in no time.

Cobalt Fringe Necklace in Progress


I haven’t yet decided what to work on next, since I’ve been so tangled up with finding the motivation to finish the cobalt necklace. I’m sure a little inspiration will be forthcoming!

What are you making this week?


Copyright 2015 Inspirational Beading
Subscribe to Inspirational Beading
Get inspired on Facebook and Google+


Tuesday, October 28, 2014

Fall Jewelry Colors Part Two

In our last color experiment, we explored using purple as a fall color, inspired by Pantone’s color of the year, Radiant Orchid. Thanks to some great pieces in Cognac and Misted Yellow, I’d say it was pretty successful. This time I’ve upped the challenge with the even pinker hue of Sangria.

Sangria by Nicole Miller Pantone Fall 2014 Colors


Although at first glance the color lineup for this fall doesn’t scream autumn, there are several colors that look right at home in the season, when taken individually. For this week’s palette, I chose Aurora Red – a somewhat lighter shade with just a hint of orange. The final player in the trio is frosty neutral Aluminum. What I like about this palette is the suggestion of winter on the horizon, which makes the addition of warm Sangria seem very appropriate for fall.

Frosted Apple


The biggest challenge for this collage was finding the right balance of colors. Too much purple would make things too busy, while too much red would be overly dramatic. Luckily, I was able to find lots of pieces that almost perfectly matched my color choices, including a gorgeous fringe necklace with red ostrich feathers and an element of gray in the leather and chain base.
I couldn’t resist adding some red rain boots to go with the jackets and overcoats. All it needs is a mug of apple cider and there’s no mistaking the autumn vibe.

To create some of these jewelry styles, try these project and tutorials in your favorite colors:

Fall Feather and Fringe Jewelry Tutorials

1. This String Feather Necklace Tutorial by Hey Wanderer makes great use of embroidery floss.
Add a few Swarovski crystals and it’s perfect!

2. The Alison Show’s Chevron Fringe Necklace Tutorial
allows for lots of gorgeous color combinations.

3. If you love to wrap, this bangle tutorial from Paperphine is worth a try.
The project uses paper twine, but could also work with your favorite fibers.

4. Would you believe that this gorgeous Embroidered Bangle Project by Alison Strang
started out as a roll of packing tape?

Druzy Bead Earring Tutorial by Beadaholique

If you can’t find the perfect pair of druzy stones for earrings, you can make your own using beads,
with this Druzy Beads Earring tutorial by Beadaholique

.

These are my favorite Polyvore collages using this week’s picks:

CampusChic


Athens


Ruffled Trench Coat


How would you use purples and pinks in your fall palettes?

Copyright 2014 Inspirational Beading and Friends
Pantone and Nicole Miller
Subscribe to Inspirational Beading
Get inspired on Facebook and Google+


Blog Widget by LinkWithin
Fire Mountain Gems and Beads

Inspiration Topics

accessories amulet Ancient Worlds Modern Beads animals April's Army art ArtFire astrology astronomy autumn awards awareness bangle beach Bead Inspired Bead Shops bead soup bead spotlight bead stash Bead Trays beaded beads beading theory beads belt bezel birthstones black blog spotlight blue boho bone book spotlight bracelet Bracelet A Week branch fringe brick stitch brown bugles buttons cabochon ceramic chain maille challenge charity chevron chain christmas collar Collections color Color Ideas color triads conservation craft shows crafts crochet crystals cuff Culled Beads current events Current Faves daggers Daily Sets daisy chain Delicas Destash drops Dutch spiral earrings Egypt Egyptian Gods embellishing embroidery environment etsy exotic fair trade fantasy fashion Favorite Beads Favorite Techniques feminine fibers film findings fire polish fixtures Flashback Test flickr inspiration flowers food found object free form fringe Geek Jewels geekery gemstones geography giveaway glass gold gray Greece green herringbone hex cuts history holiday home decor insects inspiration tip inspired beader Inspired by... Inspiring Links ivory Jewelry Stash knitting ladder stitch lampwork lariat leaf fringe leather lights literature loomwork macrame magatamas Master Class Medallions metal free metalwork Mini Collar a Week mixed media mixture Mood Board MOP multi-color multi-strand music natural beads nature necklace Necklace a Day Nepal chain netting New Beads ocean ombre orange paint paper patterns pearls pendant peyote photography Picasso finish pink Pinspiration PMC polymer clay poster sketch purple quick inspiration rainbow RAW red resin ring Ring a Day rivoli Rome Russian spiral scarf science seed beads shell silver soutache spiral rope spring square stitch St. Petersburg steampunk stringing stripes summer tagua TBT The Elements thread Tilas Time Capsule tools trade beads triangle weave tribal tropical turquoise tutorial two-hole beads Ugly vintage Wear it Twice weather white winter WIP wire wishlist wood World Beaders yellow
Blog Home * About * Beading Tutorials * Advertise

Learn About Sponsoring Inspirational Beading with Project Wonderful
Affiliated With ShareASale.com and Amazon.com