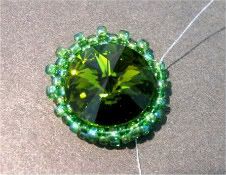
This week’s bracelet design was a little lesson in choosing beading instinct over patience. After dressing up a pair of new Czech glass hieroglyph pendants, I wanted to try capturing one in a peyote stitch bezel, and use it in a cuff bracelet. This turned out to be easier said than done.
There just aren’t enough curves on these lozenge shaped beads to hold a traditional tubular peyote bezel. I didn’t want to spend a lot of time experimenting with increases and different bead patterns until I found a bezel shape that would work. It's not much fun, and I don’t like using up thread if there’s an easier solution.
Instead, I started with the standard 3 rows of 11/o beads, and added a row of 15/o’s on each side. Then I took advantage of the bead holes, and stitched it to the bezel base to hold in in place. I added a few more rows of beadwork to one side of the bead, to prevent slipping and make sure that it didn’t pop out of the bezel.
I love the way it turned out. The face of the hieroglyph bead is totally free of the beadwork, and sits in it’s jacket snugly. After adding some peyote stitch off the sides, I ended up with a really nice cuff that has a shape reminiscent of the scarab god Khepri.
Now to come up with a palette for the orange hieroglyphs…
Copyright 2011 Inspirational Beading
Subscribe to Inspirational Beading
Get inspired on Facebook
Showing posts with label bezel. Show all posts
Showing posts with label bezel. Show all posts
Saturday, September 3, 2011
Friday, October 8, 2010
A Necklace for Autumn
Have you ever walked through a department store at the beginning of a season, and noticed that the same color trends appear in many different sections? One summer, everything from patioware to handbags came in a selection of tangerine, chartreuse and cobalt.
It might seem strange that all these different companies and designers would somehow select the same color schemes at the exact same time, but there’s a secret behind it. Every year, experts in the realm of color come together and decide on the season’s top color choices for the Pantone color report.
The idea that everyone should sleep on, eat from and wear the same colors, then switch them up again in four months is really the opposite of what the handmade movement is all about. Still, when Artbeads.com sent out a challenge to create a new design using Pantone’s 2010 fall palette, how could I resist?
The Inspiration:
This year’s fall color lineup includes some great classics like Living Coral, Lipstick Red, and Endive. Many of the color selections are wonderfully bright and vibrant, perfect for adding some personality to fall essentials in neutral colors.
Although it was tempting to mix up fun shades like Purple Orchid and Lagoon, I wanted to test myself and decided to combine all of the earthy tones and see if I could do them justice. With a palette of Endive, Golden Glow, Chocolate Truffle and Rose Dust in mind, I went hunting for some perfect fall beads.
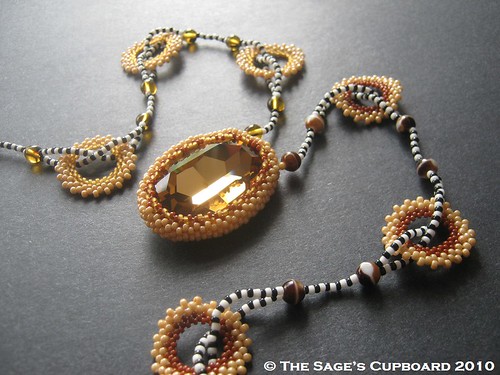
The very first thing that caught my attention was a gorgeous Colorado topaz fancy oval by CRYSTALLIZED™ - Swarovski Elements. The color is fantastic, and full of warm, glowing sparkle. I picked up a big, bold 39x28mm version and moved on to the accents.
I was really exited to come across some limited edition Czech glass druks in fun finishes, and chose tortoise for Golden Glow and brown horn for Chocolate Truffle. The 11/o lustered dark beige beads look so much like coffee caramels that they had me craving candy for days. I topped it all off with some 15/o seed beads in frosted topaz and terracotta.
The Beadwork:
I was so smitten with the druk beads that I wanted to do something with lots of beady texture, but once I had all the pieces in front of me, the colors started to take on a personality of their own. In my mind’s eye, I kept seeing circles, so I started out with circular brick stitch, using the druks for a base. After stitching one round disk, I could see that something wasn’t quite right, so I switched to one of my favorite techniques - circular peyote.
I made a few peyote rings using each shade of 15/o’s at the center, and added a matching peyote bezel to the fancy oval. Once I had all the components ready to assemble, decided to place the different colored rings and druks on opposite sides, rather than use a symmetrical pattern. The overall effect of the colors and shapes was very tribal - like ceremonial leather.
I still felt that the design needed something else. Instead of stringing everything together using the caramel 11/o’s, I used black and white seed beads, adding an extra layer of tribal appeal, which also allowed the opposing colors to stand out more clearly. This necklace is definitely ready for fall.
What are your favorite colors from Pantone’s fall 2010 lineup?
Copyright 2010 Inspirational Beading,
Pantone Inc. and Elie Tahari
I would like to thank Artbeads.com for providing the beads and crystals used in this piece. Inspirational Beading has not received paid compensation for including Artbeads.com products or reviews in this blog post. I have shared my honest opinions about the products used in this design.
It might seem strange that all these different companies and designers would somehow select the same color schemes at the exact same time, but there’s a secret behind it. Every year, experts in the realm of color come together and decide on the season’s top color choices for the Pantone color report.
The idea that everyone should sleep on, eat from and wear the same colors, then switch them up again in four months is really the opposite of what the handmade movement is all about. Still, when Artbeads.com sent out a challenge to create a new design using Pantone’s 2010 fall palette, how could I resist?
The Inspiration:
This year’s fall color lineup includes some great classics like Living Coral, Lipstick Red, and Endive. Many of the color selections are wonderfully bright and vibrant, perfect for adding some personality to fall essentials in neutral colors.
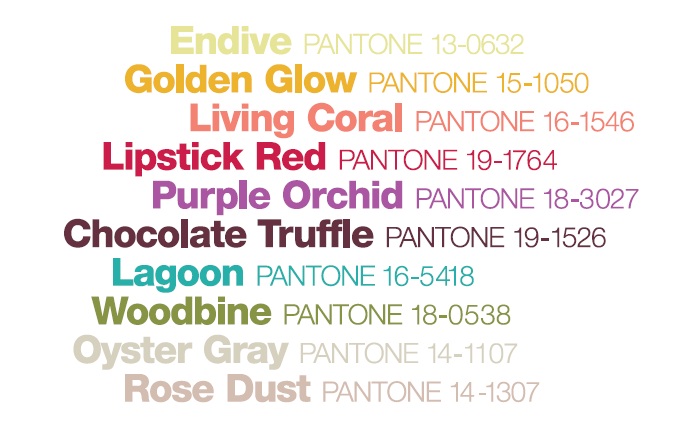
Although it was tempting to mix up fun shades like Purple Orchid and Lagoon, I wanted to test myself and decided to combine all of the earthy tones and see if I could do them justice. With a palette of Endive, Golden Glow, Chocolate Truffle and Rose Dust in mind, I went hunting for some perfect fall beads.
The very first thing that caught my attention was a gorgeous Colorado topaz fancy oval by CRYSTALLIZED™ - Swarovski Elements. The color is fantastic, and full of warm, glowing sparkle. I picked up a big, bold 39x28mm version and moved on to the accents.
I was really exited to come across some limited edition Czech glass druks in fun finishes, and chose tortoise for Golden Glow and brown horn for Chocolate Truffle. The 11/o lustered dark beige beads look so much like coffee caramels that they had me craving candy for days. I topped it all off with some 15/o seed beads in frosted topaz and terracotta.
The Beadwork:
I was so smitten with the druk beads that I wanted to do something with lots of beady texture, but once I had all the pieces in front of me, the colors started to take on a personality of their own. In my mind’s eye, I kept seeing circles, so I started out with circular brick stitch, using the druks for a base. After stitching one round disk, I could see that something wasn’t quite right, so I switched to one of my favorite techniques - circular peyote.
I made a few peyote rings using each shade of 15/o’s at the center, and added a matching peyote bezel to the fancy oval. Once I had all the components ready to assemble, decided to place the different colored rings and druks on opposite sides, rather than use a symmetrical pattern. The overall effect of the colors and shapes was very tribal - like ceremonial leather.
I still felt that the design needed something else. Instead of stringing everything together using the caramel 11/o’s, I used black and white seed beads, adding an extra layer of tribal appeal, which also allowed the opposing colors to stand out more clearly. This necklace is definitely ready for fall.
What are your favorite colors from Pantone’s fall 2010 lineup?
Copyright 2010 Inspirational Beading,
Pantone Inc. and Elie Tahari
I would like to thank Artbeads.com for providing the beads and crystals used in this piece. Inspirational Beading has not received paid compensation for including Artbeads.com products or reviews in this blog post. I have shared my honest opinions about the products used in this design.
Tweet
Saturday, June 12, 2010
Midnight Blues and Ring Twelve
Sometimes the hobbies and obsessions of our adult lives are fueled by things we loved as children. Right now, an entire generation of 30-somethings is sitting in front of the television playing video games. We were all hooked as kids, so we can’t help it! Many beaders are so determined to create because of fond crafting memories, or a childhood fascination with Grandma’s costume jewelry collection.
One of the obsessions that I’ve never fully outgrown is glass nuggets, or globs. They’re just so neat. They have many of the qualities that I like about beads - roundness, shine, smoothness and transparency. I remember arranging them for the fish in the aquarium, and hoarding them like jewels in my box of treasures.
I have a huge stash of globs, and every so often I get the urge to bead with them. For today, I thought it would be fun to use one as a ring focal. So, I poured out a bunch of globs, and searched through for some evenly shaped specimens to work with.
I selected a pretty blue oval shaped nugget, and some deep blue and black seed beads to compliment it. After adding a simple peyote stitch bezel, I stitched this unusual cabochon to a simple peyote band, and added some seed bead loops to polish off the joins.
This piece has been a nightmare to photograph, so no listing yet. This photo was all I could salvage from several dozen shots. I’ll just have to wait for the sun to cooperate. In the meantime, I created another treasury in tribute to some other midnight blue creations. To see the complete collection, visit It’s Midnight Somewhere.
Copyright 200 Inspirational Beading and Etsy.com
One of the obsessions that I’ve never fully outgrown is glass nuggets, or globs. They’re just so neat. They have many of the qualities that I like about beads - roundness, shine, smoothness and transparency. I remember arranging them for the fish in the aquarium, and hoarding them like jewels in my box of treasures.
I have a huge stash of globs, and every so often I get the urge to bead with them. For today, I thought it would be fun to use one as a ring focal. So, I poured out a bunch of globs, and searched through for some evenly shaped specimens to work with.
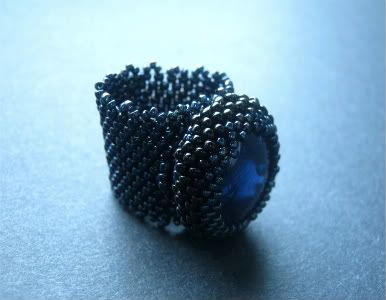
Ring # 12 - Midnight Blue
I selected a pretty blue oval shaped nugget, and some deep blue and black seed beads to compliment it. After adding a simple peyote stitch bezel, I stitched this unusual cabochon to a simple peyote band, and added some seed bead loops to polish off the joins.
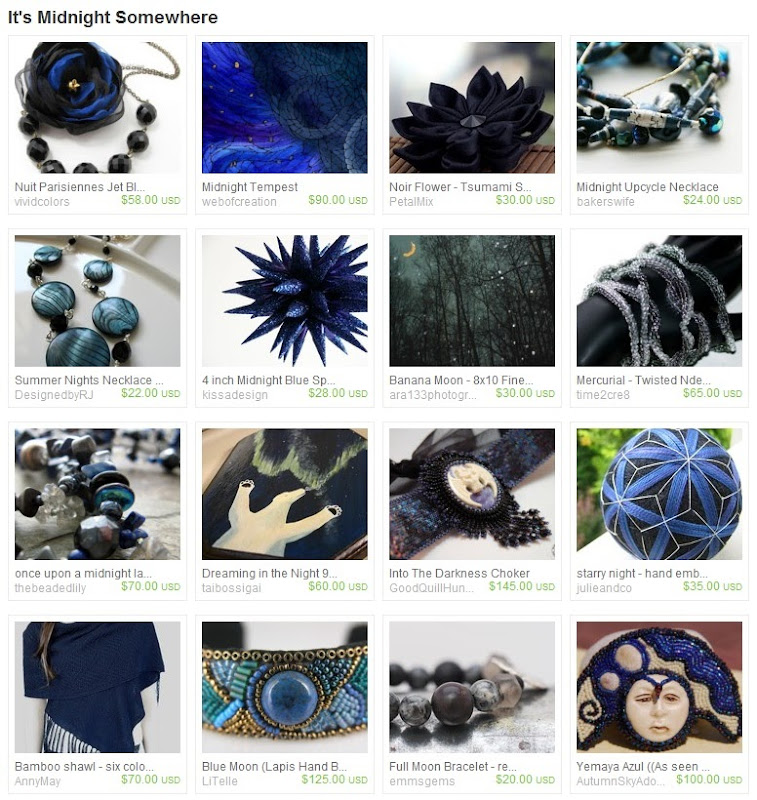
This piece has been a nightmare to photograph, so no listing yet. This photo was all I could salvage from several dozen shots. I’ll just have to wait for the sun to cooperate. In the meantime, I created another treasury in tribute to some other midnight blue creations. To see the complete collection, visit It’s Midnight Somewhere.
Copyright 200 Inspirational Beading and Etsy.com
Tweet
Topics:
bezel,
black,
blue,
cabochon,
found object,
peyote,
poster sketch,
Ring a Day
Wednesday, June 9, 2010
Bead Spotlight: Rivoli Rhinestones
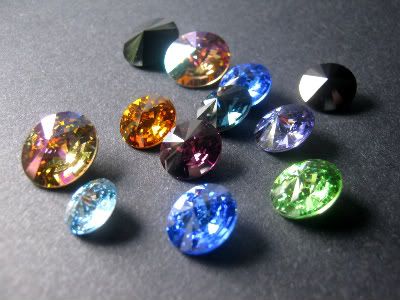
Whatever the attraction is, there’s no denying that pointed-back rhinestones are wonderful little treasures. Whenever one or more is added to a piece of beadwork, the wow-factor increases by leaps and bounds. They have a sparkle all their own. They come in gorgeous colors. They are just plain beautiful. It’s no wonder that they, and other solid crystal shapes, are always a favorite material for renowned beaders like Laura McCabe.
The most common technique for making a rivoli useful is the peyote bezel. Worked in two seed bead sizes, these little jackets are simple to do, and easy to embellish. Once the bezel has been secured, that’s when the real fun begins. The curve of the peyote shell makes the perfect base for all kinds of fringe. You can add extra layers of peyote stitch, and even go freeform!
For a fun project, try using your favorite rivoli with Royal Ring by Elizabeth Pullan and Bead & Button. You can also try creating bezels with netting and right angle weave!
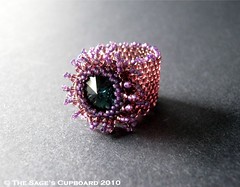
Ring # 9 - Heartache
Copyright 2010 Inspirational Beading and The Sage's Cupboard
Tweet
Topics:
bead spotlight,
bezel,
crystals,
peyote,
Ring a Day,
rivoli
Saturday, November 28, 2009
Beading Tutorial: Peyote Stitch Bezel
Aside from the many types of “pierced” or drilled objects, there are also many different materials that can be used as embellishments in beadwork that have no holes at all. Most beaders are familiar with cabochons, which can be flat or domed, and of course there are rhinestones as well. Some of the most wonderful un-beads are the things that don’t normally appear in beadwork, but which are so pretty or interesting that we can’t help but use them.
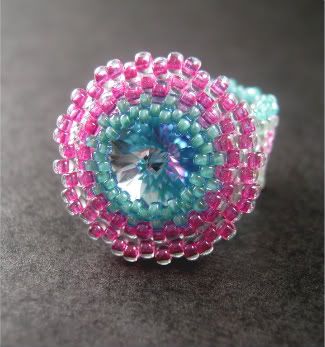
One of the most useful methods for incorporating a found object into a beading design is to surround it with a jacket of seed beads called a bezel. There are a few different ways to approach this task, but if an object is fairly uniform in shape, a circular peyote bezel is an easy technique to use. Once you have mastered it, you can turn many unique objects into beautiful un-beads.
How To Bezel a Rivoli with Peyote Stitch:
A great way to practice making peyote bezels is with Swarovski rivolis. The 14mm size is easy to work with, and comes in a variety of inspiring colors. To bezel a 14mm rivoli with circular peyote, you will need seed beads in size 15/0 and 11/0.
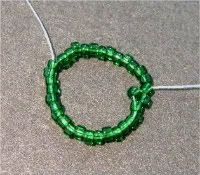
Start by stringing 32 size 15/0 seed beads onto a comfortable length of beading thread. When working with circular peyote, it’s a good idea to start with a number of beads divisible by 4. This will ensure that each row is even if you need to alternate bead sizes later on.
Slide the beads down until there is about a 6 inch tail, and stitch up through 16 of the beads again. Pull the thread snug so that the beads form a ring. If you’re working with a soft thread like Nymo, you may want to tie a square not to secure the ring. If you’re working with a braided thread like Fireline, you can simply bend the tail thread a little to form a kink where it meets the ring. This will keep it secure, but leave a little slack to prevent the first two rows from rippling. To stop the thread from slipping, hold the tail against your hand with your pinkie finger as you stitch.
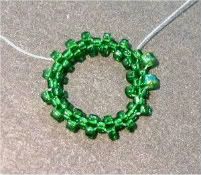
Pick up one 15/0 seed bead. Skipping the next bead in the ring, and moving in the direction that the working thread is facing, stitch through the next bead in the ring. Pull the thread snug to lock the bead in place. Pick up one 15/0 seed bead and repeat, skipping the next bead and stitching through the following bead in the ring. Continue adding beads with peyote stitch all the way around the ring.
When you reach the first stitch again, you will need to step up to start the next row. Add the final bead, and stitch through the next bead, and the first raised bead following it. Pull the thread snug and check your work for loose beads.
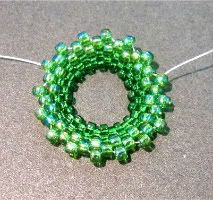
Pick up one 11/0 seed bead, and stitch through the next raised bead in the ring. Continue adding 11/0’s with peyote stitch, and step up at the end of the row.
Add two more rounds of 11/0 seed beads, so that the pattern of 11/0’s is the same as the 15/0 rows.
For the next row, switch back to 15/0 seed beads. Be sure to pull the thread snug after each stitch so that there are no openings in the beadwork. Once this row is complete, place the rivoli in the centre of the beadwork and hold it in place with your thumb and forefinger as you stitch.
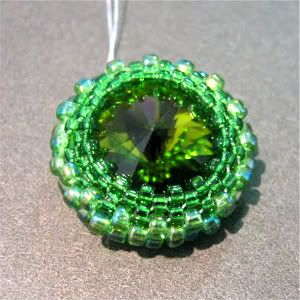
Add two more rows of 15/0 seed beads. As you work, the beadwork will tighten up around the rivoli, trapping it within the two rings of smaller beads. Once the last row has been added, weave through the last two rows again, pulling snugly to strengthen the beadwork. Repeat with the tail thread, and trim the excess.
If you still have plenty of working thread left, you can add embellishments around the 11/0 section, stitch on a bail, or connect this rivoli to other beadwork. Have fun!
Copyright 2009 Inspirational Beading
Tweet
Wednesday, August 5, 2009
Blue Rivoli Pendant
After creating my entry for the USE THE MUSE II contest, I still had quite a few beads left over. With a great starting palette of deep blues to work with, I’ve been looking for ways to put the beads to good use.
I wanted to do something with Swarovskis, but since I had used up most of the crystals in the kit, I had to start from scratch. The pointed back rivoli rhinestone has made quite a few appearances in beading magazines recently, so I thought it would be fun to try them out and see what I could create.
The Beads:
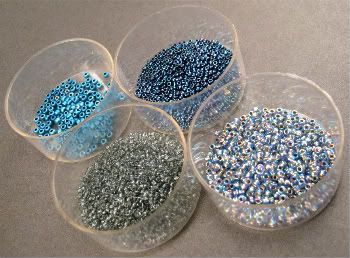
I started with four different rivolis in shades like sapphire, Montana blue, and jet. I absolutely adore the elegant sparkle of the crystals. To match the rivolis, I chose 15/o’s in transparent gray and navy iris, and 11/o’s in Dichroic-lined blue and denim blue.
The Beadwork:
I started by creating a peyote stitch bezel around each rivoli, then connected them together at different angles with seed beads and Swarovski faceted round beads. Once the body of the pendant was complete, I created a bail using square stitch.
I just happened to have a matching seed bead chain left over from another project, which was easily added with a simple lark’s head knot. I’m so pleased with the way this beading experiment turned out, that I’ve decided to keep it for myself. Next on my to do list is finding a fun way to use up my leftover silk ribbon.
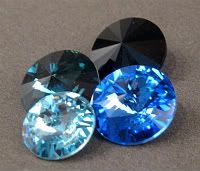
I wanted to do something with Swarovskis, but since I had used up most of the crystals in the kit, I had to start from scratch. The pointed back rivoli rhinestone has made quite a few appearances in beading magazines recently, so I thought it would be fun to try them out and see what I could create.
The Beads:
I started with four different rivolis in shades like sapphire, Montana blue, and jet. I absolutely adore the elegant sparkle of the crystals. To match the rivolis, I chose 15/o’s in transparent gray and navy iris, and 11/o’s in Dichroic-lined blue and denim blue.
The Beadwork:
I started by creating a peyote stitch bezel around each rivoli, then connected them together at different angles with seed beads and Swarovski faceted round beads. Once the body of the pendant was complete, I created a bail using square stitch.
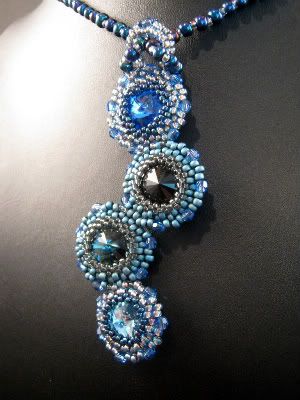
I just happened to have a matching seed bead chain left over from another project, which was easily added with a simple lark’s head knot. I’m so pleased with the way this beading experiment turned out, that I’ve decided to keep it for myself. Next on my to do list is finding a fun way to use up my leftover silk ribbon.
Copyright 2009 Inspirational Beading

Tweet
Saturday, July 25, 2009
Blue Bezel Necklace
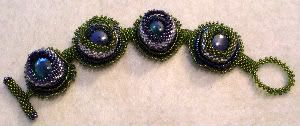
Last Christmas, I attempted my very first embroidered bezels. I had always admired the perfectly jacketed cabochons I had seen in magazines, but until then, I hadn't been brave enough to attempt one.
The green, black and silver bracelet turned out quite nice, and helped inspire more confidence in my peyote stitch abilities. For me, it's proof that practice really does make (almost) perfect. What seems impossible one day can be easy another day, with a little practice.
The Inspiration:
With a fresh selection of 11/o and 15/o seed beads in my stash, I decided to take the plunge and try a plain peyote stitch bezel. With no fabric to steady my work against, I was a little nervous about how it might turn out, but you never know until you try.
The Beads:
I wanted to experiment with inexpensive cabochons first, so I grabbed some pretty glass nuggets from the home decor section of my local craft store. After much searching and sorting, I was able to select a few that were nearly perfect circles.
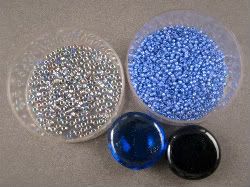
To match the blue-black cabs, I picked some dichroic-lined cornflower blue 11/o's, and purple lined sapphire 15/o's.
The Beadwork:
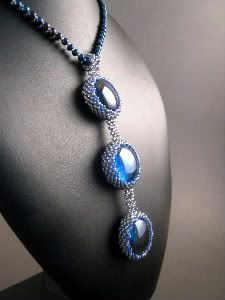
The first beaded cabochon worked out so nicely, that I just kept going made 2 more. Once they were completed, I connected each one with a small strip of right angle weave, and added a bail.
Thanks to this very successful experiment, I find myself wandering around, looking at everything and thinking to myself "Can I bezel that?!"
Copyright 2009 Inspirational Beading
Tweet
Subscribe to:
Posts (Atom)
Inspiration Topics
accessories
amulet
Ancient Worlds Modern Beads
animals
April's Army
art
ArtFire
astrology
astronomy
autumn
awards
awareness
bangle
beach
Bead Inspired
Bead Shops
bead soup
bead spotlight
bead stash
Bead Trays
beaded beads
beading theory
beads
belt
bezel
birthstones
black
blog spotlight
blue
boho
bone
book spotlight
bracelet
Bracelet A Week
branch fringe
brick stitch
brown
bugles
buttons
cabochon
ceramic
chain maille
challenge
charity
chevron chain
christmas
collar
Collections
color
Color Ideas
color triads
conservation
craft shows
crafts
crochet
crystals
cuff
Culled Beads
current events
Current Faves
daggers
Daily Sets
daisy chain
Delicas
Destash
drops
Dutch spiral
earrings
Egypt
Egyptian Gods
embellishing
embroidery
environment
etsy
exotic
fair trade
fantasy
fashion
Favorite Beads
Favorite Techniques
feminine
fibers
film
findings
fire polish
fixtures
Flashback Test
flickr inspiration
flowers
food
found object
free form
fringe
Geek Jewels
geekery
gemstones
geography
giveaway
glass
gold
gray
Greece
green
herringbone
hex cuts
history
holiday
home decor
insects
inspiration tip
inspired beader
Inspired by...
Inspiring Links
ivory
Jewelry Stash
knitting
ladder stitch
lampwork
lariat
leaf fringe
leather
lights
literature
loomwork
macrame
magatamas
Master Class
Medallions
metal free
metalwork
Mini Collar a Week
mixed media
mixture
Mood Board
MOP
multi-color
multi-strand
music
natural beads
nature
necklace
Necklace a Day
Nepal chain
netting
New Beads
ocean
ombre
orange
paint
paper
patterns
pearls
pendant
peyote
photography
Picasso finish
pink
Pinspiration
PMC
polymer clay
poster sketch
purple
quick inspiration
rainbow
RAW
red
resin
ring
Ring a Day
rivoli
Rome
Russian spiral
scarf
science
seed beads
shell
silver
soutache
spiral rope
spring
square stitch
St. Petersburg
steampunk
stringing
stripes
summer
tagua
TBT
The Elements
thread
Tilas
Time Capsule
tools
trade beads
triangle weave
tribal
tropical
turquoise
tutorial
two-hole beads
Ugly
vintage
Wear it Twice
weather
white
winter
WIP
wire
wishlist
wood
World Beaders
yellow
Blog Home * About * Beading Tutorials * Advertise
Learn About Sponsoring Inspirational Beading with Project Wonderful
Affiliated With ShareASale.com and Amazon.com
Learn About Sponsoring Inspirational Beading with Project Wonderful
Affiliated With ShareASale.com and Amazon.com


