Showing posts with label bangle. Show all posts

Friday, May 20, 2016

Peyote Stitch Master Class: Tubular and Spiral Peyote

Peyote Stitch Master Class Tubular and Spiral Peyote Tutorial

Now that we’ve covered all of the essential basics of working with peyote stitch, we’re moving on to some of the more exciting variations available for this versatile stitch. We’ve already tried out circular peyote by working skip-a-bead-add-a-bead in the round, so the next logical step is to go 3-D with the marvelously meditative tubular peyote.

Basic tubular peyote looks a lot like tubular bead crochet, and can provide some wonderful ropes for necklaces and bracelets. When worked in a single size of seed bead, the structure of tubular peyote stitch falls somewhere between bead crochet and tubular herringbone. It isn’t as supple and as crochet, but it is more flexible than herringbone. One downside is that the larger your tube is – or the more beads you start with – the more prone it is to buckling or collapsing along the tube. This is why many tubular peyote projects are worked over a form such as silk cord or latex tubing.

If you’re already familiar with the basics of peyote stitch, tubular peyote should be an easy transition. The key to getting started with this technique is not to worry too much about how your first few rows look. If you start out a little wobbly, you can always remove those stitches and reveal the cleaner beadwork within. Like with circular peyote, I recommend using size 11/o seed beads, and working without a stop-bead to get even tension. In the example piece, I’m using size 8/o seed beads for clarity, but you’ll find that size 11/o beads grip the thread a lot better and make it easier to get the stitch going.

You may want to have a dowel, knitting needle, or other form to stitch with. It’s not necessary, but if you find yourself crushing the beadwork while pulling new stitches taught, it can help protect the tube. A mandrel also makes it easy to keep the tail thread out of the way while you work. Once you’ve stitched about an inch of beadwork, it should be safe to continue without a form.

Basic Tubular Peyote Stitch:

1. On about 1 yard, or one arm’s length of thread, pick up an even number of seed beads. For a beginner rope, 8-12 beads is ideal.

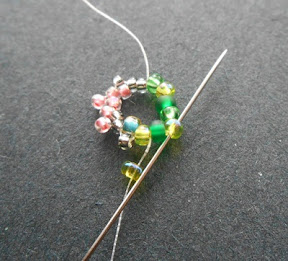
2. Slide the beads down to the end, and stitch through all of them again. Pull snug to form a ring, leaving at least a 6 inch (15 cm) tail. Pass through 2 or more beads to secure the ring.


3. Pick up 1 seed bead. Skipping the next bead in the ring, stitch through the following bead and pull snug. Repeat all the way around the ring. You will add half as many beads as you picked up in step 1.

Do not try to force the beads into a tube shape just yet. Keep the tension loose so the first round will look just like a circular peyote start.


4. At the end of the round, you will need to step up. Skip a bead, add a bead, then follow through the first bead picked up in this round and pull snug.

5. Pick up 1 seed bead, and stitch through the following raised bead – the 2nd bead added in the previous round. Repeat for the rest of the round and step up.


6. At the end of the round, you can pull the thread snug to cinch up the beadwork and form the start of the tube. You can slide the ring onto your mandrel or dowel here if desired, making sure that the tail thread is pointing towards you. Turn the beadwork on the form as you work to add each new bead.


7. Continue adding 1 bead at a time, stitching onto the raised beads as usual. The beads will now rest evenly and the tube will continue to build. Step up at the end of each round. Weave in your threads once the beadwork has reached the desired length.


Even-count tubular peyote is ideal if you want to include any type of pattern or a spiral design in your rope. If you’re working with a single color or a mixture and aren’t concerned about pattern, you can also work odd-count tubular peyote. The best thing about this variation is that there is no step-up. You simply add 1 bead at a time continuously for as long as you wish. To make an odd-count tube, just string an odd number of beads in step 1, then add one bead at a time with peyote stitch until finished.

Odd Count Tubular Peyote Start


One easy way to enhance the structural integrity of tubular peyote is to work with at least two bead sizes. This creates a simple spiral and makes the tube much stronger by providing a balance in pressure points. Even if the beadwork does kink, it will be hidden within the spiral.

For our practice project, we’ll be working with spiral peyote in 2 bead sizes to make a bangle. This is a great design to make if you want to play with adding patterns to tubular peyote. Though the pattern here is very simple, you’ll be able to see the changes in the beadwork very clearly as the bead sizes reshape the tube. I’ve used size 15/o and 11/o seed beads, but you can also use size 11/o and 8/o. You’ll need at least one color of each size. I’ve used 2 colors (A and B) in the smaller size to help accentuate the spiral even more, and an 11/o mix (color C).


Spiral Peyote Bangle:

1. On a yard or one arm’s length of thread, pick up 2 color A beads, 4 B, 2 A, and 8 C. Slide all of the beads down to the end and stitch through them to form a ring, leaving about a 6 inch (15 cm) tail.

2. Pass through the 1st 2 A beads again. It is very important to start your beadwork here to establish a continuous pattern. Once the beadwork is complete, the opposite end will match up to the starting rows so that they can be zipped.


3. Pick up 1 color A. Skipping the next color B in the ring, stitch through the following B and pull snug.

4. Pick up 1 color B. Skip 1 B in the ring, and stitch through the following B.


5. Add 1 more B with peyote stitch, followed by 1 A. You will always add the same bead size or color as the one that your thread is exiting.


6. Add 4 C with peyote stitch, and step up through 2 A to finish the round.


7. For the remaining rounds, add 1 A, 2 B, 1 A, and 4 C. Cinch up the beadwork into a tube and place it over a mandrel if desired. Continue weaving until you have a spiral tube that is at least 8 inches long. Do not try to bend or curve the tube before you have reached the desired length.


8. To add new thread when needed, drop the working thread after stepping up. Secure a new thread in the beadwork and exit from the same bead as the previous thread. Park the new thread, then weave in the old thread before continuing as usual.

9. Thread a needle on the tail thread from step 1 and weave it in (or weave it a few rows away from the edge and park it for now if desired). Gently bend the beadwork and bring both ends of the tube together until the pattern matches up.


10. Using the working thread from the fresh end of the tube, stitch through the adjacent up bead at the opposite end to begin zipping up the beadwork.


11. Weave back and forth across the join, zipping the up beads together with peyote stitch. Pull snug after each stitch. Because there are so many different bead sizes and colors at work, it can be easy to lose your place and stitch through the wrong bead. Working carefully, one bead at a time, and always look for a bead that looks less ‘attached’ than those around it. This will be your next up bead.


12. When you reach the end of the round, you should have a seamless join. Check over the area carefully to be sure that the beads were zipped up correctly. It should be impossible to tell where the spiral ends or begins.

Once you’ve mastered the basics of tubular peyote, there are some very fun variations to try. One of the lesser-known spins on the peyote tube is the Dutch spiral, which adds a large increase to the rounds that turns into a fringe-like bridge.

Dutch Spiral Peyote
Dutch Spiral Tube


One of the most popular styles of tubular/spiral peyote is the Cellini spiral. We’ll be practicing this technique in an upcoming Master Class lesson, but if you want to give it a go right away, the classic recipe to start a Cellini spiral is: 6 size 11/o, 4 size 8/o, 2 size 6/o, and 4 size 8/o. Remember to stitch through the first 2 size 11/o beads to begin the first round.

Cellini Spiral Bangle


Mortira

Subscribe * Facebook * Google+
Send your beading questions to InspirationalBeading@gmail.com
Support Inspirational Beading for bonus tutorials and more! Powered by Patreon

Copyright 2016 Inspirational Beading


Friday, December 4, 2015

Tutorial: Holiday Candy Cane Bangle Project

Holiday Candy Cane Bangle Tutorial

One of the best things about dressing for the holidays is getting the chance to wear kitschy things like ugly Christmas sweaters and incredibly literal jewelry. Though there’s something sort of wonderful about Christmas light earrings and charm bracelets – especially ones that light up – edible inspirations have to be the best. Luckily for beadweavers, there are a lot of stitches and bead shapes the lend themselves well to food themes, especially for the holidays.

This easy to make bangle puts seed beads and herringbone stitch to good use recreating the look of a tasty candy cane. All you need are size 11 seed beads in opaque white and transparent red or green, plus some thread and a clasp of your choice. Although you can use basic twisted tubular herringbone to make this bangle, we’re going to use a variation that creates an even tighter spiral for the classic candy cane stripe look.

Another advantage of this super twisted stitch is that it makes the rope much sturdier, allowing us to add multiple rows of color without losing the tubular shape when the bracelet is brought into a curve. If you want to add even more stability, you could string your herringbone tube over a core of beads or rubber tubing, and add a clasp with crimps. For added strength, I highly recommend weaving this bracelet with Fireline or another braided beading line.


1. On a comfortable length of beading thread, pick up 4 white seed beads. Slide them down to the end, leaving a 10 inch tail. Stitch up through the first 2 seed beads again, and pull snug to form a ladder. Pass down through the second pair of beads.


2. Pick up 2 red seed beads and stitch down through the same 2 white beads again – moving in the same direction as the thread. Pull snug, and stitch up through the 2 red beads. Continue weaving with ladder stitch, adding 2 beads at a time until you have a strip that is 10 beads wide, with the pattern shown.


3. Bring the ends of the ladder together and stitch the first and last rows together twice. Exit from the nearest red row at top of the ring, opposite from the tail thread.


4. Pick up 1 red and 1 white seed bead. Stitch down through the topmost white bead in the ladder below, and pull snug to bring the new beads in place along the ring. Stitch up through the topmost white bead in the next row.


5. Continue adding 2 beads at a time around the ring, matching them to the rows below until you have added 5 pairs total. To step up for the next round, stitch up through the top 2 red beads in the next row and exit from the top of the ring.


6. Repeat step 4 and 5 to add another round of tubular herringbone, but this time, stitch up through 3 beads to step up.


7. Add the first 2 beads of the new round as usual, but stitch up through the top 2 beads of the next row to exit the ring, instead of just one. Continue around the ring, stitch up through 2 beads in each stitch, and stepping up through 3 at the end.

8. Continue weaving with twisted herringbone until your rope is about 1 inch short of the desired length. Be sure to test the fit, as thicker ropes will fit a little bit differently than more flexible bracelets.


9. To close the final stitches and match both end of the beadwork, you’ll need to do a dummy stitch. Work one row of twisted herringbone without picking up any beads, stitching up through 2 beads at a time. Work a second row without any new beads, stitching up through 1 bead in each row. (Look carefully at the beadwork, and follow the natural thread path until all of the beads have the same connections.) Finally, work a round of ladder stitch in the opposite direction, moving 2 beads at a time, to flatten the edge of the rope.


10. Once you’ve woven in all of your tail threads, you can finish your bracelet as desired. My favorite technique is the crown picot finish for herringbone tubes. You could also string the bangle on stretch cord with a focal between the ends for a true bangle look.

Herringbone Candy Cane Bangle Project


Happy holidays!

Mortira

Subscribe * Facebook * Google+
Send your beading questions to InspirationalBeading@gmail.com
Support Inspirational Beading for bonus tutorials and more!

Copyright 2015 Inspirational Beading


Tuesday, October 28, 2014

Fall Jewelry Colors Part Two

In our last color experiment, we explored using purple as a fall color, inspired by Pantone’s color of the year, Radiant Orchid. Thanks to some great pieces in Cognac and Misted Yellow, I’d say it was pretty successful. This time I’ve upped the challenge with the even pinker hue of Sangria.

Sangria by Nicole Miller Pantone Fall 2014 Colors


Although at first glance the color lineup for this fall doesn’t scream autumn, there are several colors that look right at home in the season, when taken individually. For this week’s palette, I chose Aurora Red – a somewhat lighter shade with just a hint of orange. The final player in the trio is frosty neutral Aluminum. What I like about this palette is the suggestion of winter on the horizon, which makes the addition of warm Sangria seem very appropriate for fall.

Frosted Apple


The biggest challenge for this collage was finding the right balance of colors. Too much purple would make things too busy, while too much red would be overly dramatic. Luckily, I was able to find lots of pieces that almost perfectly matched my color choices, including a gorgeous fringe necklace with red ostrich feathers and an element of gray in the leather and chain base.
I couldn’t resist adding some red rain boots to go with the jackets and overcoats. All it needs is a mug of apple cider and there’s no mistaking the autumn vibe.

To create some of these jewelry styles, try these project and tutorials in your favorite colors:

Fall Feather and Fringe Jewelry Tutorials

1. This String Feather Necklace Tutorial by Hey Wanderer makes great use of embroidery floss.
Add a few Swarovski crystals and it’s perfect!

2. The Alison Show’s Chevron Fringe Necklace Tutorial
allows for lots of gorgeous color combinations.

3. If you love to wrap, this bangle tutorial from Paperphine is worth a try.
The project uses paper twine, but could also work with your favorite fibers.

4. Would you believe that this gorgeous Embroidered Bangle Project by Alison Strang
started out as a roll of packing tape?

Druzy Bead Earring Tutorial by Beadaholique

If you can’t find the perfect pair of druzy stones for earrings, you can make your own using beads,
with this Druzy Beads Earring tutorial by Beadaholique

.

These are my favorite Polyvore collages using this week’s picks:

CampusChic


Athens


Ruffled Trench Coat


How would you use purples and pinks in your fall palettes?

Copyright 2014 Inspirational Beading and Friends
Pantone and Nicole Miller
Subscribe to Inspirational Beading
Get inspired on Facebook and Google+


Blog Widget by LinkWithin
Fire Mountain Gems and Beads

Inspiration Topics

accessories amulet Ancient Worlds Modern Beads animals April's Army art ArtFire astrology astronomy autumn awards awareness bangle beach Bead Inspired Bead Shops bead soup bead spotlight bead stash Bead Trays beaded beads beading theory beads belt bezel birthstones black blog spotlight blue boho bone book spotlight bracelet Bracelet A Week branch fringe brick stitch brown bugles buttons cabochon ceramic chain maille challenge charity chevron chain christmas collar Collections color Color Ideas color triads conservation craft shows crafts crochet crystals cuff Culled Beads current events Current Faves daggers Daily Sets daisy chain Delicas Destash drops Dutch spiral earrings Egypt Egyptian Gods embellishing embroidery environment etsy exotic fair trade fantasy fashion Favorite Beads Favorite Techniques feminine fibers film findings fire polish fixtures Flashback Test flickr inspiration flowers food found object free form fringe Geek Jewels geekery gemstones geography giveaway glass gold gray Greece green herringbone hex cuts history holiday home decor insects inspiration tip inspired beader Inspired by... Inspiring Links ivory Jewelry Stash knitting ladder stitch lampwork lariat leaf fringe leather lights literature loomwork macrame magatamas Master Class Medallions metal free metalwork Mini Collar a Week mixed media mixture Mood Board MOP multi-color multi-strand music natural beads nature necklace Necklace a Day Nepal chain netting New Beads ocean ombre orange paint paper patterns pearls pendant peyote photography Picasso finish pink Pinspiration PMC polymer clay poster sketch purple quick inspiration rainbow RAW red resin ring Ring a Day rivoli Rome Russian spiral scarf science seed beads shell silver soutache spiral rope spring square stitch St. Petersburg steampunk stringing stripes summer tagua TBT The Elements thread Tilas Time Capsule tools trade beads triangle weave tribal tropical turquoise tutorial two-hole beads Ugly vintage Wear it Twice weather white winter WIP wire wishlist wood World Beaders yellow
Blog Home * About * Beading Tutorials * Advertise

Learn About Sponsoring Inspirational Beading with Project Wonderful
Affiliated With ShareASale.com and Amazon.com