Showing posts with label leaf fringe. Show all posts

Saturday, February 13, 2016

Cherry Bomb Fringe Earrings Tutorial

Cherry Bomb Beaded Earring Tutorial

It’s kind of amazing what you can recreate with just a little fringe in the right colors. The idea for this super-easy cherry fringe design popped into my head when I was creating earring projects for Ancient Worlds Modern Beads, and it was just too fun not to make. These cherry bomb earrings look great in opaque or transparent colors, but I do recommend going with a bright green to avoid any resemblance to holly berries. On the other hand, you could modify the design a bit to get a cute holiday earring as well!

You will need:

2 black 8-10mm round beads
2 black 4mm heishi or spacers
4 black 8/o seed beads
4 or more red 6mm rounds
4 or more red 11/o seed beads to match
a few grams each green and black 11/o seed beads
2 jumprings and/or earwires
Size D beading thread such as Nymo

1. Attach a stop bead to 1 yard of stretched and conditioned thread, leaving a 6 inch (15 cm) tail. Pick up 1 8/o seed bead, 1 spacer, 1 8-10mm bead, and 1 8/o bead. Slide them down to the end.


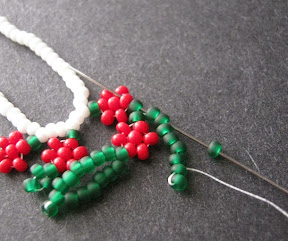
2. Pick up green 11/o seed beads in multiples of three until the strand reaches the desired length for your earring – at least 30 beads are needed for the fringe base, but you can go as long as you like. Add 1 red 6mm round, and 1 red 11/o. Skipping the red 11/o, stitch back up through the round bead and the following 9 green seed beads. Pull snug, making sure there is no slack in the strand.

3. Pick up 7 green seed beads. Skipping the last bead added, stitch back through the 6th bead and pull snug.


4. Pick up 4 green seed beads, and stitch back through the first bead added in the previous step, plus the following three beads in the main strand, moving towards the black round. Pull snug to form a leaf stitch.

5. Pick up green seed beads in multiples of three until you have a second ‘stem’ of the desired length. You can make it longer or shorter than the first cherry stem – whatever looks good to you. Add a red round and seed bead. Skipping the red seed bead, stitch back through all of the beads just added, and the following 3 beads in the main strand. Pull snug.


6. Pick up 7 green seed beads and add a second leaf stitch (steps 3 and 4). Stitch back up through the remaining beads in the main strand, and all of the black beads. Pull snug.


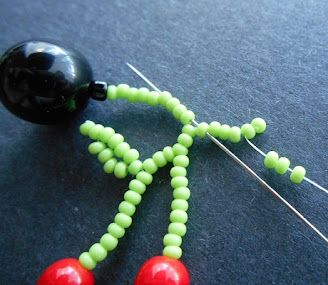
7. Pick up 9 black seed beads. Stitch back down through all of the black beads in the base to form a loop at the top of the beadwork. If desired, string on an ear wire or soldered jump ring before securing the loop.


8. Pick up green seed beads in multiples of three to begin a second cherry fringe. Repeat steps 2-6, making your fringes as long or as short as you like. Weave through the black seed bead loop at least once more to add strength, then secure any remaining thread in the fringe and trim.

9. Add jump rings and ear wires as desired, then repeat all of the steps to make a second earring.

Happy beading!

Mortira

Subscribe * Facebook * Google+
Send your beading questions to InspirationalBeading@gmail.com
Support Inspirational Beading for bonus tutorials and more!

Copyright 2016 Inspirational Beading


Thursday, December 12, 2013

Beading Tutorial: Easy Holly Berry Fringe

Christmas Holly Berry Fringe Project

One of my favorite things about beadwork is that way that you can easily use color or proportions to transform a stitch into something exciting and easily recognizable. My very first independent project was to create a necklace of ordinary leaf and branch fringe that looked just like a cluster of vineyard grapes. That was when I knew that I was truly and forever in love with beadweaving.

Today’s tutorial uses the same concept to create festive looks from simple techniques. The combination of daisy chain and leaf fringe provides an easy way to embellish holiday projects or dress up a Christmas necklace. You can start with a simple strand of seed beads or a beadwork base, such as a bracelet or necklace in your favorite rope stitch. Then all you need are size 11/o seed beads in bright red and dark green.

To Create Christmas Holly Fringe:

Attach a stop bead to a comfortable length of thread, and weave into your base, exiting from the point where you would like to begin adding berries. To start the simplest holly motif, pick up 1 green and 6 red beads, and slide them down to the work.

Stitch up through the first red bead added, and carefully pull snug to form the beginning of a daisy cluster, making sure that the beads are tight against the base. Pick up 1 red bead, and stitch through the fourth beaded added in the cluster, directly above the one your thread is exiting. Press the new bead into place at the center of the ‘berry’ and pull snug.


Pick up 6 green beads and slide them down to the work. Skipping the last bead added, pass down through the fifth bead and pull snug. Pick up 3 green beads, and stitch back through the first green added in the previous step, and the following red bead. Pull snug to form a leaf. Weave back through the first berry and into the base, exiting from the next start point.


Christmas Holly Berry Beading Tutorial


You can create different looks by changing up the pattern and proportions of your berries. Add a picot instead of a leaf by picking up just 4 green beads, and stitching back through the first one again. Nudge the beads into the picot shape and pull the thread snug before weaving back through the work.

Make larger leaves simply by picking up more green beads in the first step. Subtract this number by three to get enough beads to form the other half of the leaf in the second stitch.

Holly Berry with Picot Holly Berry Chain with Extended Leaf


Create larger clusters of berries by adding them in a daisy chain, with 2 or more green beads in between for anchoring leaves to. You can extend these leaves away from the berries by adding 2 or more extra beads as a stem.

This combination of daisies and leaves works great for flower projects, naturally, as well as other inspirations. Try using yellow, orange, and green beads (with a contrasting leaf color) to make citrus trees!

Copyright 2013 Inspirational Beading
Subscribe to Inspirational Beading
Get inspired on Facebook and Google+


Thursday, July 4, 2013

River God Lariat

Sometimes, no matter how much time we spend working on an idea, projects can completely get away from us, with unexpected results. When the finished piece is a disaster, we can at least chalk it all up to experience, but it’s always a relief when a design turns out well.

My latest Egyptian Gods design went through many transformations. At first, I wanted to do something collar-shaped, but I couldn’t come up with a design that would incorporate all of the leafy elements and beaded flower beads I wanted for the god of flooding and fertility. Then I mixed up some 8/o seed beads in blue, green, black and brown to use in a spiral rope, and it turned out hideous. Finally, I decided on St. Petersburg chain and got to work.

River God Bead Palette Hapi the Egyptian Inundation God


When it came time to make the fringe, I struggled again with execution. It would have been easy to incorporate all of the beaded flowers I had made into looped tassels, but I wanted more leaves and lots of texture. What I ended up with - simple chains with leafy fringe - didn’t exactly live up to my expectations, but it did work well with the rest of the design.

In the end, I can’t say that I’m totally thrilled with how Hapi’s necklace came out, but I’m not disappointed, either. The necklace does look great, especially when I step back and try to forget some of my original ideas.

Hapi the Flood Lariat


Copyright 2013 Inspirational Beading
Subscribe to Inspirational Beading
Get inspired on Facebook and Google+


Sunday, April 7, 2013

Tropical Toucan Necklace

Many beaders and artists keep a notebook on hand at all times, because you never know when an Idea is going to suddenly drop out of the sky. Not just a solution for those new beads you bought on a whim, or a fun color palette, but a fully formed image of a complete design that is so great, you have to drop everything to make it.

I recently had such an idea. It was completely random, appearing behind my eyelids in the middle of the night. I saw a necklace with a tribal style beaded rope in the colors of a toucan, and floral beadwork like an artistic doodle. It was a little art nouveau, with large leafy components and bright flowers. I couldn’t wait to get started.


I began with some very rough sketches of the necklace that I had imagined, but when I sat down to actually create it, I realized that some of the components would be impossible to make the way I wanted them. I modified things a bit to fit into my favorite techniques, and to work with the colors and bead quantities that I had, starting with the flowers. Yellow and blue druks would make excellent tropical flower bases, with petals in more blue, orange, and some fruity magenta.

I made several different types of beaded flowers, and some green discs that would fill in for the lime-shaped leaves that I wasn’t able to recreate. For the rope, I chose 8/o seed beads in turquoise blue, pumpkin orange, black, and white. Instead of an asymmetrical pattern, I took my inspiration straight from the colors of a toucan. Once everything was ready to assemble, I also added some lime and emerald green 15/o seed beads for extra leafy fringe.

Toucan Necklace Idea Tropical Bead Palette


Technically, this necklace didn’t turn out anything like the one I had originally pictured, but I like it much better. My favorite moment of triumph is the tiny flower bud, which I made to match the magenta flowers. Instead of using circular brick stitch, I started with a ladder base, and stitched the yellow druk in last.

I decided at the very last minute not to include the green Swarovski minis, because they seemed to clash a little with the other shapes, colors, and textures. So far, I haven’t been able to come up with any ideas for how to use them, so they’ve gone back to the stash until something appears in the night.

Tropical Toucan Necklace Tropical Beaded Flowers


Copyright 2013 Inspirational Beading and Friends
Images Hosted by Pinterest
Subscribe to Inspirational Beading
Get inspired on Facebook and Google+


Sunday, July 22, 2012

Lotus and Leaves Necklace

Last week I finally got around to working with a packet of wavy Czech glass leaves that have been waiting patiently in the destash box. Like many of the materials that I’m trying to use up, I was hoping that an idea would come along that would be different from the other projects I’ve done with these beads. And in the end, I once again decided to go with what works.

The last time I used these pretty leaves was in a double daisy chain for my first beaded strawberry pendant. They looked great as spacers between the strands, cinching everything together and creating little points of interest. This time around, I went with a lotus theme, and added some other destash beads: light blue pinch bicones, wooden rounds, and the last of my blue lined E beads.

Blue Lotus Bead Palette


To bring everything together, I used transparent dark topaz for the beadwork base, with dark beige 8/o spacers. I also added a handful of cobalt druks to reinforce the beadwork and create points where the stitches could be secured, which helps keep all of the strands smooth and steady.

Instead of cutting this necklace off at a specific length, I kept on beading until I had used up all of the leaves. Since there were an odd number, and there was no place for an asymmetrical element, I have only one leaf left, and a lovely opera length design.

Blue Lotus Necklace


Copyright 2012 Inspirational Beading
Subscribe to Inspirational Beading
Get inspired on Facebook and Google+


Wednesday, February 23, 2011

Beading Tutorials: Leaf Fringe

Wicked Fringe Necklace
Fringe is a beader’s best friend. Whether you specialize in embroidery, loom work, or beadweaving, chances are, you’ll want to add a bit of trim to your designs from time to time. There are many different techniques and styles of fringe to choose from. One of the easiest and most interesting, is leafy fringe.

Making a simple beaded leaf requires only two quick stitches, and can be done with nearly any type of bead that can be used for weaving. Round seed beads provide the best leaves, and you can create different sizes simply by increasing the number of beads used.

To make a basic fringe leaf:

String 5 seed beads, and slide them down to your beadwork. Skipping the last bead added, stitch down through the next bead in the stack, and pull snug. The final bead should now be locked in place at the top of the stack.

Leaf Fringe Tutorial
If you notice some slack thread in the stitch, try pushing the top bead down while you gently tug the needle end to snug up the loose thread.

How To Make a Beaded Leaf
Pick up 2 seed beads, and stitch through the first seed bead added to the stack, and continue back into your beadwork. When you pull the thread snug, a little leaf will form.

Leaf Fringe Variation
You can create any size leaf using a basic formula. The number of beads picked up in the second stitch is equal to the original stack, minus three. So if you start with seven beads, you will pick up four beads in the second stitch. If you start with six, you will add three beads.

Regular and Wide Leaf Fringe
Smaller leaves look the most realistic. As you increase the number of beads, the leaves become loopier, with a wider gap in the center. You can also increase the number of beads passed through in the first stitch for a different shaped leaf, or increase the number of beads at the base for a longer stem.

Leaf fringe can fit in just about anywhere. You can add it to rows of backstitch to add texture to bead embroidery, or combine it with branched fringe or corralling for a leafy vine fringe. You can even use beaded leaves to finish the edges of flat beadwork like peyote or herringbone weave.

Combining Leaf Fringe and Branch Fringe
More fringed project ideas:

Fringe Bracelet by Whimbeads.com
Beadwork.About.com Leaf Fringe Tutorial
Christmas Lights Bracelet
Seascape Necklace Project

Want to try out some new techniques, or add some new must-haves to your bead stash? Until the end of February, you can use this exclusive coupon code for 15% off any sized order from Artbeads.com: ZZ-DESIGNER-0211

Just copy and paste the coupon code and apply it during checkout for your discount. Happy beading!

Copyright 2011 Inspirational Beading
Subscribe to Inspirational Beading


Saturday, February 19, 2011

A Bracelet a Week: Winter Frost

Snow White Bead Palette

No matter how much we love skiing and making snow angels, there usually comes a time when winter becomes old hat. But no matter how much we long for spring, it’s still hard to ignore or forget the things we do love about the colder months, especially all the beautiful sights. There’s nothing quite like the look of evergreen boughs covered in frost on a sunny winter morning.

I wanted to capture that look in this week’s bracelet, so I started with white pearl Ceylon finish seed beads in 11/o and 6/o sizes. I think that this shimmery finish makes for really gorgeous snow-inspired designs. Better than stark opaque white, they seem to capture that sparkle of tiny frost crystals.

Snow White Fringe Bracelet

To add a bit of ice, I used crystal luster druks. The shiny finish on the transparent glass looks exactly like water that has just frozen. It has that perfect glossiness to it that makes them perfect for a winter inspired piece.

This design really brought out one of the issues that often kept me from making a lot of bracelets in the past. Because they need to fit just so, it’s often difficult to decide on the proper dimensions to use. Some designs, like this one, will change in length as you work, so there’s no sure fire way to tell how long a bracelet will be until it is finished.

I over estimated the amount of shrink the leaf fringe would cause, so this one ended up being in the plus size range. But now I know for next time! Every beading mistake is another valuable learning experience.

I would like to thank Artbeads.com for providing the seed beads and druks used in this piece. Inspirational Beading has not received paid compensation for including Artbeads.com products or reviews in this blog post. I have shared my honest opinions about the products used in this design.

Copyright 2011 Inspirational Beading
Subscribe to Inspirational Beading


Saturday, January 22, 2011

A Bracelet a Week: Spring Flowers

Spring Flower Bead Palette

As with any challenge, I started brainstorming for a year of bracelets right away, and planning ahead for upcoming designs. Not only do I want to stretch my imagination and come up with some new ideas, but I would also like to keep things interesting, and avoid repeating the same techniques, at least until they can seem new again.

One of the first ideas that came to mind when I was jotting down possible bracelet styles, was an extra large variation of my herringbone rings. I thought it would be really fun to make a large flower focal, and an extra long herringbone band to go with it.

I borrowed the flowery design from my Oasis ring, and used sunny yellow seed beads for the petals. Then I had to choose a second color for the band. I went with some pretty light amethyst seed beads, and an earth tone mix for the increase rows.

Spring Corsage Bracelet by The Sage's Cupboard

After I started working, I realized that a two-color palette would look even better, so I ditched the mix and stuck with purple and yellow. I love the way this particular shade of yellow brings out the Easter in other primary colors.

As with many first designs, my measurements and estimates were a little off. This beaded corsage only came in at about 6 inches, even with the clasp. I definitely want to make another one later this year, if only to get the sizing right!


Copyright 2011 Inspirational Beading
Subscribe to Inspirational Beading


Saturday, November 20, 2010

A Necklace a Day - Twenty

Nanaimo's First Snow of 2010

Winter has officially arrived on the West Coast. Everything outside of my window is covered with a soft blanket of flaky white snow, just waiting to melt and refreeze again. I’m sure that I’m not the only person who is ready to take back everything I said about the heat this past summer.

In this part of the world, winter is a funny time of year. No matter how long someone has lived here, they always seem utterly shocked when the snow comes, as if they were expecting the rain to go on forever. There are never enough snow plows to go around, and you can forget about finding a sidewalk that has been courteously shoveled. West Coast winters are a pedestrian’s nightmare.

Summer Birthstone Pendant by The Sage's Cupboard

Although I do love the look of a fresh layer of pure white snow, it is still the symbol of many long, cold and slushy days ahead. So to cheer myself up, I’m looking back on summer.

Today’s necklace is the summer version of my new seasonal birthstone pendants. The beadwork is done in a sunny golden topaz, with bicone crystals in peridot, ruby, alexandrite and emerald.

Welcome, Winter! So glad you only come around once a year.

Copyright 2010 Inspirational Beading


Tuesday, November 16, 2010

Swarovski Birthstones and Necklace Sixteen

Swarovski Birthstone Chart

Jewelry and birthstones go together like peanut butter and jelly, so it’s no wonder that crystal manufacturers like Swarovski make sure that they have a selection of birthstone colors in their product lines. Though I never use real gemstones in my designs, I enjoy being able to personalize gifts and custom work with such close imitations.

The Swarovksi birthstone chart uses crystal colors to replace traditional gems throughout the year. When I started making limited edition birthstone pendants, I worked out my own chart, using close matches in color and shape, with some lesser used birthstone colors as well. Here’s my modified crystal birthstone chart:

January: Garnet
February: Amethyst
March: Aquamarine
April: Diamond/Crystal
May: Emerald
June: Alexandrite or Pearl/White Pearl
July: Ruby
August: Peridot or Carnelian/Red Coral
September: Sapphire
October: Green Tourmaline or Opal/Rosaline Pearl
November: Topaz or Citrine
December: Tanzanite or Blue Topaz/Blue Zircon

Winter Birthstone Pendant by The Sage's Cupboard

I had always intended to start a family birthstone selection for my Mother Nature pendants, but never got around to it. Now that I have a new shop to fill up and fill out, I got started with a four stone pendant using winter birthstones.

Today’s necklace features crystal bicones in citrine, blue zircon, garnet and amethyst. The color combination seems odd, but they still somehow fit together. I really like the way the fringe turned out on this piece, it’s much more playful and visible than my original design.

My birthstone is garnet, and I find it a bit dull compared to some of the more vibrant stones. How I wish peridots where January’s birthstone!

What’s your favorite birthstone color?

Copyright 2010 Inspirational Beading
Artbeads.com and Swarovski Elements


Monday, August 16, 2010

Cornucopia Lariat

Cornucopia the horn of plenty

As I write this, I think I may be sitting right between two of the hottest days of the year. Even in the wee hours of the morning, the heat from the previous day still lingers while the sun makes it’s way back up the sky. Yet despite the summer’s last attempts to melt everything in sight, fall is closer than ever.

You really can’t beat fall. It’s always a favorite time of year, because so many wonderful things occur in autumn. The weather is mild and bearable - you can do what you want and wear what you want while doing it. There are wonderful holidays, with even more wonderful treats. Seasonal fruits and vegetables are in abundance, and the air is fragrant and crisp.

Perhaps I’m letting go of summer too easily, but I can’t wait for fall.

The Inspiration:

Sometimes ideas come from the most unusual sources. While I was working on a herringbone lariat using a mixture of red and pink seed beads, my husband walked by, and asked me why I was making red corn.

I had to look at the rope again with new eyes to see what he meant, but sure enough, the assortment of tiny red beads arranged in a neat tube looked just like a dried cob of corn. I was instantly overcome with a need to create a new lariat using fall colors and shapes.

Fall Harvest Bead Palette

The Beads:

It took awhile to collect enough beads for the project I had envisioned. I wanted to include a variety of accents that would represent different types of fruits and vegetables. I also started collecting leaf beads of different shapes and colors.

For the corn itself, I started with a hank of yellow charlottes. I wanted to make sure that the rope had some natural-looking texture, and hoped the facets would add a natural look. I mixed the charlottes with Japanese seed beads in oranges, browns, and rusty reds. I thought the minute size and shape difference between the Czech and Japanese beads would also add a more organic look to the design.

Cornucopia Lariat
Cornucopia Fringed Lariat

The Beadwork:

This necklace was several months in the making, mostly because it kept getting put on the back burner for other things. Before I knew it, the end of summer was approaching and I had to get in gear and finish it. After a few weeks of stitching between trips to the beach and the pool, it is finally complete.

The corn rope turned out exactly as I had hoped, and although it comes in at over 40 inches, it was the easy part. Planning out each strand of fringe, and trying to evenly distribute all of the accent beads was the real challenge.

Each side of the necklace is basically the same, with different amounts of each seed bead color, and a different pattern of fringed strands. To keep things simple, I paired up the same beads each time: purple cat eye grapes with shell oranges, glass tube zucchinis with vitrail leaves, chocolate pearl potatoes with vintage amethyst leaves, and so on.

Although I used fewer strands of leaf fringe that I have with previous lariats like this, the fringe is full and lush, thanks to all of the beautiful accents. Because Cornucopia turned out exactly as I had hoped, it was totally worth all of the effort.

Copyright 2010 Inspirational Beading and The Sage's Cupboard


Thursday, June 24, 2010

A Ring a Day - Twenty-four

Oasis Ring by The Sage's Cupboard
Ring # 24 - Oasis

Is it possible to look at an image of a palm tree without feeling a little more relaxed? What is it about tropical themes that makes our shoulders loosen, and our worries fall away? Perhaps it is simply a habit, after years and years of media influence, telling us that there is nothing more liberating than lying on a beach with the blue waves at our feet.

Or maybe there really is something therapeutic about salty air, warm sun, and the steady rush of the surf. I recently read an article that stressed the importance of regular sun exposure for physical and mental health. It is the fastest and easiest way to develop our much needed supplies of Vitamin D, which strengthens our bones and immune systems. Researchers are uncertain if a lack of Vitamin D causes depression, or whether it is simply a lack of sunlight that causes both depression and Vitamin D deficiency. It’s sort of like the chicken and the egg.

One thing is for certain - palm trees are wonderful to look at. And that is why I decided to capture one in today’s ring.

I started with a pretty little wood bead with a “parched desert” pattern stain, and added two rounds of brick stitch, followed by beaded leaves in alternating sizes. The ring band is done in a sandy, golden amber, with two shades of green at the center.

Using 11/o seed beads for the focal instead of 15/o’s made it so much bigger than most of the flower shapes I’ve made so far. I think it helps to emphasize the leaves, and make them more like tree branches than flower petals.

Copyright 2010 Inspirational Beading and The Sage's Cupboard


Blog Widget by LinkWithin
Fire Mountain Gems and Beads

Inspiration Topics

accessories amulet Ancient Worlds Modern Beads animals April's Army art ArtFire astrology astronomy autumn awards awareness bangle beach Bead Inspired Bead Shops bead soup bead spotlight bead stash Bead Trays beaded beads beading theory beads belt bezel birthstones black blog spotlight blue boho bone book spotlight bracelet Bracelet A Week branch fringe brick stitch brown bugles buttons cabochon ceramic chain maille challenge charity chevron chain christmas collar Collections color Color Ideas color triads conservation craft shows crafts crochet crystals cuff Culled Beads current events Current Faves daggers Daily Sets daisy chain Delicas Destash drops Dutch spiral earrings Egypt Egyptian Gods embellishing embroidery environment etsy exotic fair trade fantasy fashion Favorite Beads Favorite Techniques feminine fibers film findings fire polish fixtures Flashback Test flickr inspiration flowers food found object free form fringe Geek Jewels geekery gemstones geography giveaway glass gold gray Greece green herringbone hex cuts history holiday home decor insects inspiration tip inspired beader Inspired by... Inspiring Links ivory Jewelry Stash knitting ladder stitch lampwork lariat leaf fringe leather lights literature loomwork macrame magatamas Master Class Medallions metal free metalwork Mini Collar a Week mixed media mixture Mood Board MOP multi-color multi-strand music natural beads nature necklace Necklace a Day Nepal chain netting New Beads ocean ombre orange paint paper patterns pearls pendant peyote photography Picasso finish pink Pinspiration PMC polymer clay poster sketch purple quick inspiration rainbow RAW red resin ring Ring a Day rivoli Rome Russian spiral scarf science seed beads shell silver soutache spiral rope spring square stitch St. Petersburg steampunk stringing stripes summer tagua TBT The Elements thread Tilas Time Capsule tools trade beads triangle weave tribal tropical turquoise tutorial two-hole beads Ugly vintage Wear it Twice weather white winter WIP wire wishlist wood World Beaders yellow
Blog Home * About * Beading Tutorials * Advertise

Learn About Sponsoring Inspirational Beading with Project Wonderful
Affiliated With ShareASale.com and Amazon.com