Showing posts with label ring. Show all posts

Sunday, March 6, 2016

Peyote Stitch Master Class: Even Count Basics

Peyote Stitch Master Class - Even Count Peyote Ring

The most basic and classic version of peyote stitch is even-count – so named because it begins with an even number of beads. Although the technique is so simple and essential to many other variations, it can be incredibly tricky to learn. The first few rows are difficult to work, sometimes resulting in twisted or uneven beadwork and frustrated beaders.

In our first Master Class lesson, we looked at the way that the two-drop, or two-bead variation of peyote stitch is easier to start, and can help you practice the stitch. If you’ve experimented with two-drop peyote and have developed some of that essential muscle memory, it’s time to move on and tackle the terrifying even-count peyote. Once you’ve mastered those first 3 rows, we’ll practice some essentials like weaving in threads and zipping up the edges of a peyote strip to form a tube.

In these steps I’ve used size 8/o seed beads for clarity, but I recommend working with size 11/o Japanese seed beads like TOHOs. The size and shape will give you even tension and neat beadwork. If you’d like to give it a try with larger seed beads, make sure to double or even triple-stitch your stop bead to prevent it from moving when you stitch the first rows. This will help you keep your tension when working with roomier beads and prevent twisting or loose stitches.

Basic Even-Count Peyote Stitch:

1. Attach a stop bead to a comfortable length of thread, leaving a 6 inch (15cm) tail. I recommend working with a single arm’s length to help prevent tangles and twisted thread. Pick up an even number of seed beads and slide them down to the stop bead. Flip the work so that the stop bead is facing away from you.


2. Pick up 1 seed bead. Skipping the last bead added in step one, and gripping the beadwork securely with your off hand, carefully needle up through the following bead and gently pull snug to form the first stitch.


3. Pick up 1 seed bead. Skipping the next bead in the base, needle up through the following bead and pull snug.

Continue adding one bead at a time - skip a bead, add a bead – until you reach the end of the row. Maintain your hold on the beadwork to keep the work steady and secure - try to nudge the beadwork downwards as you move up the base to add new beads.


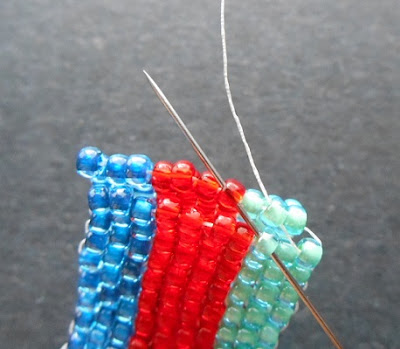
4. Flip the beadwork, keeping the stop bead to the left, and begin the next row. Pick up 1 seed bead, and stitch up through the nearest raised bead (the final bead added in the previous row). Pull snug to lock the new bead into place.


5. Pick up 1 seed bead, and stitch up through the following raised bead in the previous row. Continue adding one bead at a time until you reach the end of the row.

Repeat steps 4 and 5 until your peyote strip has reached the desired length. Your piece will be complete when the working thread exits from the opposite side of the beadwork as your original stop bead. This indicates that you have worked an even number of rows, and that the edges of the beadwork will interlock, allowing you to zip them up into a tube.


6. To weave in one or more threads, pass down through the adjacent bead along the edge, and gently pull the thread snug. Stitch down through one of the two beads below where your thread is exiting – either one will do. Continue weaving across the beadwork, one bead at a time. Through it’s possible and tempting to needle through multiple beads, this can cause the beadwork to shift and warp, resulting in skewed rows. When pulling the thread snug, be sure to pull only enough to pop the thread into place – yanking too much will also cause the surrounding beads to pucker.


If you’ve ever tried to take apart a piece of peyote stich, you know that the beadwork is incredibly tough; therefore it’s not really necessary to knot the thread. It is important to make at least two passes across the beadwork when weaving in tails. If possible, back track across areas that you’ve already stitched, rather than weaving in one continuous direction.


7. To zip up peyote, bring the edges of the beadwork together. You should see that the raised beads on either edge alternate, allowing them to interlock like a zipper. Needle through the edge bead directly opposite from the one your thread is exiting, and through the following raised bead on the same side as your working thread. Gently pull the thread snug to lock this portion of the edges together.


8. Needle through the next raised bead on the side opposite from your thread, and the following raised bead on your thread side. Pull snug to lock the beads into place. Continue weaving across the join until you exit from the edge of the beadwork.

9. To make the final join, pass the needle back into the beadwork through the adjacent bead on the edge of the beadwork and pull snug. You should now have a bridge of thread connecting every bead on this edge of the tube.


10. Stitching through one or two beads at a time, weave back across the tube at least once more. Secure the remaining thread in the beadwork and trim.

Once you’ve practiced weaving with even-count peyote, it’s time to work on some simple projects to test your skills. This super easy peyote stitch ring is a great place to begin. You can incorporate any patterns into the band that you like, though keep in mind that any minor changes in bead size or shape can warp the beadwork. A solid-colored band or simple stripes will help ensure a nice, even peyote strip for your piece.

Even Count Peyote Stitch Ring Tutorial


For these steps I used four colors of 11/o Japanese seed beads: A, B, and C for the band, and D for the cluster decoration. The embellishment uses a variation of ‘stiching in the ditch’ - another peyote stitch essential that is great for adding texture to all kinds of projects. Because the band will not have a trim, the beadwork will have quite a bit of stretch. When planning your design, it is important to make your band one size smaller (or about 3 mm shorter) than desired – it will stretch to the correct size once complete.

Peyote Stitch Cluster Ring:

1. Attach a stop bead to a comfortable length of thread, leaving a 6 inch (15 cm) tail. Pick up 3 A, 4 B, and 3 C beads, and slide them down to the stop bead. Flip the beadwork so that the stop bead is facing away from you.


2. Pick up 1 color C bead. Skipping the last bead added in step 1, stitch up through the following bead and pull snug.

3. Continue using peyote stitch to add 1 C, 2 B, and 1 A to complete this row. Flip the beadwork, and complete the next row, matching the beads picked up to the adjacent rows.


4. Work rows of peyote stitch following the stripe pattern until your strip is one ring size smaller than desired – it will stretch to fit once the beadwork is complete. If desired, remove the stop bead and weave in the first tail thread, but leave the working thread in place for now.

5. Attach a stop bead to 12 inches (30 cm) of thread, leaving a 4 inch (10 cm) tail. Stitch up through an edge just off-center of the band. Weave across the beadwork, one bead at a time to anchor the thread.


6. Exit from the opposite edge, then turn and stitch into the edge bead of an adjacent row.


7. Pick up 3 color D seed beads. Find the next bead that is aligned with the one your thread is exiting, and stitch up through the following bead in that line. Pull snug, and the color D beads should rest neatly in the ‘ditch’.

Stitch up through the next bead in the row.


8. Working towards the center of the band, stitch down through the bead next to the one that your thread is exiting. Pick up 3 color D beads. Skipping the next bead aligned with the one your thread is exiting, stitch down through the following bead in the same line and pull snug.

9. Stitch down through the beadwork to exit from the edge, then turn and weave back up through the next row towards the center.


10. Stitch up through 2 more beads, exiting next to the previous D clusters. Add 3 more color D, as before.

11. Weave across the beadwork to the edge to anchor the thread. Turn and stitch back towards the center. Add a second set of 3 clusters, starting 1 row away from the last cluster added in step 10. You can align your new color D beads in any pattern that you like - experiment with zig zags or a continuous line to practice 'stitching in the ditch'.


12. Repeat to add a third cluster of beads. Weave in the newly added thread, passing through as many cluster beads as possible, then secure the thread in the beadwork and trim.


13. Bring the edges of the beadwork together, making sure that the clusters are facing out, and zip up. Weave across the join at least twice, then secure any remaining thread in the beadwork and trim. Don’t worry if your beadwork gets a little bit warped from the zipping – once you’ve stretch the ring on a mandrel or dowel, the stitches should straighten out.


A basic peyote stitch ring can be embellished many ways. Once you've mastered the even-count peyote technique, have fun playing with different decorations to create a collection of stylish rings! For tips on 'sewing' accent beads onto flat beadwork, check out the Ombre Herringbone Cuff tutorial.

Happy Beading!

Mortira

Subscribe * Facebook * Google+
Send your beading questions to InspirationalBeading@gmail.com
Support Inspirational Beading for bonus tutorials and more!

Copyright 2016 Inspirational Beading


Thursday, May 29, 2014

Work in Progress: Relaxing Rings

It is so good to be back! I was hit with a really wretched cold awhile back, and was couch bound for days. Even when I’m feeling up to it, I never do beadwork while sick, so I’ve fallen way behind on designs, posts, and everything else. Now that I'm back to normal, I've got my to-do list before me and I’m working on catching up.

Going back to work really knocked the wind out of me for a second week, so I’m taking it easy right now with some super easy beaded rings for my top secret project. The big reveal is just around the corner, and I can’t wait to share the news! Meanwhile, I’m up to my ears in projects.

Beaded Rings in Progress


On the last bead tray, which seems like years ago already, I was working on some new embroidery pendants. Although I haven’t yet had the time to finish stringing the new medallions, I did finish my second fish leather experiment, and it turned out great! I wanted to do something a little more special than just a simple sliding knot for this piece, which includes one of Kristal and Cynthia’s designer seed bead mixes from Artbeads.com, so I went with a spiral rope necklace instead. Check out the Bead & Button blog for my full 'review' and thoughts on fabulous fish leather.

Black Desert Fish Leather Pendant


What are you working on this week?

Copyright 2014 Inspirational Beading
Subscribe to Inspirational Beading
Get inspired on Facebook and Google+


Tuesday, October 1, 2013

Work in Progress: Interim Rings

My bead tray is looking a little crowded this week, as I juggle several different projects. I’m still working on making new herringbone rings between designs, and I’ve also added St. Petersburg bracelets to my list of items to stock up on. Even with three quick pieces to make after each major project, I’m still looking forward to wrapping up the Egyptian Gods series at the end of the year. Next up is Ra, and I’m planning some new netting experiments that will work great for the sun god.

Herringbone Rings in Progress


I’m also working on samples for some custom work, and I’ve got lots of colors shuffling around as we search for the perfect palette and pattern. I really need to get around to putting away beads from my last few projects so that things feel a little less frenzied in my workspace. Sometimes it's nice just to have lots of beads to gaze at, though!

Last week’s lariat is finished, and turned out great!

Cobalt Chevron Lariat


What are you working on this week?

Copyright 2013 Inspirational Beading
Subscribe to Inspirational Beading
Get inspired on Facebook and Google+


Tuesday, August 27, 2013

Work in Progress: Leftover Rings

This week I finally got around to setting up a little filing system for my growing collection of herringbone rings. I simply labeled some of my bead cups with sizes 7-10 and made room for them in the bottom of my beading tray. But when I sorted all of the rings I had made into the cups, the quantity looked painfully small. I need to step things up a little if I‘m going to have enough inventory for the holidays.

Herringbone Rings in Progress


Since I was between two projects and not ready to start the new one, I pulled out all of my seed bead boxes and druks, and started setting aside colors for future rings. I chose a handful of pinks, purples and oranges from the druks - colors I’m not likely to need desperately for upcoming projects. Then I gathered up some assorted seed beads with low quantities that I’ll probably never replenish - experimental colors and those that just don’t suit my work anymore. Combined in the right ways, they’ll all make some fantastic rings.

I’ve got two down and one more on the go, then I’ll have to get back to regular designs again. I’ll be keeping this supply of leftover beads handy to work on a ring or two whenever I get the chance.

What are you working on this week?

Copyright 2013 Inspirational Beading
Subscribe to Inspirational Beading
Get inspired on Facebook and Google+


Tuesday, August 20, 2013

Work in Progress: Transition Rings

This week’s bead tray is looking really fresh in my eyes. This is how it appeared just minutes after finally finishing the herringbone collar I’ve been working on for two weeks, and I couldn't wait to pull out some new colors. I’m taking a quick break to catch up on herringbone rings - there are 3 druks set aside during previous projects to use - and then it’s on to something totally new.

My original plan for making a lot of rings was to keep it simple and go with sold colored bands. Then I started getting all these interesting ideas for stripes and fun palettes. Along the way, I discovered that I really, really like two-tone bands, with the contrasting colors at either edge. This is the pattern I’ll be working with for these three rings.

Beaded Herringbone Rings in Progress


Usually I’ll just grab whatever colors are handy that will make a good match for the druks I’ve saved, but this time around I took a little more time to find just the right palettes. It’s hard to resist the temptation to only use leftover colors and the dregs of seed bead packets - although small projects like rings are a great way to clean up lingering colors in one’s bead stash.

Here’s how Nekhbet’s collar turned out. I decided at the last minute not to put any trim on the edges, and just leave the bridges bare. Any extra beadwork would have diminished the look of the collar, I think.

Nekhbet Egyptian Broad Collar


What are you working on this week?

Copyright 2013 Inspirational Beading
Subscribe to Inspirational Beading
Get inspired on Facebook and Google+


Tuesday, July 30, 2013

Work in Progress: Rainbow Rings

Inspiration can strike at any time, and when it does it’s often difficult to ignore. I prefer to stick to a single project at a time, checking things off my to-do list with rhythm. But every once in awhile, I can’t resist the urge to stop everything and try out an idea.

In order to create lots of rings for a craft fair this fall, I came up with a plan that wouldn’t interfere with my other projects: Every time I use druks in a design, I set aside one, and make a ring at the end - usually with the same beads I used in the preceding project. It’s been working well so far, at least until my latest project.

Assorted Bead Rings in Progress


The necklace I’ve been working on had two colors of druks, so I set aside one of each. Then, somewhere I got this inexplicable idea to make rings with rainbow striped bands. I liked it so much, that instead of making one or two rings with the colors I had set aside, I went through my stash to make the perfect rainbow palette. And I changed my mind about one of the druk colors after pulling all of the beads, so now I have all these rings on my to-do list!

I haven’t yet decided if I’ll finish all four rings before moving on to my next Egyptian gods piece, but I did get started on one after finishing the rainbow pieces, since I had so many seed bead colors right there to choose from.

What are you working on this week?

Copyright 2013 Inspirational Beading
Subscribe to Inspirational Beading
Get inspired on Facebook and Google+


Wednesday, July 3, 2013

Work in Progress: Leftover Ring

This week it looks like there’s a lot going on at my bead tray, but it isn’t really all that exciting, at least not at this moment. I was about 20 minutes away from finishing up another disc in my latest audio book when I trimmed the final thread on a new collar. I had my tray of druks nearby - which has a few stray beaded beads in it - and decided to use the time to start on a new ring, using some of the seed beads I already had on the tray.

Ring and Collar in Progress


I didn’t get very far, as you can see. Once I’ve whipped together an all-blue ring, it’s on to a new cuff and something moon-inspired for the Egyptian god Khonsu.

Last week’s lariat project is finished. I’ll be sharing all the gritty details on how this piece turned out tomorrow. It was one of those comme ci comme ca endings that happens when an idea fails and you pick up the pieces and keep going.

Lotus and Papyrus Lariat Fringe


What are you working on this week?

Copyright 2013 Inspirational Beading
Subscribe to Inspirational Beading
Get inspired on Facebook and Google+


Wednesday, June 19, 2013

Work in Progress: Rings and Pendants

Something rare is happening on the bead tray this week: multiple projects. I try to make a habit of finishing one design before starting the next, as difficult as it may be - unless a piece that I’m working on is incredibly tiresome and unlikely to have a satisfying end. Right now I’ve got a bit of an assembly line thing going.

First I have a new set of four medallion pendants. After gluing on the backing and setting them aside to dry, I got to work on a quick quartet of herringbone rings to pass the time. The pendants all have bead centers and some interesting color combinations. My favorite so far is the lime green with stripes, which looks so much like a caterpillar even my bead helper remarked on it. I’ll leave the final judgment until they’re all snipped and trimmed.

Beaded Rings and Pendants in Progress


With my first ever craft show coming up at the end of this year, I’m hoping to build up a good supply of beaded rings to bring with me. Rather than spend weeks working at nothing but rings - which would interfere with the Egyptian gods challenge, barely on schedule as it is - I’m planning to make them in small batches along the way. I started by choosing some favorite colors and mixing and matching until I got combinations that I liked. Perhaps some new pattern ideas will immerge!

Last week’s ombre lariat is ready to go, and turned out fabulous. I can’t believe that I was so determined to have a continuous rope design - this is so much better.

Blue Green Ombre Lariat


What are you working on this week?

Copyright 2013 Inspirational Beading
Subscribe to Inspirational Beading
Get inspired on Facebook and Google+


Blog Widget by LinkWithin
Fire Mountain Gems and Beads

Inspiration Topics

accessories amulet Ancient Worlds Modern Beads animals April's Army art ArtFire astrology astronomy autumn awards awareness bangle beach Bead Inspired Bead Shops bead soup bead spotlight bead stash Bead Trays beaded beads beading theory beads belt bezel birthstones black blog spotlight blue boho bone book spotlight bracelet Bracelet A Week branch fringe brick stitch brown bugles buttons cabochon ceramic chain maille challenge charity chevron chain christmas collar Collections color Color Ideas color triads conservation craft shows crafts crochet crystals cuff Culled Beads current events Current Faves daggers Daily Sets daisy chain Delicas Destash drops Dutch spiral earrings Egypt Egyptian Gods embellishing embroidery environment etsy exotic fair trade fantasy fashion Favorite Beads Favorite Techniques feminine fibers film findings fire polish fixtures Flashback Test flickr inspiration flowers food found object free form fringe Geek Jewels geekery gemstones geography giveaway glass gold gray Greece green herringbone hex cuts history holiday home decor insects inspiration tip inspired beader Inspired by... Inspiring Links ivory Jewelry Stash knitting ladder stitch lampwork lariat leaf fringe leather lights literature loomwork macrame magatamas Master Class Medallions metal free metalwork Mini Collar a Week mixed media mixture Mood Board MOP multi-color multi-strand music natural beads nature necklace Necklace a Day Nepal chain netting New Beads ocean ombre orange paint paper patterns pearls pendant peyote photography Picasso finish pink Pinspiration PMC polymer clay poster sketch purple quick inspiration rainbow RAW red resin ring Ring a Day rivoli Rome Russian spiral scarf science seed beads shell silver soutache spiral rope spring square stitch St. Petersburg steampunk stringing stripes summer tagua TBT The Elements thread Tilas Time Capsule tools trade beads triangle weave tribal tropical turquoise tutorial two-hole beads Ugly vintage Wear it Twice weather white winter WIP wire wishlist wood World Beaders yellow
Blog Home * About * Beading Tutorials * Advertise

Learn About Sponsoring Inspirational Beading with Project Wonderful
Affiliated With ShareASale.com and Amazon.com