Showing posts with label beaded beads. Show all posts

Saturday, March 29, 2014

Beading Tutorial: Tubular Pearl Netting

Pearl Netting with Firepolish Beads

If you love to incorporate shaped seed beads and other small accent beads into your work, nothing beats pearl netting for satisfying a craving for rounds. This variation of tubular netting - which is really a spin-off of tubular peyote - works with just about any round bead you can think of, so long as it has holes suitable for the weave. Druks, firepolish, gemstone rounds, and pearls are all gorgeous when netted.

In this tutorial, we’ll be working with 4mm druks and 15/o seed beads - with 11/o anchors. If you want to use larger beads, you can adjust both the seed bead sizes and quantities used until you get a net that fits your accents. Try experimenting with different combinations, but remember that if your nets are too small, the accent beads will get lost inside the beadwork. Less is not more when it comes to this stitch. When in doubt, add more beads to your nets and test the fit with one or two rounds.

To Weave a Simple Pearl Netting Rope:

Start with a comfortable length of beading thread. Pick up one 11/o seed bead and one 4mm druk four times. Slide them down to the end of the thread, leaving about a 6 inch tail.

How to Start Tubular Pearl Netting First Round of Tubular Pearl Netting


Pass through all 8 of the beads again, and pull snug to begin forming a small ring. Stitch through the first 3 beads again so that your thread is exiting from an 11/o seed bead. Pull the thread snug.

Pick up three 15/o seed beads, one 11/o, and three more 15/o seed beads. Stitch through the following 11/o seed bead in the ring, and pull the thread snug. Repeat for each of the remaining 11/o’s, until you have a flower-shape. Step up by stitching through the first 4 beads added in this round, so that your thread is exiting from an 11/o bead on the edge.

Tubular Pearl Netting Tutorial Second Round of Tubular Pearl Netting


Pick up one 4mm druk, and stitch through the following 11/o seed bead in the previous round. Repeat 3 times - don’t worry about pulling the thread tight until you’ve added the final druk. Gently push the beadwork into a tube shape and pull the thread snug, then stitch through the first druk added in this round, and the following 11/o seed bead to step up.

How to Weave Tubular Pearl Netting Stitch Third Round of Tubular Pearl Netting


Pick up three 15/o, one 11/o, and three 15/o. Stitch through the next 11/o seed bead in the base. Repeat three times and step up, then add the next round of druks.

Tubular Pearl Netting Weave Tutorial How to Weave Tubular Pearl Netting Stitch


Continue weaving the pattern until your netting reaches the desired length. Finish with a round of druks, then stitch through all of the beads in the final round a second time to secure them.

Tubular Pearl Netting Beaded Bead Length Tubular Pearl Netting Pendant and Earring Length


A short length of pearl netting is great for earrings or a pendant. Longer pieces can be strung with other beads for bracelets and necklaces, or stitched together for a very dramatic focal piece. By increasing or decreasing the size of your round beads and the quantity of net beads, you can create unique shapes such as spheres and donuts or - my favorite - strawberries!

Connecting Tubes of Pearl Netting Pearl Netted Beaded Strawberry Project


Copyright 2014 Inspirational Beading
Subscribe to Inspirational Beading
Get inspired on Facebook and Google+


Friday, February 14, 2014

Work in Progress: Beaded Beads

I’ve been a bit overwhelmed by my to do list of late, and I’m way overdue for a bead tray update. This week I’ve been working on wrapping up some projects, as well as experimenting with new stitches and a few little inspirations.

Right at this moment, I’ve got a handful of simple beaded beads that I’ve been playing with for an upcoming project. I just threw together a few favorite colors and got stitching. It’s been really fun! It’s interesting how different a technique can look just by changing up the placement of colors.

Beaded Beads in Progress


In other news, I’ve got a brand new camera and it’s my absolute favorite thing right now. The old one was dropped by a certain small person, right on the lens while it was open. After that, I couldn’t get it to take a clear photograph, and it was time to invest in something new. Even though I bought one of the least expensive models available, it’s still way better than what I was working with before.

The new camera is a Nikon COOLPIX,and my favorite feature - apart from the crystal clear photos it takes - is how lightweight it is. I’m looking forward to trying it out a lot more in the coming weeks. I’ve already finishing photographing the new rope necklace I was working on, which turned out pretty great. It was a lot more work than was worth it for the results, but it looks exactly the way I wanted it to.

Tawaret Sa Amulet Necklace


What are you working on this week?

Copyright 2014 Inspirational Beading
Subscribe to Inspirational Beading
Get inspired on Facebook and Google+

Actions you take from this page can result in a commission for Inspirational Beading.


Thursday, August 1, 2013

Book Spotlight: Artistic Seed Bead Jewelry

There are so many beading books in print today, and more being written all the time. Some are good, some are great, and some of them wow you with every page. Maggie Roschyk’s fabulous guide to Artistic Seed Bead Jewelryis one of those books - the kind that you want to thumb through again and again, the kind that makes you want to get out your beads and play.

What makes this book so inspiring is Maggie’s unique style of beadwork, which often focuses on using smaller beaded components to construct a harmonious whole, rather than weaving a single design all in one motion. From RAW bezelled cubes to patterned beaded beads, Maggie shows how powerful small can be. Many of the techniques and beadwork styles explored are featured in multiple projects with varying sizes, so readers can choose to tackle designs that fit their budget and timetable.

Seed beads take center stage in the projects of course, but many of the designs incorporate stunning accent beads like crystals and stones, and gorgeous art glass focals. Each design is a perfect marriage of elements, from the tiniest seed bead to the largest lampwork disc. Techniques include tubular herringbone, bead embroidery, sculptural peyote stitch, cubic right angle weave, and circular brick stitch - just to name a few.

There are thirteen jewelry and beading projects in all, but some of the best inspiration comes from the introduction. Maggie explains the cultivation of ideas, color use, bead selection, and tools in a way that will make even a timid beader confident in their design abilities.

Copyright 2013 Inspirational Beading
Maggie Roschyk and Kalmbach Books
Subscribe to Inspirational Beading Get inspired on Facebook and Google+


Friday, October 5, 2012

Book Spotlight: The Art of Beaded Beads

What could possibly be more fun than making big, beautiful beads out of smaller ones? Even more appealing is the idea of creating your own unique focals and components for your jewelry designs, or perhaps just to showcase as little beaded works of art.

In The Art of Beaded Beads,readers will find a treasure trove of styles and techniques to add to their beading repertoire. There are 40 beaded bead projects in all, some using sculptural stitches, and others made by beading around a larger base bead. With the exception of a bead made entirely from steel hex nuts, all of the projects incorporate seed beads to create miniature beaded sculptures.

Author and designer Jean Campbell gets beginners off to a good start with an overview of bead types and materials, plus bead weaving basics, including instructions for the stitches used throughout the book. Clear, easy to follow diagrams will help new beaders who want to try out beaded beads - the short projects make for excellent beading practice.

The beaded bead projects range in difficulty from absolute beginner to advanced, and use a wide variety of techniques, shapes and materials. Contributors include Diane Fitzgerald and Sharon Bateman. Sprinkled throughout the book are some fabulous beaded bead jewelry designs to help inspire your next creation!

Each project includes a full materials list, step-by-step instructions, and clear diagrams; but beaders may want to be somewhat familiar with stitches like peyote, herringbone, square stitch and right angle weave, before tackling each bead.

If you’re a seed beader, and you’ve been wanting to create your own unique art beads without learning to use a torch or kiln, The Art of Beaded Beadswill provide plenty of ideas for beads that you can make using the skills and materials that you already have.

Copyright 2012 Inspirational Beading
Jean Campbell and Lark Books
Subscribe to Inspirational Beading
Get inspired on Facebook and Google+


Thursday, October 4, 2012

Three Elemental Pendants

If there’s one thing that I can say about the destash challenge, it’s that I’m learning an awful lot about myself and my beading habits. The most recent lessons came from trying too hard to force beads together, instead of just letting things evolve naturally.

It all started when I decided to make a bunch of elemental Y necklaces, to use up assorted destash beads. Things were going really well at first. I combined some matte yellow Czech clams with the last two of my emerald glass rings, and a handful of green hexes and cubes.

Water Bead Palette


After adding a variety of blue beads, the palette was complete - lots of beautifully aquatic transparent glass, filled with light and ready to head to the beach. I was really happy with how this necklace turned out, after avoiding the clam beads for months, and I was so excited that I forgot what made this piece so perfect.

Elemental Water Pendant


Rather than choose beads carefully, I mashed a whole lot of destash elements together for the Flora pendant. I started with lime cubes, and added a dash of bright orange 8/o seed beads that I never seem to have any use for. Once the pendant was complete, I tried to use the same palette for the beaded chain.

Instead of trusting my instincts, which were telling me to make the chain and beaded bead contrast like in the Earth pendant, I tried to make greens and oranges and wood beads all work together. I sort of liked how it all looked, but something was telling me that it could be a lot better. I took a little poll on Facebook to confirm these doubts, and started over.

Frogged Flora Chain


I didn't try to find a way to make all of the beads work together - instead I decided to change the palette quite a bit. I grabbed half a packet of raspberry lined seed beads, and made little daisies with rootbeer centers. I kept the topaz fire polish I had chosen, and the wood beads, but didn’t concentrate on using everything up. The new necklace was much better.

Elemental Flora Pendant


Finally, I moved on to Air, again excited about finally finding a use for some tricky destash beads. Starting with some green and blue Swarovski Elements butterflies, I added a handful of blue fire polish, some Ceylon seed beads, and the last of the white porphyr pinch beads. Since I already had some pastel colors, and I needed seed beads for the base of the beadwork, I also added half a packet of smoky amethyst.

Air Bead Palette


It wasn’t until I was ready to think about a clasp that I realized how little the Air necklace resembled the previous pendants. I was really ready to move on to other things, so I threw on a Swarovski button (another destash bead down!) and called it a day. This necklace I’ll be keeping for myself. Perhaps it will serve as a reminder of what happens when you rush inspiration and cut corners with bead choices.

Elemental Air Pendant


At this point in the challenge, I’m looking ahead to the end. I have a few tagua pendants to complete, and then it will be time to take stock again. There are two more projects I want to finish, which will make a big impact on what’s left in the destash tray, but they probably won’t empty it completely. After this week’s lessons, I’m thinking that a few items will stay through the New Year, so that they can wait for the right project to come along.

Copyright 2012 Inspirational Beading
Subscribe to Inspirational Beading
Get inspired on Facebook and Google+


Wednesday, July 18, 2012

Fire and Flame Pendant

So far during this year’s destash challenge, some of my favorite successes have been pieces that tackle more than one type of bead from the outbox. It’s incredibly satisfying to combine these destash beads in a single design, especially when the piece turns out as planned.

Last month I started a series of elemental Y pendants, with herringbone beaded bead focals. For the third piece, I chose a fire theme, and I was able to tackle four different bead styles at once. It all started with a single lampwork spacer that I received with an off-mandrel pendant last year. The simple swirl design has a shock of bright red, which would make the perfect topper for a fire necklace.

Fire and Flame Bead Palette


To add more flame, I tossed in a handful of hyacinth orange Swarovski Elements bicones, and some orange cat eyes. Even though I made my first ever starfish design with these orange beads, I still have more of them than any other 6mm round, and some of them need to go. To build the herringbone pendant, I also included ruby red AB hex cuts.

I didn’t want to go with an obvious palette of red, orange, and yellow, which could be dangerously garish. Instead, I used brown and deep garnet to round out the palette. I suppose it’s flame and char, instead of just flame. I like how it turned out, although I wish I’d had some transparent rootbeer to use, instead of the opaque red-brown. Every time I try to order some, they are sold out - they are the best brown seed beads.

Elemental Fire Pendant


I already have my eye on a destash bead for the “Ice” pendant, but I’m not ready to think winter just yet. Water will probably be the next element in the series - hopefully I can work in some more destash beads!

Copyright 2012 Inspirational Beading
Subscribe to Inspirational Beading
Get inspired on Facebook and Google+


Thursday, June 28, 2012

Nut and Geb Necklace

For my most recent destash project, I wanted to combine several elements from pieces that I’ve enjoyed in the past. The more recent piece of inspiration was a chunky asymmetrical necklace with beaded macramé beads. I had a lot of fun making the beads and putting them all together, and the results were very satisfying.

I also wanted to use up some more of my silver-lined crystal seed beads, since I decided not to complete my quadruple St. Petersburg chain necklace. I started thinking about possible color palettes to use them in, and thought it would be fun to use them like stars, similar to my space lariat from long ago.

Macrame and 4/0 Beads


These ideas kept rolling forward, picking up other seed bead colors that have been needing a home, until I finally came up with plan to capture the essence of Nut and Geb - the Egyptian deities of earth and sky. In addition to most of the macramé beads left in the destash tray, I also grabbed some blue lined 4/o beads, and a few patterned wood beads to help blend all of the colors together.

Earth and Sky Necklace


This time around, I used two sizes of macramé beads, and a symmetrical pattern with earth in the front, and sky over top. Although I still like the look of the bare wood beneath the seed beads, I almost wish that it was a little darker for the sky beads.

Copyright 2012 Inspirational Beading
Subscribe to Inspirational Beading
Get inspired on Facebook and Google+


Tuesday, June 19, 2012

Tutorial: Making Bead Covered Beads

Seed Bead Covered Macrame Beads

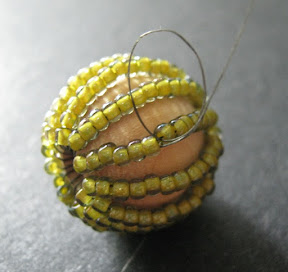
Here and there, we’ve covered some of the amazing ways that beaders can create their own components using materials like polymer clay and even paper. But what about transforming the beads that we already have? Today we’re going to look at a simple technique that turns an ordinary macramé bead into a seed bead wonder.

You can use just about any round, large-hole bead for this technique. Wooden macramé beads are ideal because they are lightweight, and they won’t damage the threads with sharp edges. Size 11/o seed beads are also recommended for the best coverage and overall bead shape, with Fireline thread for strong tension.

To Make a Bead Covered Bead

Start by cutting a comfortable length of Fireline, between one and two yards, and thread a needle on one end. Leaving about an 8 inch tail, stitch up through the macramé bead twice, to secure the thread around the bead.

Securing a Thread to the Base Bead How to Make a Bead Covered Bead


To prevent seed beads from slipping into the hole as you work and causing a big mess, it is important to cover the bead holes at all times using the thumb and forefinger of your non-stitching hand. Placing your seed beads in a shallow dish or on a beading tray while you work will make one-handed stitching easier. Keep the tail thread pressed against the bottom of the bead with your thumb to maintain tension on the first few rows.

Bead Covered Bead Row One Making a Bead Covered Bead


Pick up enough seed beads to cover the outside of the macramé bead from hole to hole, leaving a few millimeter gap on either end. Add or remove seed beads until you have the desired length, then stitch up through the macramé bead, being careful not to let any seed beads slip into the hole. Pull the thread snug.

Beaded Macrame Beads Bead Covered Bead Tutorial Stitching a Bead Covered Bead


Pick up the same number of seed beads, less one, and stitch up through the macramé bead. Pull snug. For the third row, pick up the same number of seed beads as row one. You can move from left to right, or right to left, but continue in the same direction once you begin. Rotate your grip on the macramé bead as you work, but be careful to maintain coverage of the holes to keep the seed beads in place.

If a strand of beads does not fall into place correctly, gently use your needle to nudge the thread into position before pulling snug. If at any point you make a mistake, or need to undo a stitch, do not try to pass the needle back through the macramé bead. Always remove the needle, and gently pull the thread out from the back.

Adjusting New Bead Rows Keeping Bead Rows Secure


When the bead starts to become full, it will be more difficult to cover both holes on the macramé bead. Use you forefinger instead to hold the previous rows in place as you work, and keep an eye out for stray seed beads.

If a bead or two does slip into the hole, use the tip of your needle to pierce the bead, and then ‘scoop’ it out gently, being careful not to damage any of the threads. Push the bead back into place on its row. It is best to catch these stray beads as early as possible. Even with the most careful stitching, the core of the bead can become criss-crossed with threads, making recovery of lost beads more difficult.

Rescuing Lost Seed Beads Weaving Thread Into a Bead Covered Bead


Continue adding new rows, alternating between long and short using the bead quantities you determined in the first two rows, until you have the amount of coverage that you want. Finish with a short row, then stitch down into the very first row added, moving a few beads at a time. Stitch up through the macramé bead, and then through the second row of seed beads. Continue reinforcing the rows, pulling the thread as snug as possible with each stitch to achieve the best tension throughout.

Tie off your thread at the top of a row, using a half hitch knot, then pass through most of the remaining beads, and trim the thread. Untie the tail thread by passing your needle underneath, and pull up to loosen and remove the stitch. Weave the tail in, finishing with a half hitch knot.

Knotting the Thread Removing the Tail Stitch Varnish the Bead Threads


For added stability, brush the threads around the bead holes with one or two coats of clear nail polish or other clear lacquer. Make sure that the varnish is completely dry before using your covered beads in a project.

You can get even more coverage on a bead covered bead by using three or more row lengths in an even pattern, such as: 3 2 1 2 3 2 1 2... The number of rows, lengths, and seed beads per row will vary by the size of the base bead that you use.

Bead Covered Bead Necklace


Happy beading!

Copyright 2012 Inspirational Beading
Subscribe to Inspirational Beading
Get inspired on Facebook and Google+


Blog Widget by LinkWithin
Fire Mountain Gems and Beads

Inspiration Topics

accessories amulet Ancient Worlds Modern Beads animals April's Army art ArtFire astrology astronomy autumn awards awareness bangle beach Bead Inspired Bead Shops bead soup bead spotlight bead stash Bead Trays beaded beads beading theory beads belt bezel birthstones black blog spotlight blue boho bone book spotlight bracelet Bracelet A Week branch fringe brick stitch brown bugles buttons cabochon ceramic chain maille challenge charity chevron chain christmas collar Collections color Color Ideas color triads conservation craft shows crafts crochet crystals cuff Culled Beads current events Current Faves daggers Daily Sets daisy chain Delicas Destash drops Dutch spiral earrings Egypt Egyptian Gods embellishing embroidery environment etsy exotic fair trade fantasy fashion Favorite Beads Favorite Techniques feminine fibers film findings fire polish fixtures Flashback Test flickr inspiration flowers food found object free form fringe Geek Jewels geekery gemstones geography giveaway glass gold gray Greece green herringbone hex cuts history holiday home decor insects inspiration tip inspired beader Inspired by... Inspiring Links ivory Jewelry Stash knitting ladder stitch lampwork lariat leaf fringe leather lights literature loomwork macrame magatamas Master Class Medallions metal free metalwork Mini Collar a Week mixed media mixture Mood Board MOP multi-color multi-strand music natural beads nature necklace Necklace a Day Nepal chain netting New Beads ocean ombre orange paint paper patterns pearls pendant peyote photography Picasso finish pink Pinspiration PMC polymer clay poster sketch purple quick inspiration rainbow RAW red resin ring Ring a Day rivoli Rome Russian spiral scarf science seed beads shell silver soutache spiral rope spring square stitch St. Petersburg steampunk stringing stripes summer tagua TBT The Elements thread Tilas Time Capsule tools trade beads triangle weave tribal tropical turquoise tutorial two-hole beads Ugly vintage Wear it Twice weather white winter WIP wire wishlist wood World Beaders yellow
Blog Home * About * Beading Tutorials * Advertise

Learn About Sponsoring Inspirational Beading with Project Wonderful
Affiliated With ShareASale.com and Amazon.com