Showing posts with label green. Show all posts

Wednesday, November 30, 2016

Tutorial: Golden Tapestry Netted Cuff Bracelet

Golden Tapestry Cuff Bracelet Project

Netting is one of my favorite beading techniques because it is simple, medidative, and creates such beautiful collars. The method of connecting beads together in nets has been around for thousands of years, and was even used by the Ancient Egyptians - chances are you've seen photographs of the beautiful faience bead 'gown'. Netting in some form can be found in the beadwork of many cultures, sometimes with elaborate patterns and lovely layers. Though it does have some basic structural limitations, the spacing of the beads allows for many variations in netting, including the addition of accents in many sizes.

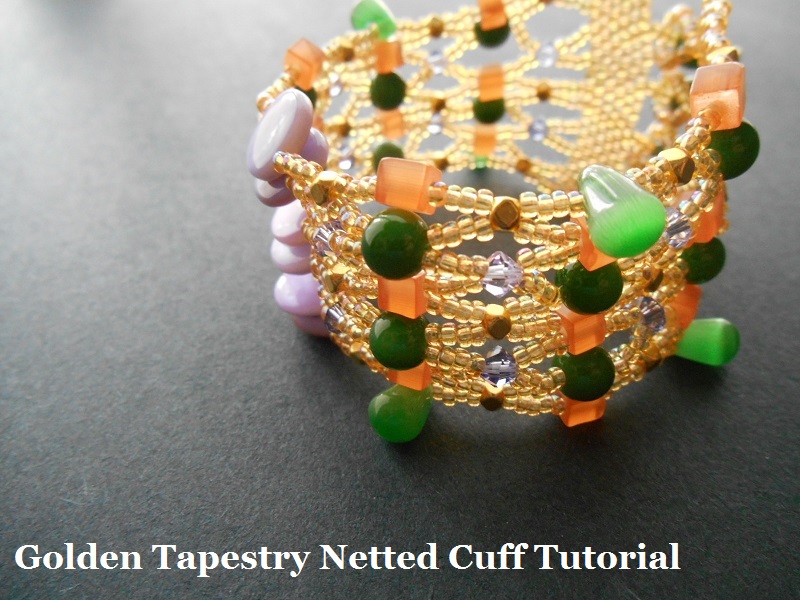
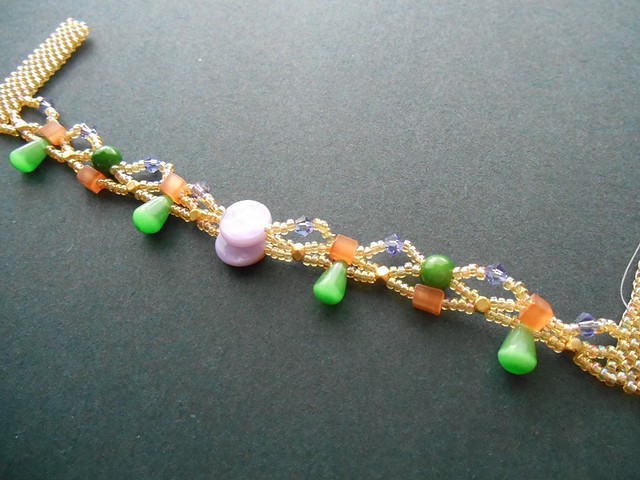
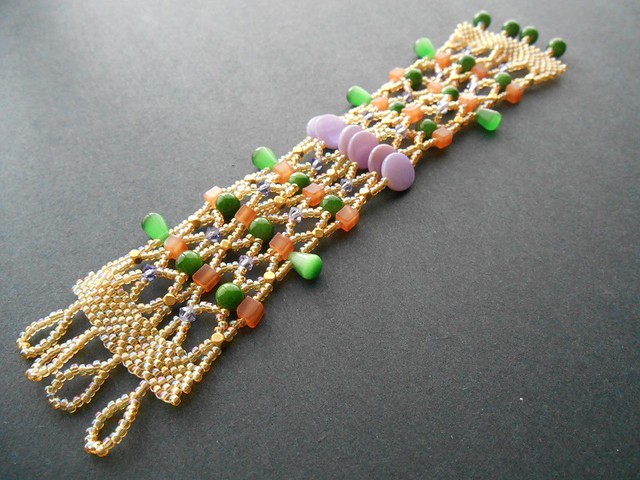
This super easy 'tapestry' cuff project was inspired by the Geometric bead box from Blueberry Cove Beads. This has been my all time favorite bead collection so far this year. When I pulled out all of the lovely beads in the inspiration box, I was struck by how wonderful each of the individual pieces was. The shapes and colors are each unique and beautiful in their own way, but when combined they create a gorgeous tapestry.

The harmony of combining beads together is one of the things that makes it such a rewarding art form, and this project is a great example of the way that you can easily mix together elements that might not seem matched at first sight.

Blueberry Cove Beads Geometric Inspiration Box
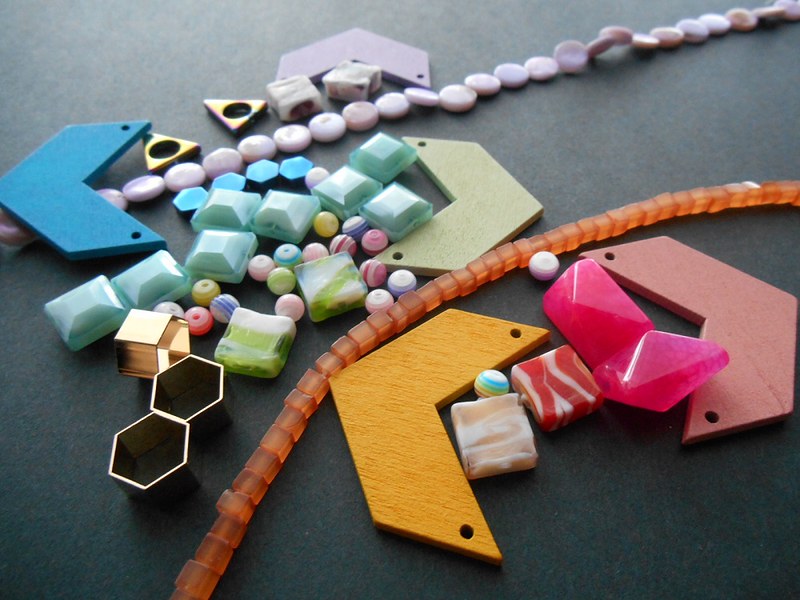
Blueberry Cove Geometric Bead Box


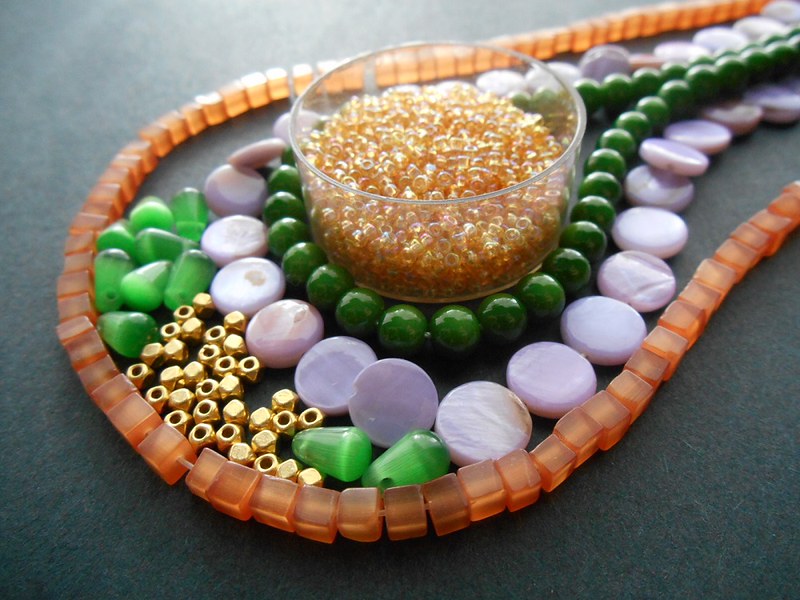
Some of my favorite pieces from this set include the pretty purple mother of pearl coins, and the orange cat's eye cubes. Individually the beads are wonderul, and though they are different in every way, I knew that I could mix them together to make a gorgeous piece of jewelry. I added tiny gold hexagon beads to the palette from the Geometric box, and some green glass rounds and drops from the Rainforest bead box as well. Transparent topaz seed beads and purple crystals from my stash rounded out the palette perfectly.

If you don't have similar materials in your stash, try combining some of your favorite accents together. The pattern will work with just about anything 6mm and smaller - just be sure to leave room for the size and shape of each bead that you add: the coins in the project are used as a focal since they can overlap each other nicely along a single row, but the other beads sit snugly side by side. Once the netting is complete, the beadwork will have a wonderfully chunky texture. If you like your bracelets extra slinky, use waxed beading thread in place of the Fireline.

Golden Tapestry Cuff Harmony Palette


Materials:

10 yards 6lb test Fireline (crystal)
5 grams size 11/o seed beads (transparent topaz)
6 x 10mm mother of pearl coins (purple)
6 x 6mm glass drops (green)
18 x 5mm glass cubes (orange)
16 x 6mm glass rounds (green)
16 x 3mm crystal bicones (purple)
24 x 3mm hexagon beads (gold)


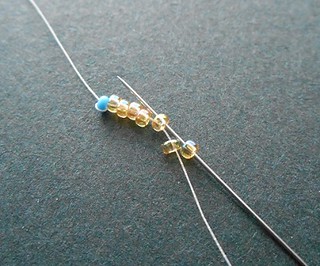
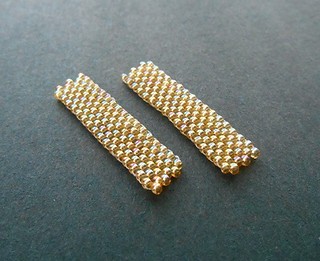
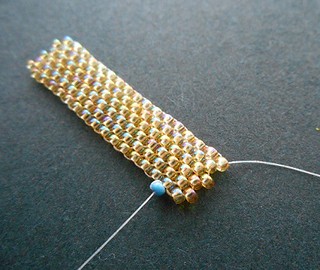
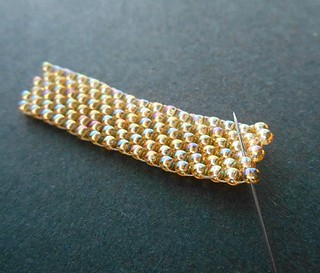
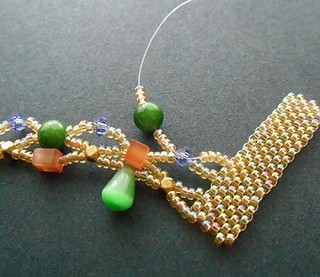
1. Attach a stop bead to a comfortable length of Fireline, leaving a 6 inch (15 cm) tail. Pick up 6 seed beads, and slide them down to the end. Pick up 1 seed bead, and begin stitching an even-count peyote panel. Continue working until your panel is 19 beads wide. Weave in and trim both threads. Create a second 6 x 19 peyote stitch panel and weave in the threads.


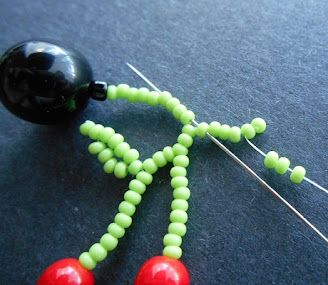
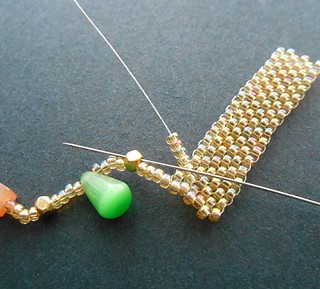
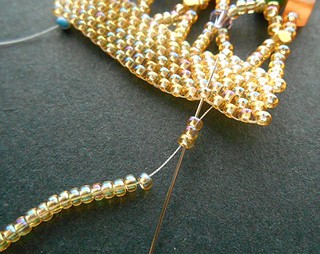
2. Attach a stop bead to a new length of Fireline, and weave into one of the peyote strips, exiting from a corner up-bead. Pick up 4 seed beads, and 1 hexagon bead. Continue stringing accents with 4 seed beads between each: add 1 drop, 1 hex, 1 cube, 1 hex, 1 drop, 1 hex, 1 coin, 1 hex, 1 drop, 1 hex, 1 cube, 1 hex, 1 drop, 1 hex. Finish with 4 seed beads.


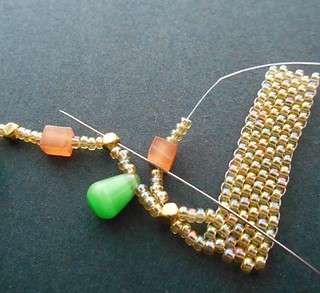
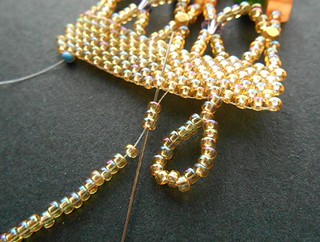
3. Stitch up into a corner up-bead on the second peyote strip, and weave up through the following bead. Pass back down through the adjacent bead and the following bead to exit the panel. Pull snug.

4. Flip the beadwork. Pick up 4 seed beads, and stitch up through the last hex bead added in the previous row.


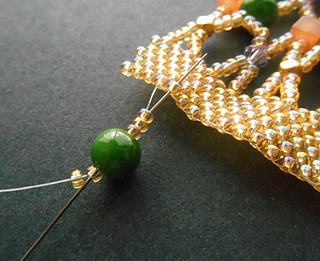
5. Pick up 4 seed beads, 1 cube, and 4 seed beads. Stitch up through the next hex bead of the previous row.

6. Continue adding accents with 4 seed beads to either side, passing through the hex beads to secure them: add 1 round, 1 cube, 1 coin, 1 cube, 1 round, and 1 cube.

Netted Bracelet TutorialTapestry Cuff i


7. To complete the row, pick up 4 seed beads.Stitch into the 3rd bead of the peyote strip, leaving one bead between each of the netting rows. Stitch through the following bead in the strip, and then turn as in step 3 to begin the next row.


8. Pick up 4 seed beads, 1 crystal, and 4 seed beads. Stitch through the last cube bead added in the previous row. Continue adding crystals for the entire row, passing through each of the accents beads. Finish by stitching into the 3rd bead of the peyote panel and turning the thread as usual.

Netted Cuff Tutorial


9. Add 4 seed beads, passing through the last crystal added. Pick up 4 seed beads, 1 round bead, and 4 seed beads. Pass through the next crystal in the previous row.

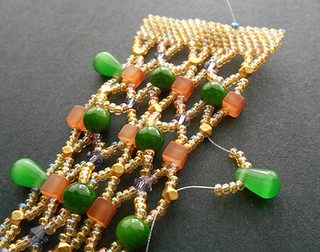
10. Continue adding accent beads, using the opposite color/shape as the previous row, and a coin in the center. Finish the row and turn. In the following row, add all hexagon beads. Repeat the pattern until you have 5 rows with accents, 3 rows of hexagons, and 2 rows of crystals as shown.


Turn and exit from the last bead of the peyote panel to begin the final row.

11. Add 4 seed beads and pass through the last hexagon bead added in the previous row. Add 4 seed beads, 1 cube, and 4 seed beads. In the next stitch, add seeds beads and a glass drop. Continue adding the remaining accent beads, and finish the row with 4 seed beads. Weave in your threads and trim.


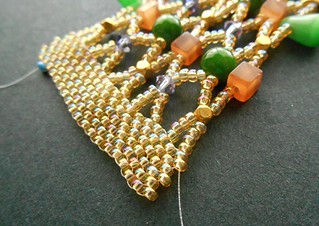
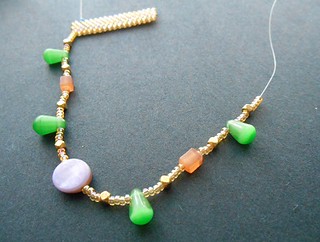
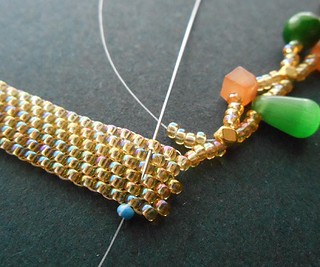
12. Weave across the peyote panel and exit from the fouth bead on the outside edge. Pick up 21 seed beads. Pass back through the first 3 beads again and into the 5th bead of the peyote panel. Pull snug.

Check the fit of the loop on one of your remaining glass rounds. It should be just big enough to slip over the bead smoothly. Adjust the number of beads in the loop if necessary, then continue weaving.


13. Weave through the peyote panel and exit from the edge, leaving a 2-bead space from the previous loop. Add a second loop with the same number of beads. Repeat to add two more loops, then weave in and trim the thread.

14. On the opposite edge of the cuff, position a new thread 4 beads from the end as before. Pick up 3 seed beads, 1 round, and 2 seed beads. Skipping the last seed bead added, pass back through all of the beads again, and into the 5th bead of the peyote panel. Pull snug.


Repeat this step to add 3 more toggles, leaving a 2-bead space between each. Weave in any remaining thread and trim.


This pattern will create a bracelet that is 6.5 inches (16.5 cm) long. To increase the length of your design, you can add additional seed beads to the nets - working with 5 seed beads per stitch instead of 4 will add about 1 inch (15 cm).

Golden Tapestry Cuff Bracelet Tutorial


Mortira

Subscribe * Facebook * Google+
Send your beading questions to InspirationalBeading@gmail.com
Support Inspirational Beading for bonus tutorials and more! Powered by Patreon

Copyright 2016 Inspirational Beading


Tuesday, September 6, 2016

Work in Progress: Spiral Daisies

As promised I have moved on from herringbone fringe necklaces, but I wasn’t quite ready to give up on fringe yet. Not only is it really satisfying to make fringe, but I’ve been in the mood to use up not just my favorite accent beads, but some of the less-than-versatile Czech seed beads as well. One of my goals for this year was to be a little less picky about culling Czech beads, and fringe gives me the freedom to just go ahead and use seed beads that are just a little bit wonky.


I really wanted to try out some of the millefiori beads that I picked up at a thrift store about a year ago, so I started with a strand of black rounds with a daisy motif and worked up from there. A spiral rope lariat would allow me to incorporate a daisy pattern while also using up a hank of green seed beads that has been sitting in my stash since making the blue-green ombre project from Ancient Worlds Modern Beads. So far things are going really well, and I can’t wait to get started on the tassels.


The Egyptian stripe necklace from last week turned out really nice. I was worried about the pattern being a bit much, but once it was complete and the accents added on, things really came together. I tried something new for the fringe this time around, and matched the top of each loop to the beadwork base. I’m not sure if I love it completely, but it may come in handy for future projects without so many colors in play.

What are you making right now?

Mortira

Subscribe * Facebook * Google+
Send your beading questions to InspirationalBeading@gmail.com
Support Inspirational Beading for bonus tutorials and more! Powered by Patreon

Copyright 2016 Inspirational Beading


Wednesday, July 13, 2016

Work in Progress: Beadwork Potpourri

My tentative steps back into my normal beading routine have begun, and I have actually had some time to sit down with beads over the past couple of days. I decided it was time to just pick a project and go with it, then took some time to decide what I really, really wanted to do. For a while, I plan to just make things that I want to, and avoid anything that feels obligatory (though that doesn’t rule out a tutorial or two!).

Two Necklaces and a Bracelet in Progress


I finally decided to do something with stripes, and to just go ahead and use some of my favorite colors without worrying about quantities. This new project is all about fun. So far I’ve got the beginnings of a nice herringbone rope. I haven’t yet decided if I’m going to add additional colors or just stick with the olive green.

To help keep things interesting, I’m also chipping away at unfinished projects, rather than dedicating all of my time to a single piece. Changing things up a bit may take away from the progression of each project, but I still feel a sense of accomplishment with each new stitch. Although I can’t say that I’m dead excited to sit down, it does feel familiar to be beading again, and there is comfort to be had in that.

Bob Ross Inspired Paintings


Part of my newfound motivation is thanks to finally getting another creative project out of my system. My bead helper and I did some paintings this week that turned out pretty great. We’re planning to do more as soon as we get the chance, and to experiment with techniques and themes. The joy of making something is definitely helping to bring back my need to bead.

What are you working on right now?

Mortira

Subscribe * Facebook * Google+
Send your beading questions to InspirationalBeading@gmail.com
Support Inspirational Beading for bonus tutorials and more! Powered by Patreon

Copyright 2016 Inspirational Beading


Sunday, May 29, 2016

Mini Collar a Week: Blues and Greens

Last week’s mini collar was a complete success, and a very welcome one as well. A spot of illness totally ruined my timetable, so it was fortunate that this collar turned out just right, and I was already finished stitching it before things got derailed. With a new week beginning, I can use the start of a new collar to help me get back on track.

Blue Green Mini Collar


The design process for this collar was a lot more difficult than it would seem from the simplicity of the piece. I wanted to use an as-yet uncut strand of glass drops, but I also didn’t want to use all of them up in a single necklace. At the same time, I wanted to make sure that their presence in the piece would be worthwhile, so it was important to use them well. It was also important not to repeat the focal design that I’d used for the previous two collars, so it took some time to decide exactly how to balance out the drops. Although there isn’t a lot of complicated pattern work in this collar, it showcases the drops very well, and has just enough color to be interesting. I’m really pleased with how it turned out.

Dragonfly Drop Bead Palette


I haven’t begun to work on the new collar design just yet. I did want to work on something without drops for a change of pace, so I’ll have to spend some time with my beads and see what happens. Cleaning up my workspace, which has been accumulating bead packets for a while now should prove inspiring!

Mortira

Subscribe * Facebook * Google+
Send your beading questions to InspirationalBeading@gmail.com
Support Inspirational Beading for bonus tutorials and more! Powered by Patreon

Copyright 2016 Inspirational Beading


Tuesday, May 24, 2016

Work in Progress: Satisfactory Necklaces

My beading trays look much the same this week as they have for the past month or so. I’m making good progress on this week’s mini collar, using some of the greens I experimented with for a recent bead color challenge. I’m very happy with how this collar is coming along, although it is pretty tame compared to some of the previous projects that held a few surprises. I think for the next piece, I’m going to have to try something a little more exciting. So far I’ve tried to choose accents and build patterns on a whim, just to see what will happen, but I think a little more planning is in order for the next project.

Green Mini Collar in Progress


I’m also nearly finished with the blue dagger necklace, at last. I have a whole bunch of tutorial projects lined up for my days off, so I’m not entirely sure if I’ll be able to finally finish this necklace before another week begins, but I’m certainly going to try. I have a feeling that it’s going to turn out great. Because the daggers have a curved shape, they don’t drape in a uniform way; I would have preferred a more even look, but in the end I think it will look great anyway. Only a few more hours of work and I’ll know for sure.

Blue Coconut Necklace Still in Progress


What are you working on at the moment?

Mortira

Subscribe * Facebook * Google+
Send your beading questions to InspirationalBeading@gmail.com
Support Inspirational Beading for bonus tutorials and more! Powered by Patreon

Copyright 2016 Inspirational Beading


Monday, May 16, 2016

Bead Color Ideas: Green Duo

While working on the often-earthy Greek and Roman projects for Ancient Worlds Modern Beads, I ended up accumulating more shades of green seed beads than I would normally ever use. Since then most of them have been untouched in my stash, waiting for another Geb-inspired design or something that would require a lot of green. For this week’s color ideas, I thought it would be both inspiring and useful to try out some accent beads against a two-tone green palette and see if anything sticks.

Lady Dragonfly Bead Color Idea


I had a lot of choices for the seed bead duo, but I immediately went for a hank of transparent rainbow mint that I haven’t even cut into yet. It was meant for the Atlantis lariat project, but proved to be much too shimmery for the rest of the palette. I paired it with some metallic June bug and then picked out a few ideal accent beads, starting with a strand of metallic blue drops. The finishes on all three beads play together very nicely, and would make a great collar, or some wing-inspired bead embroidery. I call this trio Lady Dragonfly.

Scarab Beetle Bead Color Idea


Next I tried out some flat rounds that have been in my stash for ages. I picked them up with a particular project in mind, but when it went sideways I never found another use for them. Once again the shimmery finish works really well with the seed beads, but this time in a coppery hue. This Scarab Beetle trio is exactly the sort of palette I’d been hoping for, and would be great in a medallion or an embellished cuff.

Curious Caterpillar Bead Color Idea


Finally, I had to go with something a little more spring-inspired. It took a while to find the packet of pink freshwater pearls, as they were hiding behind some olive ones, but it was worth the effort. I love the way the soft pink complements the mint green, while the June bug adds depth. Curious Caterpillar would be great in something spiraled or fringed, but I would love to use it in a full-sized collar.

What are you favorite colors to pair with green?

Mortira

Subscribe * Facebook * Google+
Send your beading questions to InspirationalBeading@gmail.com
Support Inspirational Beading for bonus tutorials and more! Powered by Patreon

Copyright 2016 Inspirational Beading


Saturday, April 16, 2016

Mini Collar a Week Challenge

For many months now I’ve been saying that I have to use up some of my accent beads. Over the last couple of years I have amassed a pretty great collection of beads that I love and love to use, but I recently reached a point where I just didn’t know where to begin. I’ve long since passed the hoarding stage and am ready to see what my beads can do. I just never have an idea that I think is good enough. I’ve been taking beads out, trying them on different palettes, imagining what they can do, but never really getting down to making something with them. I’ve also been busy with tutorial projects and other pursuits, so I haven’t been concentrating on just making jewelry for fun. I decided it was time to do something about it.

Destash Challenge Mini Collar


I was looking through old photos for something or other when I started reminiscing about some of my favorite creative challenges. Although the Egyptian Gods challenge was by far the most rewarding for me, the early marathons like A Ring a Day and A Bracelet a Week were the ones that taught me the most overall. Like the Destash Challenge, they also helped me to stretch out my limits and use up things in my bead stash. I did try out a new challenge at the start of this year, but it fizzled out. I thought that I would end up going without for the rest of 2016, but a marvelous idea finally emerged.

Destash Challenge Mini Collar


For the remainder of 2016, or until I’ve used all of my small accent beads at least once, I’m going to make a mini collar every week. I chose mini collars because they stitch up quickly, and I’d really love to have a few more of them for my shop, which I’ve been neglecting lately. Although the chevron chain design that I use for them is pretty simple, there are lots of different ways to add patterns and highlight exciting beads. I can’t wait to start experimenting!

Blue Lime Mini Collar


To kick off the challenge I used a couple of old favorites – lime green and cobalt blue Indonesian glass spacers. In order to include these large-hole beads in the design, I ended up increasing the stitches quite a bit to make room for 8/o bumpers. The netting is roomier and the collar is much bigger overall than my usual designs. I’m really happy with results, because it means that I can take more chances with other accents as well. Plus I love the palette with rainbow patriot blue for the netting.

Next I’m going to try out some drops or magatamas, and perhaps a new pattern. Wish me luck!

Mortira

Subscribe * Facebook * Google+
Send your beading questions to InspirationalBeading@gmail.com
Support Inspirational Beading for bonus tutorials and more!

Copyright 2016 Inspirational Beading


Friday, April 15, 2016

Bead Color Ideas: Slate and Olive

Blue and green have really been taking over my creative space lately, so for this week’s bead color experiment, I thought it would be fun to make a great blue-green pairing and then test out some of my favorite accents with it. You can never really go wrong with a blue and green palette, though some combinations are more exciting than others. For this set of color trios, I went with opaque slate blue and opaque olive seed beads. They’re like an earthier version of lime and turquoise, and pair together really well.

Olive Creme Bead Color Idea


Of course my first instinct was to go with more primary colors to finish the palettes, but they would have to be equally earthy or subdued. My first choice was chunky pale yellow mother of pearl chips, which I’m still trying to find a great project for. I really like these beads, so of course that means that I’m reluctant to use them for just anything. This Olive Crème palette is nice, but I think that the yellow does more for the blue and green than the seed beads do for the chips. The palette would work well in a fringed project, with the blue scaled way back and green/yellow taking center stage.

Juniper Berry Bead Color Idea


Red horn rounds were up next, and although I have used these beads a bit, I like them too much to see the last of them go until the perfect palette comes along. The slightly translucent finish and deep color are a perfect match for the seed beads, not to mention a lot more versatile than the chunky shell chips. I think Juniper Berry would be perfect for just about any project, but I’d love to use it in a collar or a patterned rope necklace.

Summer Buds Bead Color Idea


Finally, I just had to see if my elusive strand of polka dot Java beads would work with slate blue and olive. I’ve been holding on to these beads for years now, and I’m way past the hoarding stage. I really, really want to use them but the right project just won’t make itself known. I do like this Summer Buds palette, but I’m still not seeing it in a stitch. The polka dot beads are going back into the stash. Again.

What’s your favorite way to pair blue and green?

Mortira

Subscribe * Facebook * Google+
Send your beading questions to InspirationalBeading@gmail.com
Support Inspirational Beading for bonus tutorials and more!

Copyright 2016 Inspirational Beading


Wednesday, April 13, 2016

Work in Progress: Blue Lime

I’m back down to just one bead tray this week, though I’m sure it’s only temporary. I’ve got a few more tutorials lined up that I want to get started on, but first I have to get caught up on some other design ideas. I had hoped that the new Christmas bead lariat would be finished long before now. It seemed like no matter how long I worked on it, the beadwork just never seemed to get any longer. I think this might be why I haven’t made one in so long. Fifty inches of chevron chain is a pretty big commitment.

Blue and Lime Beadwork in Progress


I’ve just finished up the fringe on the lariat, and I’ve got my beads out for an exciting surprise project. I’ve built a palette around the cobalt and lime Indonesian glass that I paired up for last week’s bead faves, and I’m really eager to get started. I’m not entirely sure that I’ll be able to make the striped cobalt beads work for this project, but I’m definitely going to try. If all else fails, I can save them for another time.

What are you making this week?

Mortira

Subscribe * Facebook * Google+
Send your beading questions to InspirationalBeading@gmail.com
Support Inspirational Beading for bonus tutorials and more!

Copyright 2016 Inspirational Beading


Saturday, March 12, 2016

Wardrobe Inspiration: Spring Crunch

I didn’t expect to have quite so much fun with the Pantone-inspired spring bead picks this week, but once I got going it was hard to stop. By removing the least inspiring color – Rose Quartz – I was left with 9 gorgeous colors to experiment with. Three color trios just weren’t enough! It’s been quite a while since we’ve had a fashion collage, and I always like to play with different jewelry styles to see how they’ll look in an ensemble. Pantone colors are one of my favorite inspirations for the Wear It Twice collage, which features one great statement necklace and two outfit options to showcase it with.

Spring Crunch


I decided to start the first palette with Green Flash, which I think had a lot more potential than just an aquatic-looking palette. I was really wishing for a more orange-y color to work with here, which I think would have made for an awesome tropical themed palette. Instead, I added Buttercup yellow and Lilac Gray for a rather crisp and fresh palette. This trio really brings to mind the first flowers of the season, as well as those first few shoots of wild grass and the subtle sunshine of spring.

The necklace I found is so delicious with loads of chunky yellow beads in a multistrand design. I also included some lovely leaf earrings and a super chunky lavender bangle. It was rather difficult to find garments and accessories that were close in hue to Green Flash. For the casual outfit I ended up subbing Buttercup for a pale crème yellow top. The green frock dress is definitely my favorite of the two, and would make a gorgeous backdrop for our necklace.


Multistrand necklace tutorials are always easy to find – the trick was choosing just a few to share this time! My favorite is a wonderfully chunky multistrand necklace by Restyle Restore Rejoice featuring multicolored stones. This one would be super easy to adapt to any palette that you like. The best feature is the variety of textures and shapes in the strands, which really brings out the beauty of the beads.


To get a look that’s a little more similar to our Buttercup necklace, this turquoise necklace project from Panda Hall is a great way to go. I love the suede cord straps and the easy seed-bead gather. You could also do this project with a spreader bar. I’d love to try it with some wood or tagua hoops to anchor the strands.


I wasn’t able to track down any faceted bangle tutorials, but I did find one amazing polymer clay project that would look gorgeous in our palette. This tutorial is by CW Art and is featured in the Craftster forums. The two-tone design is great for showcasing a favorite palette. I’m particularly fond of the striped embellishment!


For the leaf earrings, I found a wonderful embellished earring project on Fire Mountain Gems that uses leather scraps and an assortment of tiny beads. This design would be so easy to adapt for your tastes and stash. Just picture it in bright green with little aqua dew-drop crystals, or perhaps some lampwork ladybugs!

What’s your favorite color palette for spring or floral inspired projects?

Mortira

Subscribe * Facebook * Google+
Send your beading questions to InspirationalBeading@gmail.com
Support Inspirational Beading for bonus tutorials and more!

Copyright 2016 Inspirational Beading and Friends

Actions you take from this post can result in a commission for Inspirational Beading.


Saturday, February 13, 2016

Cherry Bomb Fringe Earrings Tutorial

Cherry Bomb Beaded Earring Tutorial

It’s kind of amazing what you can recreate with just a little fringe in the right colors. The idea for this super-easy cherry fringe design popped into my head when I was creating earring projects for Ancient Worlds Modern Beads, and it was just too fun not to make. These cherry bomb earrings look great in opaque or transparent colors, but I do recommend going with a bright green to avoid any resemblance to holly berries. On the other hand, you could modify the design a bit to get a cute holiday earring as well!

You will need:

2 black 8-10mm round beads
2 black 4mm heishi or spacers
4 black 8/o seed beads
4 or more red 6mm rounds
4 or more red 11/o seed beads to match
a few grams each green and black 11/o seed beads
2 jumprings and/or earwires
Size D beading thread such as Nymo

1. Attach a stop bead to 1 yard of stretched and conditioned thread, leaving a 6 inch (15 cm) tail. Pick up 1 8/o seed bead, 1 spacer, 1 8-10mm bead, and 1 8/o bead. Slide them down to the end.


2. Pick up green 11/o seed beads in multiples of three until the strand reaches the desired length for your earring – at least 30 beads are needed for the fringe base, but you can go as long as you like. Add 1 red 6mm round, and 1 red 11/o. Skipping the red 11/o, stitch back up through the round bead and the following 9 green seed beads. Pull snug, making sure there is no slack in the strand.

3. Pick up 7 green seed beads. Skipping the last bead added, stitch back through the 6th bead and pull snug.


4. Pick up 4 green seed beads, and stitch back through the first bead added in the previous step, plus the following three beads in the main strand, moving towards the black round. Pull snug to form a leaf stitch.

5. Pick up green seed beads in multiples of three until you have a second ‘stem’ of the desired length. You can make it longer or shorter than the first cherry stem – whatever looks good to you. Add a red round and seed bead. Skipping the red seed bead, stitch back through all of the beads just added, and the following 3 beads in the main strand. Pull snug.


6. Pick up 7 green seed beads and add a second leaf stitch (steps 3 and 4). Stitch back up through the remaining beads in the main strand, and all of the black beads. Pull snug.


7. Pick up 9 black seed beads. Stitch back down through all of the black beads in the base to form a loop at the top of the beadwork. If desired, string on an ear wire or soldered jump ring before securing the loop.


8. Pick up green seed beads in multiples of three to begin a second cherry fringe. Repeat steps 2-6, making your fringes as long or as short as you like. Weave through the black seed bead loop at least once more to add strength, then secure any remaining thread in the fringe and trim.

9. Add jump rings and ear wires as desired, then repeat all of the steps to make a second earring.

Happy beading!

Mortira

Subscribe * Facebook * Google+
Send your beading questions to InspirationalBeading@gmail.com
Support Inspirational Beading for bonus tutorials and more!

Copyright 2016 Inspirational Beading


Blog Widget by LinkWithin
Fire Mountain Gems and Beads

Inspiration Topics

accessories amulet Ancient Worlds Modern Beads animals April's Army art ArtFire astrology astronomy autumn awards awareness bangle beach Bead Inspired Bead Shops bead soup bead spotlight bead stash Bead Trays beaded beads beading theory beads belt bezel birthstones black blog spotlight blue boho bone book spotlight bracelet Bracelet A Week branch fringe brick stitch brown bugles buttons cabochon ceramic chain maille challenge charity chevron chain christmas collar Collections color Color Ideas color triads conservation craft shows crafts crochet crystals cuff Culled Beads current events Current Faves daggers Daily Sets daisy chain Delicas Destash drops Dutch spiral earrings Egypt Egyptian Gods embellishing embroidery environment etsy exotic fair trade fantasy fashion Favorite Beads Favorite Techniques feminine fibers film findings fire polish fixtures Flashback Test flickr inspiration flowers food found object free form fringe Geek Jewels geekery gemstones geography giveaway glass gold gray Greece green herringbone hex cuts history holiday home decor insects inspiration tip inspired beader Inspired by... Inspiring Links ivory Jewelry Stash knitting ladder stitch lampwork lariat leaf fringe leather lights literature loomwork macrame magatamas Master Class Medallions metal free metalwork Mini Collar a Week mixed media mixture Mood Board MOP multi-color multi-strand music natural beads nature necklace Necklace a Day Nepal chain netting New Beads ocean ombre orange paint paper patterns pearls pendant peyote photography Picasso finish pink Pinspiration PMC polymer clay poster sketch purple quick inspiration rainbow RAW red resin ring Ring a Day rivoli Rome Russian spiral scarf science seed beads shell silver soutache spiral rope spring square stitch St. Petersburg steampunk stringing stripes summer tagua TBT The Elements thread Tilas Time Capsule tools trade beads triangle weave tribal tropical turquoise tutorial two-hole beads Ugly vintage Wear it Twice weather white winter WIP wire wishlist wood World Beaders yellow
Blog Home * About * Beading Tutorials * Advertise

Learn About Sponsoring Inspirational Beading with Project Wonderful
Affiliated With ShareASale.com and Amazon.com