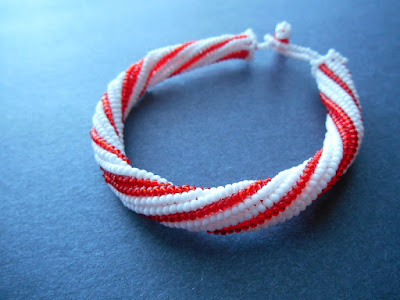
This easy to make bangle puts seed beads and herringbone stitch to good use recreating the look of a tasty candy cane. All you need are size 11 seed beads in opaque white and transparent red or green, plus some thread and a clasp of your choice. Although you can use basic twisted tubular herringbone to make this bangle, we’re going to use a variation that creates an even tighter spiral for the classic candy cane stripe look.
Another advantage of this super twisted stitch is that it makes the rope much sturdier, allowing us to add multiple rows of color without losing the tubular shape when the bracelet is brought into a curve. If you want to add even more stability, you could string your herringbone tube over a core of beads or rubber tubing, and add a clasp with crimps. For added strength, I highly recommend weaving this bracelet with Fireline or another braided beading line.

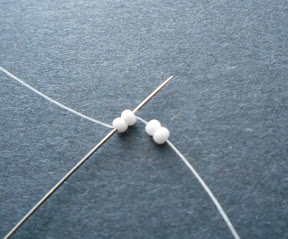
1. On a comfortable length of beading thread, pick up 4 white seed beads. Slide them down to the end, leaving a 10 inch tail. Stitch up through the first 2 seed beads again, and pull snug to form a ladder. Pass down through the second pair of beads.

2. Pick up 2 red seed beads and stitch down through the same 2 white beads again – moving in the same direction as the thread. Pull snug, and stitch up through the 2 red beads. Continue weaving with ladder stitch, adding 2 beads at a time until you have a strip that is 10 beads wide, with the pattern shown.

3. Bring the ends of the ladder together and stitch the first and last rows together twice. Exit from the nearest red row at top of the ring, opposite from the tail thread.

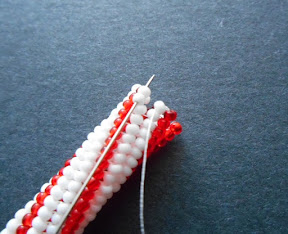
4. Pick up 1 red and 1 white seed bead. Stitch down through the topmost white bead in the ladder below, and pull snug to bring the new beads in place along the ring. Stitch up through the topmost white bead in the next row.
5. Continue adding 2 beads at a time around the ring, matching them to the rows below until you have added 5 pairs total. To step up for the next round, stitch up through the top 2 red beads in the next row and exit from the top of the ring.
6. Repeat step 4 and 5 to add another round of tubular herringbone, but this time, stitch up through 3 beads to step up.
7. Add the first 2 beads of the new round as usual, but stitch up through the top 2 beads of the next row to exit the ring, instead of just one. Continue around the ring, stitch up through 2 beads in each stitch, and stepping up through 3 at the end.
8. Continue weaving with twisted herringbone until your rope is about 1 inch short of the desired length. Be sure to test the fit, as thicker ropes will fit a little bit differently than more flexible bracelets.

9. To close the final stitches and match both end of the beadwork, you’ll need to do a dummy stitch. Work one row of twisted herringbone without picking up any beads, stitching up through 2 beads at a time. Work a second row without any new beads, stitching up through 1 bead in each row. (Look carefully at the beadwork, and follow the natural thread path until all of the beads have the same connections.) Finally, work a round of ladder stitch in the opposite direction, moving 2 beads at a time, to flatten the edge of the rope.

10. Once you’ve woven in all of your tail threads, you can finish your bracelet as desired. My favorite technique is the crown picot finish for herringbone tubes. You could also string the bangle on stretch cord with a focal between the ends for a true bangle look.
Happy holidays!
Mortira
Subscribe * Facebook * Google+
Send your beading questions to InspirationalBeading@gmail.com
Support Inspirational Beading for bonus tutorials and more!
Copyright 2015 Inspirational Beading


that is super cool! I never thought about making a candy cane bracelet!
ReplyDeleteThank you! It's so simple, it's amazing how yummy it looks.
Delete