

In the nautical-themed March bead box from Blueberry Cove Beads, subscribers got so many wonderful treasures, including a lovely packet of wooden cut-out charms with a sailboat motif. I was totally taken with these pretties instantly because they would go so well with my favorite tagua-slice-and-St.Petersburg necklace design. Front-drilled charms and pendants are great for layering as a unique focal. However, since the charms came in pairs – two each in white, pale blue, and navy – I decided to experiment with earring designs instead, and the Sailing Away earrings were born.
Lightweight wooden beads and charms are ideal for earrings, and are a great way to add oomph without making earrings too heavy. You could also use tagua nut slices, shell charms, or mini pendants.
To create these earrings you’ll need a few grams of 11/o seed beads in three colors, and one matching 8/o seed bead color. You’ll also need some lightweight front-drilled charms or pendants, like the sailboat cut-outs, jumprings, and earring findings. For the example project I used an ocean sunset palette of orange, purple, and navy blue, but any color trio would look great!

Sailing Away Silhouette Fringe Earrings
1. Attach a stop bead to 2 yards (1.8 m) of beading thread, leaving a 6 inch (15cm) tail. Pick up 6 seed beads and slide them down to the end.


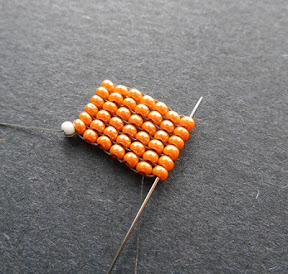
2. Working in square stitch, add 6 rows of beadwork for a total of seven vertical columns of beads.

3. Anchor the thread by stitching down through the 6th column, and back up through the 7th column again.
4. Pick up 2 seed beads. Skipping the nearest bridge of thread between the top beads, needle under the following bridge, moving towards you. Gently pull the thread snug to bring the new beads into place along the top of the beadwork.


5. Stitch up through the 2nd bead just added and pull snug, being careful not to cross or splice the threads.
6. Pick up 1 seed bead. Pass the needle under the next thread bridge at the top of the beadwork and pull snug. Stitch up through the new bead.


7. Repeat step 6 until you reach the end of the beadwork and all of the bridge threads are covered. Stitch up through the last bead added. Flip the beadwork to start the new row.


8. Repeat steps 4-7 until you have a row with just 2 beads. Pick up 1 size 8/o seed bead, and 13 size 11/o seed beads.

9. Stitch back down through the 8/o and into the opposite brick-stitch bead in the final row to secure the loop.
10. Pass down through the beads at the edge of the brick stitch section and all of the beads in the outer square stitch column.


11. Anchor the thread by stitch up through a few beads in the next column, then back down through the same number of beads in the outer column to exit from the bottom. Leave the working thread for now.
12. Remove the stop bead from the tail thread and weave it into the beadwork, passing through the loop section at least once to add strength. Trim.
13. Pick up the working thread again. String about 3cm of size 11/o seed beads, 1 size 8/o seed bead, and a size 11/o.

14. Skipping the last bead picked up, stitch up through the 8/o seed bead and the rest of the strand. Stitch up through a few beads in the square stitch section, then down through the same number of beads in the next column. Check the tension on the fringe.


15. Continue adding strands of fringe, tapering as desired, until you have 7 strands.


16. Weave up into the center of the brick stitch section. Pick up a silhouette charm and 2 size 11/o seed beads. Skipping the 2nd bead added, pass back through the 1st seed bead and the charm, and needle through to the back of the beadwork. Pull snug.


17. Working from the back of the beadwork, stitch through the nearest seed bead. Weave around to retrace the thread path through the charm, then secure any remaining thread and trim.
18. Attach a jump ring and ear wire to the loop. Repeat to make a second matching earring.

Happy beading!
Mortira
I would like to thank Blueberry Cove Beads for giving me the chance to try out the Nautical Bead Box. Inspiration Beading has not received compensation for including products in this post.
Subscribe * Facebook * Google+
Send your beading questions to InspirationalBeading@gmail.com
Support Inspirational Beading for bonus tutorials and more!
Copyright 2016 Inspirational Beading


Love the earrings, especially the white and turquoise. Thanks for another fabulous pattern! Patricia B
ReplyDeleteVery pretty, especially the one with orange.
ReplyDeleteLove, love the idea to add a decorative disc in front of beaded fringe earrings!! Will share on my blog so others can come visit!
ReplyDeleteThanks, Pearl! Layering disc charms over other flat components is one of my all-time favorite design tricks. It works for all kinds of projects and just provides that extra bit of personality.
Delete