Monday, January 25, 2016

Inspired Bead Maker: Serena Smith Lampwork

Iris Lampwork Focal by Serena Smith

Whatever new innovations in beads come our way, nothing quite beats the beauty of a handmade lampwork bead to inspire amazing creations. The colors, shapes, and patterns of unique flameworked glass go so perfectly with our favorite techniques and materials. One of my favorite lampwork artists of late is Serena Smith, whose floral creations are a delight to behold.

Inspirational Beading: How did you first get started with lampwork?

Serena: In 1991 I was working my first "real job" after college in Seattle, at a company called TSI that sold jewelry and lapidary supplies. I found out through them about the Pratt Fine Arts Center in Seattle where they were doing all kinds of art classes, including glass. I took the bead making class and not long after I turned my bedroom in my 1 bedroom apartment into a studio and moved into the living room, bought an oxy/propane set up and supplies from Frantz, and started making beads. Not long after that I returned to school to get a degree in glass art from the Rhode Island School of Design. At that time, lampwork was not given much respect in the art world and the department didn't even have a lampworking torch - other than mine. With my degree I learned about all different kinds of glass working, some of which I still do today, but lampwork is my first love.

Inspirational Beading: Do you remember your first bead? Where is it today?

Serena: Not my first bead, but I do remember the first demo the instructors did on sculpting beads. Most of the class was about how to make a round bead with dots on it. But they demo'd a pudgy little bug thing and warned us that sculpted beads were pretty much guaranteed to break so the demo was just a throw away idea. This was back before annealing kilns were on the market, didn't even know about fiber blanket, we used vermiculite in a can and flame annealing was considered a myth by a lot of people. But, once I saw the potential in sculpting glass that was pretty much it for me, I knew that was what I wanted to do. I used vermiculite for years and did in fact have a lot of luck with flame annealing. I still make a version of my first sculpted bead designed after the Venus of Willendorf sculpture.

Purple Goddess Lampwork Focal by Serena Smith Black and White Garden Lampwork Focal by Serena Smith


Inspirational Beading: Where do you look for inspiration? How does it translate in your designs?

Serena: I have a lot of books with flower pictures in them, but I think I get most of my inspiration just from nature in general, as well as the glass colors they make now. I work in my garden and grow flowers. I also go for long walks, and especially when the flowers are blooming I get inspired to get into the shop and try to create some new bloom or color I've never noticed before. That's how the japonica style flower came to me. I saw bushes in a parking lot that had masses of wee flowers and I took a close look to see these lovely vase shaped blossoms I'd never seen before. I looked them up when I got home to find the name (japonica pieris) and started working with the shape. I don't always try to be faithful to the original flower, as you can see in some of my fantasmagorical Lady Slippers.

Pink Japonica Lampwork Beads by Serena Smith Lampwork Lady Slipper Bead by Serena Smith


Inspirational Beading: Do you have a favorite color or combination to work with?

Serena: Always, pinks make me happy even though I think my favorite color in general is turquoise blue (I have a terrible time with high metal content opaque turquoise glass). These days there are so many more glass colors to work with, some fantastic pinks from Bullseye glass and not just the ruby pink from Moretti that used to turn brown. It's amazing to me to think back to when all we had was Moretti (Effetre) to now when we have so many manufacturers and some really incredibly beautiful colors to work with. I think one of my favorite new colors these days is from Bullseye, an opalescent blue purple color which is fantastic over petal pink.

Inspirational Beading:
Do you have a favorite bead style or shape to create?

Serena: That's a tough one. I don't think I do as far as making them, what I like is to be able to have a variety of things to work on so I make things in small batches. It's not fair to the pretty beads I make to feel irritated because I had to work all day making the exact same thing so I try to avoid doing that. Regardless, I am always cheered when I open the kiln and see a beautiful bouquet of flower beads in a rainbow of colors. What could possibly be better than that? As far as shape, I think my favorite flower to look at right now is the tulip. Simple but lovely.

Lampwork Tulip Beads by Serena Smith Lampwork Heart Beads by Serena Smith


Inspirational Beading: What is the most rewarding moment in your design process?

Serena: I think it must be that "aha" moment when I finally know how to do it, whatever "it" is. Getting the color right, or just figuring out how to create a shape. There is a certain amount of frustration when you first start out something new and you can't "see" or "feel" it, and when it settles down into your hands and they just start making it happen, it is a really good feeling. I've learned not to let those moments of frustration deter me from believing that I can really, truly, figure it out. And the only way to fail is to quit.

Inspirational Beading: What is the most exciting design in your shop right now? What makes it special?

Serena: I have been making a lot of Lady Slippers this month and it has been fun. I designed them a while ago but sort of let them go and hadn't made any in several years when I looked back through some of my history and realized how long it had been, and how special they were! They are a real joy to make, each one comes out different and I am playing with different colors and details and combinations that really makes it fun. I love the moment I open the kiln! Sometimes on my walk from the studio into the house I forget what I'm doing and just stand in the yard looking at each one and smiling.

Fused Glass Heart Cabochon by Serena Smith Turquoise and Ivory Fused Glass Cabochons by Serena Smith


Inspirational Beading: Do you have any plans for new bead styles or themes in the works?

Serena: I've always been interested in different forms of glass work so I do casting, fusing, pate de verre, etc. always looking for ways to incorporate lampwork. What I have been working on this last 6 months or so is how to make cast beads, and also fused components like cabochons. The cabochons often include a lampworked element, like the heart in this cabochon, and just recently I've made just a couple of lampwork blobs that I want to put in the kiln and fuse and just see what happens. I might try fusing some holes into the cabochons to make them into beads. Not sure yet, just expanding my horizons!

Needle Felted Animals with Lampwork Flowers by Serena Smith

Inspirational Beading: Who do you hope to inspire with your work?

Serena: Definitely jewelry makers! But, speaking as a person who likes to try just about every craft, I really would like to reach people who work in areas I might not know anything about, and who might never have considered that their work could include lampwork or glass components. For instance, I also do needle felting and have incorporated my beads into those projects. People think of beads as just for jewelry but they are so versatile and useful and add a wonderful element to any kind of creation.

You can see more of Serena’s gorgeous lampwork beads at the 2016 Best Bead Show in Tucson, Arizona, on her website Serena Smith Lampwork, and on Etsy at Serena Smith and 4GlassCabochons. Follow along on Facebook to see her latest creations and inspirations!

Mortira

Subscribe * Facebook * Google+
Send your beading questions to InspirationalBeading@gmail.com
Support Inspirational Beading for bonus tutorials and more!

Copyright 2016 Inspirational Beading and Serena Smith


Sunday, January 24, 2016

Peyote Stitch Master Class: Two Drop Peyote

Peyote Stitch Master Class - Two Drop Peyote Cuff

For our very first beading Master Class, we’re going to explore the essential and often frustrating peyote stitch. This technique is one of the most common in beadwork, with many applications and variations; it is also one of the most difficult to learn. The first few rows of peyote stitch are tricky to control on a first or even tenth attempt. New beaders often complain of uneven stitches, curving beadwork, tangling threads, and all kinds of aggravations.
The key to mastering any beadwork stitch is muscle memory. With enough practice, the moves and steps become second-nature, allowing you to achieve better results over time. In order to practice peyote stitch and gain that ‘groove’ for how the stitches work, it is best to skip the frustration of those first few rows and go straight to the skip-a-bead-add-a-bead flow. Working peyote stitch off of a strip of right angle weave, or with a Quick Start Card is one way to do this. I like two-drop peyote because you still get the benefit of practicing the first rows of peyote stitch, but in a much more cooperative format.
Working with multiple beads per stitch - rather than the one bead per stitch of traditional peyote - creates a stronger base that holds together much better, and is easier to grip. This helps to prevent any twisting of the beads while you work, giving you a cleaner start. Once you’ve made a few samples or projects with two-drop peyote, you’ll have some valuable insight into how the technique feels, making your future attempts and traditional peyote stitch that much stronger.

Peyote Stitch First Attempts
Failed First Attempts and Peyote Stitch


I’ve used 8/o seed beads for the basic instructions below, but I highly recommend using 11/o seed beads for your first few tries. The extra space in 8/o seed beads doesn’t grip the thread as snugly, which can make it difficult to control the beadwork as you build. Japanese or Czech seed beads will both work – the added bonus of two-drop peyote is that slight changes in bead shape are automatically corrected and supported by the surrounding beads – one more reason that it’s a great technique for beginners.

Like most peyote stitch variations, you’ll need to string the first 2 rows. The real work begins once you start to stitch on the third row. This technically isn’t relevant unless you’re working with a pattern so don’t worry if it sounds confusing; it is important to remember that with basic (even count) peyote, the first beads that you pick up must be an even number. For two-drop peyote, they must also be divisible by 4, since each stitch is two beads, and there must be an even number of pairs in those first 2 ‘rows’. We’ll start with an easy 12 beads – use this basic technique to stitch a few practice panels of any length you like. This is a great opportunity to test out any new bead colors in your stash, or start a swatch collection to help with color selection in future projects.

Basic Two-drop Peyote Stitch:

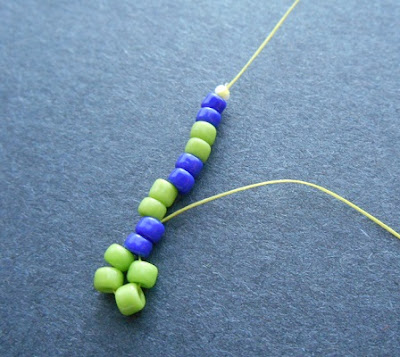
1. Attach a stop bead to a comfortable length of beading thread, leaving at least a 6 inch (15 cm) tail. Pick up 12 seed beads and slide them down to the stop bead. Flip the work so that the stop bead is facing away from you, and the working thread is facing towards you.


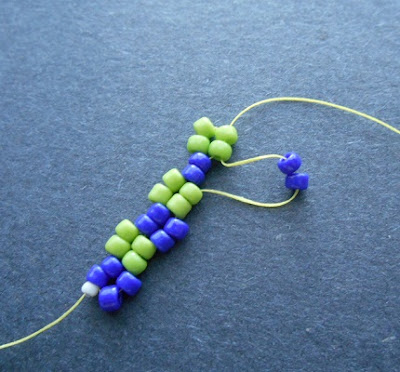
2. Grip the last 4 beads added and the start of the working thread firmly with your off hand, allowing a bit of space to needle through. Pick up 2 seed beads. Skipping the last 2 beads picked up (the two beads closest to you) stitch up through the next 2 beads in the strand and gently pull snug. The new beads should click into place below the beads that you’ve just stitched through.


For best results, maintain your hold on the beadwork, nudging it downward bit by bit as you work the rest of the row. Once all of the beads are in place, the beadwork will be sturdier – until then it is easy to lose your place or twist the beadwork, resulting in a big mess right out of the gate.

3. Pick up 2 seed beads. Skip over the next 2 bare beads in the strand (the two above those you’ve just stitched through) and stitch up through the following 2 beads. Pull snug so that the new beads click into place. Repeat once more to finish the row.


4. Flip the beadwork so that the working thread is facing you again. You should be able to recognize the beads that were added to the previous row. Often called ‘up’ beads, the last row along the edge of peyote is always raised a little higher than the beads of the previous row. It is now a little easier to see those first 2 rows that we strung – row one is green, row two is blue, and the third row that was stitched on is also green.


Pick up 2 seed beads. Stitch up through the first set of raised beads from the previous row (the last 2 beads that you added in the previous step). Pull snug so that the new beads click into place between the surrounding beads.

5. Pick up 2 beads, and stitch up through the following set of raised beads. Pull snug, then repeat once more to finish the row.


6. Repeat steps 4 and 5 until your panel reaches the desired length.


Now that we’ve covered the basics, it’s time to make a practice piece to build that muscle memory and prepare for future peyote projects. If you’re ready to move beyond beading samples and swatches, this simple two-drop cuff is a great place to start. It has a built-in fringe and an easy freeform pattern that is neither dull nor distracting. You’ll need 11/o seed beads in 3 colors, 2 colors of 15/o seed beads, and a clasp of your choice. You can substitute the 15/o seed beads with additional 11/o colors if necessary.

Ocean Waves Two-Drop Peyote Cuff with Trim:

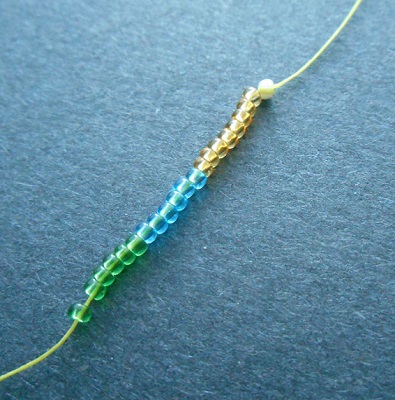
1. Attach a stop bead to a comfortable length of beading thread, leaving an 8 inch (20 cm) tail. Pick up 8 topaz 11/o seed beads, 6 blue, and 6 green. Flip the beadwork so that the stop bead is facing away from you.


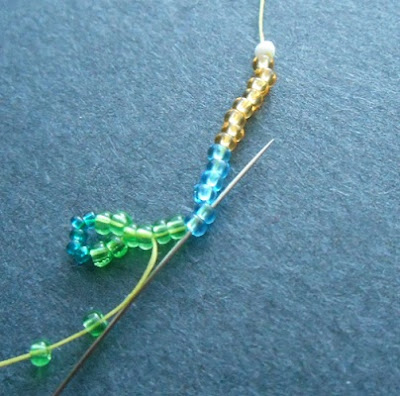
2. Pick up 5 green 15/o seed beads, and 2 green 11/o. Skipping the last 2 green beads added in the first step, stitch up through the following 2 beads and pull snug so that the 2 new green beads click into place. The 15/o accents should form a small loop of fringe along the edge.

3. Pick up 2 green 11/o and stitch up through the following 2 (blue) beads. Pull snug.


4. Add 2 blue, 2 topaz, and 2 topaz to finish the row with two-drop peyote.

5. Flip the beadwork, and pick up 5 topaz 15/o, and 2 topaz 11/o beads. Stitch up through the last 2 topaz beads added in the previous row and pull snug to click the new 11/o’s in place.


6. Complete the rest of the row, adding 2 beads per stitch: topaz, blue, blue, green. On the final stitch, pass up through the last (nearest) 2 size 15/o beads on this edge.

7. Flip the beadwork. Pick up 3 green 15/o, and 2 green 11/o beads. Stitch up through the last 2 beads added in the previous row.


8. Finish the row with pairs of green, blue, topaz, and topaz.


9. Repeat steps 5-8 until the beadwork reaches the desired length for your bracelet, adding 3 15/o beads at each edge for the remainder. To get the optional freeform look, replace one bead in each 11/o pair at random with the following or previous color, to expand and contract the length of each color section. Repeat the addition 1-3 times before returning to the normal pattern. Replace colors at random intervals along the beadwork.


10. When you've completed the cuff, weave your remaining thread across the last row to secure it, then exit from a central pair, 3 or more rows back from the edge. Pick up enough blue seed beads to create a loop that will fit around your clasp or button. Stitch through the same 2 beads in the cuff again, moving in the same direction.

Weave through the loop and along the last few rows of beadwork 1-2 more times to add strength, then trim any remaining thread.

11. Remove the stop bead from the first tail thread, and repeat step 10, stringing your clasp at the center of a bead loop. Make sure that you are exiting from the same side of the cuff as the previous loop so that the components will connect.


Secure any remaining tail threads in the beadwork and trim. If you’re not yet familiar with the technique, we will fully cover adding and finishing threads in an upcoming Peyote Stitch Master Class lesson. For now, be sure to follow the natural thread path – stitching through 2 beads at a time across the width of the cuff, and turning at the edges. Cross over your tail stitches at least once for added security, then trim the thread as close to the beadwork as possible.

Two Drop Peyote Cuff Master Class Tutorial


Happy beading!

Mortira

Subscribe * Facebook * Google+
Send your beading questions to InspirationalBeading@gmail.com
Support Inspirational Beading for bonus tutorials and more!

Copyright 2016 Inspirational Beading


Saturday, January 23, 2016

Bead Color Ideas: Leftover Druks

I’m currently working my way slowly through my workspace clean up and as always I’m making new discoveries and inspirations along the way. One thing that occurred to me as I was putting beads away in their proper places is that I still have way too many druk beads that haven’t been used in years. Some of them are nearly 10 years old, while others seemed really exciting a short time ago, but haven’t quite lived up to their expectations. I thought it was time to pair some of them up with seed beads and see if any ideas arise.

Romantic Turquoise Bead Color Idea
Romantic Turquoise Palette


The first trio was surprisingly easy to build, considering just how long I’ve been holding on to the pink druks. I so rarely have a reason to use pink, and this particular shade of transparent rose is way too subtle for anything I’m making these days. At first glance, I couldn’t possibly imagine what I could make with them. That all changed once I started adding the right seed beads, though. First came transparent topaz AB, which I love with this shade of pink. It’s a romantic, champagne-in-Paris kind of pairing. All it needed was a dash of lustered turquoise and...voila! I definitely think this palette needs a spiral design - perhaps a rope lariat or an embellished bangle.

True Blue-Green Bead Color Idea
True Blue-Green Palette


The next druk color still makes me a little sad. When I ordered them I was so excited to have this color in my stash of accents, but in person they just didn’t deliver. It might be because these are actually a coated finish, and not a true lime green. Even though I couldn’t wait to use them at first, I’ve barely touched these beads. The first color I chose to go with them was black-lined aqua – definitely my favorite blue right now. When the light hits both beads, they really zing. To finish the palette, I didn’t want to use a contrasting color, so I added lustered emerald instead. I almost went with metallic June bug, but it looked much too moody next to the bright green. I’d love to use this trio in something netted or freeform with lots of fringe.

Cherry Bomb Bead Color Idea
Cherry Bomb Palette


The last palette was actually a pre-planned one. I’ve got something special in mind for these colors, but I wanted to test them out first and see how they played together in person, not just my mind’s eye. This palette begins with opaque cherry druks – a long time favorite that have started to lose their appeal after all these years. Although I’m sure a project or two might come up in the future where they would work, I’d really like to move on and try some other reds instead. The first seed bead color I chose for them was opaque lime. I’ve used these two colors in projects before, and they always look fresh and fruity. To keep things looking chic, a backdrop of jet black was all the trio needed. I think the palette would look amazing in flat beadwork like a cuff, but I’m planning to use it for something light and fringy!

Do you have any not-so-inspiring beads just hanging around? What was the last project you used them for?

Mortira

Subscribe * Facebook * Google+
Send your beading questions to InspirationalBeading@gmail.com
Support Inspirational Beading for bonus tutorials and more!

Copyright 2016 Inspirational Beading


Thursday, January 21, 2016

Work in Progress: Modified Collar

My bead tray is looking a little tidier this week and it feels like I’m finally getting back down to just one project – not counting the ongoing ugly necklace and my herringbone rope which I might just finish this weekend. Right now I’m working on the prototype for an upcoming collar tutorial. I'm keeping the palette simple which really makes a difference in how messy my creative space feels. I haven’t made much progress on the collar since I got hit with an annoying cold bug, and I have very strict rules about beading while under the weather. Even if I could manage to sit upright long enough to get any work done, I just don’t think it’s worth it.

Turquoise and Coral Collar in Progress


Although my bead tray is in pretty good shape, my workspace is currently a bit of a disaster – I haven’t yet complied with my resolution to keep a weekly clean-up schedule. Once I’m feeling better I plan to do a complete overhaul of my space and then maintain it ongoing. I got some new organization tools for Christmas that I haven’t implemented yet, and I can’t wait to see how well they work into my routines.

What are you making right now?

Mortira

Subscribe * Facebook * Google+
Send your beading questions to InspirationalBeading@gmail.com
Support Inspirational Beading for bonus tutorials and more!

Copyright 2016 Inspirational Beading


Monday, January 18, 2016

Book Spotlight: Leather Corded Fusion Ties

Some of the biggest trends in jewelry of late include knotting and cords – from wrap bracelets to paracord jewelry, the possibilities are constantly evolving. One of the best places to learn new knotting techniques for jewelry design is the Tying It All Together channel hosted by J.D. Lenzen. There are oodles of videos for tying gorgeous and interesting knots and creating unique knotted jewelry.

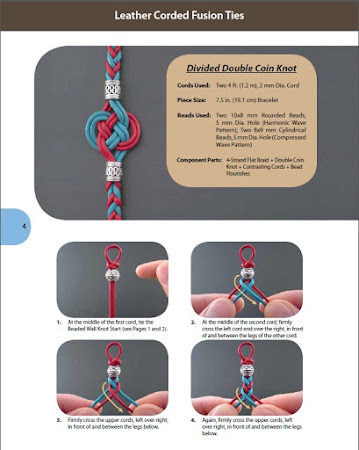
J.D.’s latest book features some of the prettiest and most versatile knots for jewelry making, paired with gorgeous leather cord and large hole beads for deceptively simple jewelry that looks stunning. Leather Corded Fusion Tiescombines a variety of traditional and innovative knotting elements into wearable jewelry designs that anyone can try.

There are 15 projects in all, each one introducing or expanding on techniques that can be used to create one of a kind leather necklaces and bracelets. My favorites are the Divided Double Coin Knot Bracelet, and the Beaded Ashoka Chakra Knot, which look so good they make me want to drop everything and delve into a whole new medium. The combinations of elegant knots with colorful leather and classic beads is incredibly appealing, and the possibilities for variation are very inspiring. These designs look great on their own, and could easily be adapted to include additional beads or even bead wrapping. Plus I love the metal-free clasp techniques that go along with leather cord designs!


Ashoka Chakra Knot Pendant and Noble Heart Knot Pendant


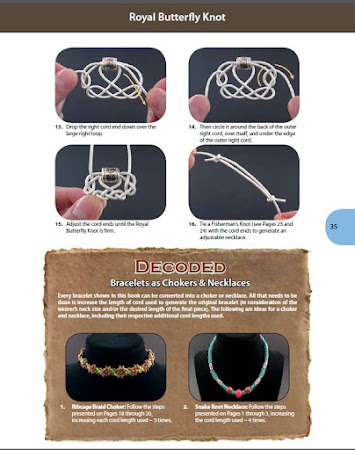
Each project includes easy to follow, step-by-step instructions, and clear photographs of each new technique. The close-up images clearly illustrate the steps, and include handy arrows to really guide you through the process of tying the essential knots. Each design begins with a full materials list, finished project size, and a list of the techniques used. Some projects also include a Decoded section, which is my favorite feature of Leather Corded Fusion Ties. These sections highlight design elements and possible variations for alternative design ideas, including example photos or step-by-step instructions. These extra tips provide valuable information and inspiration that give readers the tools they need to adapt what they’ve learned to make even more beautiful jewelry.


Although the knots look complex, the techniques are very straightforward and are so well explained, you’ll be knotting away in no time. J.D. has included some excellent tips for getting started, such as how to select the best leather cords and beads to use, and which tools will give you the best results.

If you’re looking for an exciting new medium to expand your jewelry design repertoire, Leather Corded Fusion Ties will definitely deliver!


Leather Knot Pendants and Beaded Leather Cord Bracelets


I would like thank J.D. Lenzen and Tying It All Together for giving me the opportunity to enjoy this wonderful book. Inspirational Beading has not received compensation for including products or publications in this post; however, actions you take from this page may result in a commission for Inspirational Beading.

Mortira

Subscribe * Facebook * Google+
Send your beading questions to InspirationalBeading@gmail.com
Support Inspirational Beading for bonus tutorials and more!

Copyright 2016 Inspirational Beading and J.D. Lenzen


Blog Widget by LinkWithin
Fire Mountain Gems and Beads

Inspiration Topics

accessories amulet Ancient Worlds Modern Beads animals April's Army art ArtFire astrology astronomy autumn awards awareness bangle beach Bead Inspired Bead Shops bead soup bead spotlight bead stash Bead Trays beaded beads beading theory beads belt bezel birthstones black blog spotlight blue boho bone book spotlight bracelet Bracelet A Week branch fringe brick stitch brown bugles buttons cabochon ceramic chain maille challenge charity chevron chain christmas collar Collections color Color Ideas color triads conservation craft shows crafts crochet crystals cuff Culled Beads current events Current Faves daggers Daily Sets daisy chain Delicas Destash drops Dutch spiral earrings Egypt Egyptian Gods embellishing embroidery environment etsy exotic fair trade fantasy fashion Favorite Beads Favorite Techniques feminine fibers film findings fire polish fixtures Flashback Test flickr inspiration flowers food found object free form fringe Geek Jewels geekery gemstones geography giveaway glass gold gray Greece green herringbone hex cuts history holiday home decor insects inspiration tip inspired beader Inspired by... Inspiring Links ivory Jewelry Stash knitting ladder stitch lampwork lariat leaf fringe leather lights literature loomwork macrame magatamas Master Class Medallions metal free metalwork Mini Collar a Week mixed media mixture Mood Board MOP multi-color multi-strand music natural beads nature necklace Necklace a Day Nepal chain netting New Beads ocean ombre orange paint paper patterns pearls pendant peyote photography Picasso finish pink Pinspiration PMC polymer clay poster sketch purple quick inspiration rainbow RAW red resin ring Ring a Day rivoli Rome Russian spiral scarf science seed beads shell silver soutache spiral rope spring square stitch St. Petersburg steampunk stringing stripes summer tagua TBT The Elements thread Tilas Time Capsule tools trade beads triangle weave tribal tropical turquoise tutorial two-hole beads Ugly vintage Wear it Twice weather white winter WIP wire wishlist wood World Beaders yellow
Blog Home * About * Beading Tutorials * Advertise

Learn About Sponsoring Inspirational Beading with Project Wonderful
Affiliated With ShareASale.com and Amazon.com