Jewelry and craft books are a wonderful source of knowledge and inspiration, but how often is it that you come across one that actually makes you want to drop everything so you can sit down and create? Even the most popular beading books are at their best when used as a reference or guide, but once in awhile an author’s designs can really inspire.
What I love most about Beaded Allureby Kelly Wiese is that it’s not really a beading book at all. It’s a jewelry making book, with an emphasis on beadweaving. The tone suggests that the projects are intended for anyone and everyone, not just those of us who are already hopelessly obsessed with seed beads.
A brief but informative basics section describes some of the important beadwork terminology that a beginner should know, plus techniques such as weaving in threads. Kelly shows you how to do some of the basic stitches used in the projects, like ladder stitch, picots, and embroidering a cabochon.
Most of the 25 projects use variations of netting and peyote, but there are also appearances by daisy chain, ladder stitch and lots of fun fringes. A reversible lariat project includes a clever closed-back rivoli bezel that would also work well with other pendant projects. Step-by-step instructions and photographs guide you through each design from start to finish.
The necklaces, bracelets and earrings featured in Beaded Allure are made with a variety of easy to find materials, like seed beads, Czech glass, and crystals. They are also incredibly wearable, but live up to the title. Each piece is a mini work of art, but not too over the top for even beginners to attempt.
Copyright 2012 Inspirational Beading
Kelly Wiese and North Light Books
Subscribe to Inspirational Beading
Get Inspired on Facebook
Pages
▼
Tuesday, January 31, 2012
Friday, January 27, 2012
Inspired Beader: Elizaveta Yankelovich
No introduction could possibly prepare you for the fabulously wild designs of Elizaveta Yankelovich. Her unique statement jewelry combines eye catching elements and abundance with a wide variety of found objects and unusual materials. Each design is a work of art, and a story, all wrapped into one piece of amazing jewelry.
Inspirational Beading: How did you first get into jewelry design?
Elizaveta: I've always loved fashion, I've always loved making things with my hands... For 6 years I immersed myself into wardrobe styling, for fashion creatives, independent magazines, websites, and commercials ...while doing that I realized I craved doing things in an original, resourceful and shocking make-your-jaw-drop kind of way.... I started creating props, clothing and looks that were just meant for the camera not for every-day functionality...that brought me to the necklaces... I realized that there was really no limits.... other than weight perhaps... that anything can look shockingly gorgeous and provoke different feelings from the wearer of the piece and the people that see them wearing it.
When I started selling my work on Etsy in 2006 I honestly didn't expect to sell any of my elaborate grander pieces... so to get the ball rolling I made little quirky pieces... but I quickly came to the conclusion that those pieces didn't excite me ... even if yes they were more mainstream and sold faster... they really didn't do anything for me...So I decided to stay true to myself and not worry about sales and focus on the process that I love of making necklaces that make me smile and jump up and down swearing it's my best one to date .... which happens after almost every piece.
Inspirational Beading: What’s the most unusual or unexpected material you’ve ever used?
Elizaveta: A lot of the materials I use are unusual and unexpected. One of my favorite activities is to go to thrift shops and garage sales to discover and unearth forgotten items.... Like I mentioned above there are no limits or boundaries... anything that calls to me ... like a doll with eyes that open and shut... or a mini tea set, or a bunny sculpture or a sail boat.
I also use things that were a part of my past ... like cassette tapes, 12" records or My Little Ponies, and bubble gum... I also love finding bulk items like 3 bags of amazing scrunchies... or 5 bags of hair rollers or a box of paint chips... I really can't get enough. I also love to combine odd objects with recycled fabrics, like tearing up bed sheets or t-shirts and dresses and braiding them together...and incorporating beads and gems or old buttons and scrap jewellery parts.
Inspirational Beading: Do you have a favorite kind of bead or jewelry component?
Elizaveta: To me it's more about my favorite process.... It's very important to me to work on a different/one of a kind piece each time.
Every single necklace is different. It's part of the magic. No one else will ever have the same one. Right now I have noticed that I am very much obsessed with necklaces that take me a long time to make. Before when I first started I would always work on a piece until I was done.... I wouldn't be happy if it wasn't completed in one session, however long (max two evenings).
But now I revel in the process that takes longer so every few days when I look at a work in progress new ideas come to me.... and seeing the different stages that a piece goes through inspires me to think about other designs and directions they can take. I like this new change. It's definitely slower but my necklaces are more elaborate and feel different.
My favorite processes to date [are] feathering, braiding, tying and hand painting.... for example. This Is What Love Is and the Long Tribal Rain Necklace are the most recent.
Inspirational Beading: Where do you find the most inspiration?
Elizaveta: I find inspiration everywhere.
Inspirational Beading: What was the inspiration behind your favorite design?
Elizaveta: Well.... I love Gaudiness in an understated kind of way....
For example with This Is What Love Is .... I was thinking of marriage, traditions, mermaids, nets, love, but to be honest all those thoughts and inspirations almost come as I'm making the piece.... It's almost like the piece is it's own inspiration.... it's hard to describe.
Inspirational Beading: Is there a material or subject that you would love to work with, but haven’t tried yet?
Elizaveta: I want to eventually try working with metals, gold and silver .... One day I want to be able to create large obnoxious and luxurious pieces from scratch too....
Inspirational Beading: Who do you hope to inspire with your work?
Elizaveta: Whoever wants to be inspired.
You can see more one of a kind statement jewelry, art, fashion and more at ElizavetaYankelovich.com, or in Elizaveta’s Etsy shop.
Copyright 2012 Inspirational Beading and Elizaveta Yankelovich
Subscribe to Inspirational Beading
Get inspired on Facebook
Tuesday, January 24, 2012
Heart Shaped Beading Tutorials and Projects
As the universal symbol of love, devotion and passion, nothing beats a heart when you want to add a little charm to a design. There are so many different ways to add this fun shape to beadwork, from heart beads, to metal stamps, to beadwork patterns.
With Valentine’s Day just around the corner, you might be inspired to use some variations of the heart theme in your designs. Though shades of red are a traditional color scheme at this time are year, any combination of colors that speaks to you can be combined with hearts to make beautiful designs.
I searched from some fun and fantastic heart tutorials and patterns, especially those that would work with more adventurous palettes at any time of the year. I’ll try to come up with some unique ways to mix up these patterns, and I hope you’ll make your own suggestions, too! Here are my favorites:
FusionBeads.com’s True Love Bracelet is a fun variation on the leather wrap bracelet. A sprinkling of opaque red glass hearts among ruby fire polish brings to mind cinnamon candies. I like the use of red cord in the original project for a cohesive look, but I prefer a little contrast. I would combine black leather with white or ivory hearts, and fire polish beads in emerald green.
For a fun, textured focal, Anna Nimmity’s felt heart pendant tutorial is a sure hit. Her version is suspended from a simple chain, but could also be combined with beads, silk, or cord for even more texture. I like the pattered red in the original project, but I think it would look fabulous in friendly yellow or an earthy mixture of green and brown.
One of the best things to come around at this time of year is the conversation heart. These little candies look too good to eat! Delighted Momma’s easy tutorial for making candy heart beads from polymer clay is perfect for satisfying a sweet tooth. Instead of a traditional rainbow of pastels, how about minty blues, whites and greens?
A swirled glass heart and luscious crystals combine with chain in this romantic necklace tutorial from Artbeads.com, entitled Everything for Love. For a more tropical approach to romance, I would combine a fiery orange heart with round glass beads in yellow and fruity green. Perhaps it would be called "Jungle Love"!
This beginner friendly Wild Heart Earrings tutorial from Beadaholique is eye-catching in Siam ruby crystals. The simple design leaves lots of room for embellishment, like additional bead dangles or some chain fringe for shoulder dusting Valentine earrings. Instead of red and black, why not turquoise and chocolate brown?
One more fantastic design from Fusionbeads.com, this Wild At Heart peyote stitch pattern is perfect for year-round wear. I love the starburst pattern in the background, which would look equally wild in green, purple and black.
For added Valentine’s fun, I also discovered these great projects:
What’s your favorite way to include hearts in your designs?
Copyright 2012 Inspirational Beading and Friends
Subscribe to Inspirational Beading
Get inspired on Facebook
With Valentine’s Day just around the corner, you might be inspired to use some variations of the heart theme in your designs. Though shades of red are a traditional color scheme at this time are year, any combination of colors that speaks to you can be combined with hearts to make beautiful designs.
I searched from some fun and fantastic heart tutorials and patterns, especially those that would work with more adventurous palettes at any time of the year. I’ll try to come up with some unique ways to mix up these patterns, and I hope you’ll make your own suggestions, too! Here are my favorites:
FusionBeads.com’s True Love Bracelet is a fun variation on the leather wrap bracelet. A sprinkling of opaque red glass hearts among ruby fire polish brings to mind cinnamon candies. I like the use of red cord in the original project for a cohesive look, but I prefer a little contrast. I would combine black leather with white or ivory hearts, and fire polish beads in emerald green.
For a fun, textured focal, Anna Nimmity’s felt heart pendant tutorial is a sure hit. Her version is suspended from a simple chain, but could also be combined with beads, silk, or cord for even more texture. I like the pattered red in the original project, but I think it would look fabulous in friendly yellow or an earthy mixture of green and brown.
One of the best things to come around at this time of year is the conversation heart. These little candies look too good to eat! Delighted Momma’s easy tutorial for making candy heart beads from polymer clay is perfect for satisfying a sweet tooth. Instead of a traditional rainbow of pastels, how about minty blues, whites and greens?
A swirled glass heart and luscious crystals combine with chain in this romantic necklace tutorial from Artbeads.com, entitled Everything for Love. For a more tropical approach to romance, I would combine a fiery orange heart with round glass beads in yellow and fruity green. Perhaps it would be called "Jungle Love"!
This beginner friendly Wild Heart Earrings tutorial from Beadaholique is eye-catching in Siam ruby crystals. The simple design leaves lots of room for embellishment, like additional bead dangles or some chain fringe for shoulder dusting Valentine earrings. Instead of red and black, why not turquoise and chocolate brown?
One more fantastic design from Fusionbeads.com, this Wild At Heart peyote stitch pattern is perfect for year-round wear. I love the starburst pattern in the background, which would look equally wild in green, purple and black.
For added Valentine’s fun, I also discovered these great projects:
Lori Greenberg demonstrates how to create a perfect
puffy heart lampwork bead in her fantastic tutorial.
Maria Nerius creates a fun and textural
heart pendant with needle punch techniques.
This Key to My Heart Necklace tutorial
from Little Birdie Secrets is great for Valentine’s Day or Mother’s Day.
What’s your favorite way to include hearts in your designs?
Copyright 2012 Inspirational Beading and Friends
Subscribe to Inspirational Beading
Get inspired on Facebook
Monday, January 23, 2012
New Beads: Indonesia
When I first decided that my 2011 New Year’s resolution would be to try out new beads every month, I had my sights set on really unique materials, like one of a kind lampwork and vintage treasures. I have found some fantastic focals along the way, and learned a lot about my own beading preferences and abilities.
Towards the end of the year, I had to make some adjustments to my goal, since ever shrinking bead budgets left little room for expensive art beads and one-use components. Although I’m glad I had this challenge to give me the chance to try out other things, like long magatamas, I wanted to make sure that the final New Beads design was a big one. Luckily, December is always a little fatter than the rest of the year, and I was able to finally make a trip back to Happy Mango Beads for some irresistible goodies.
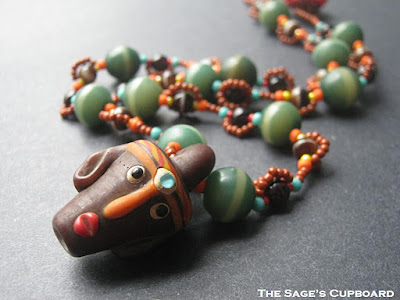
The selection on the website is large and varied, and since I didn’t have a specific focal style in mind for the last challenge piece, I started in the new arrivals section. Much to my delight, I came across some adorably charming face pendants from Indonesia. I was even more thrilled to discover that they are made from glass - no metals, gems, or plastic! I didn’t even hesitate to snap them up. I couldn’t walk away without a few strands of this and that, and I found some beautiful dyed buri nuts, also from Indonesia, and added them to my African Christmas beads and white hearts.
When I saw my new face pendant in person, I had a long debate about how I was going to use it. Such a beautiful bead deserves a great background, but did I want to make something so elaborate that it would take away from the fine details in the pendant? And with so many different accent colors to draw from, how could I choose a palette that would work with both the beadwork and the focal?
At the risk of boring even myself, I was drawn to use a simple beaded chain - my favorite treatment for unique focals. The advantage to such an uncomplicated necklace would be the extra room for color play. So, I gathered up an assortment of brown beads, plus orange, yellow, red and turquoise green to match the decorative glass face.
I love the natural element that the buri beads bring to the chain, and their size allows the smaller, more colorful beads to sit in the background a little, balancing the design. Although this wasn’t exactly the ‘big’ necklace I had envisioned for the twelfth and final piece, I couldn’t be happier with how it turned out. Trying out these Indonesian treasures was exactly the experience that I had hoped for last January.
Thank you so much for following along and supporting me during this challenge. The new mission for 2012 will be revealed soon, and I’ll be inviting beaders and bloggers to join in the fun!
Copyright 2012 Inspirational Beading
Subscribe to Inspirational Beading
Get inspired on Facebook
Sunday, January 22, 2012
Inspired Beader: Strings for Hope
Have you ever stopped before tossing something in the trash or recycling, and wished that you knew of a way to reuse it instead? We all know that recycling is the last option of the Three R’s, and if there’s a way to keep items from ending up in a bin, we should take it. Many artists, beaders and jewelry designers use this approach in their work by saving, salvaging and repurposing objects that others view as trash, and turning it into treasure.
Laura Wilson of Nashville Restrung keeps used guitar strings out of the landfill by using them to create beautiful upcycled jewelry. In addition to reducing a little bit of waste and making a great statement, she also uses her creativity to help support causes locally, and around the world, that aim to alleviate and eliminate poverty.
Inspirational Beading: How did you first get into combining guitar strings with beads?
Laura: I started working with guitar strings 2009; at that point I had been a beader for 10 years. My husband is a guitar builder and I kept watching him throw used strings in the trash. That perfectly beautiful wire was headed to the landfill! I learned that strings from musical instruments are made from mixed metals and therefore not recyclable. I thought the wire itself had far too much character to be wasted, and figured I should be able to do something with it. The first bracelet I made used an interesting triangle bead.
Inspirational Beading: Do you have a favorite material or color to work with?
Laura: Strings come in such a variety of textures and weights there is always something new to work with. I particularly enjoy when I get a set of violin or cello strings. They are so fluid and flexible they make very delicate, feminine pieces. When it comes to beads, I love stalking thrift shops and estate sales for pieces I can disassemble to reuse. I recently found a bracelet at a thrift shop that was commercially made from wonderfully carved Tibetan silver and accented with huge blue plastic pony beads. It could not have been more hideous! I redesigned the silver pieces and it’s one of my top favorites now.
Inspirational Beading: Where do you find inspiration for new pieces?
Laura: Each brand of guitar string has different characteristics. The ferrule ball end – the piece that holds the string to the bottom of the instrument, at the saddle -- can be round, bullet shaped, or even a loop. They can be stainless, brass or a variety of colors. I let the strings' unique character take me down a path to beauty.
Inspirational Beading: If you could master any new technique, what would it be?
Laura: I made some trial and error stabs at soldering and it hasn’t been pretty. I think soldering would allow me to add so much more dimension to the items I make.
Inspirational Beading: Do you remember your first jewelry project? Where is it today?
Laura: I was so blissfully unaware! I thought, How hard can it be to throw some beads together? I learned a lot of lessons from that piece. I still wear it often – a multistrand necklace of black glass and crystal beads.
Inspirational Beading: Do you have a favorite organization to donate to?
Laura: In the summer of 2011 I listened to a message based on Matthew 25 and the parable of the 10 talents. Before going away on a trip the master gave his servants his wealth to care for. To one he gave five talents, another two and the final one. When he returned they came back and presented his wealth and what they had done with it in his absence. At the end of the story the master states, “For whoever has, will be given more, and they will have an abundance.”
I looked around my life and was overwhelmed with how blessed I am with a great family and friends, a home, a job I love. It opened my heart to really see how many people in our own communities are struggling to feed their families. I had this great little hobby making jewelry, so why not use it to do something meaningful?
I’d had some success in selling my pieces but it wasn’t until we opened ourselves up to really giving back to our community that it took off. We’ve made a commitment to work equally with local and global agencies. In our community we support the Backpack Ministry that sends food home with students who otherwise would not have meals available on weekends, and we also support our local food bank. Globally, we’re currently working with two fabulous organizations – Jacaranda Kids in Kenya, and Mission Lazarus in Honduras.
You can see more of Laura’s creations, and learn about her commitments to creating change through jewelry at Strings for Hope, and browse designs in her shop Nashville Restrung.
Copyright 2012 Inspirational Beading and Laura Wilson
Subscribe to Inspirational Beading
Get inspired on Facebook
Tuesday, January 17, 2012
How to Style a Valentine Necklace
A time for great debate is approaching - the middle of February, when everyone will have the opportunity to show their allegiance or disdain for everything from greeting cards and chocolate, to singles bars and cinnamon cocktails. While the merits of Valentine’s Day are always up for argument, it also brings us to a major color battle as well. Is it okay to pair red with pink?
Many people do not approve of putting pinks and reds together, but still others agree that it can be done, if done right. With the right shades and proportions, pink and red can be gorgeous together. And with this in mind, I decided to take on the challenge of combining red with a really tough shade of pink - magenta - plus a little peach thrown in for extra fun.
Naturally, any Valentine collage should start with hearts, and I found an abundance of simple heart pendants that weren’t very inspiring. When I finally stumbled across a Betsey Johnson statement necklace with zebra print hearts and magenta colored rhinestones, I couldn’t resist. But how well would it work with my chosen palette?
I combined soft fabrics and pretty contours with black, red and peachy coral. Each outfit provides a romantic backdrop for our quirky necklace. A simple black bag and a luscious red crystal cluster bracelet easily cross over from casual to semi-formal. My favorite find is the chunky Murano glass statement ring!
As always, these looks - or something like them - can be found in handmade and vintage.
And here are my favorite Polyvore sets featuring today’s picks.
Do you like to combine red and pink in your designs?
Copyright 2012 Inspirational Beading
Polyvore.com and Etsy.com
Subscribe to Inspirational Beading
Get inspired on Facebook
Saturday, January 14, 2012
Time Capsule: January 2009
Three years ago this month, something really fantastic happened on Inspirational Beading - the first ever Inspired Beader segment. I had originally imagined this showcase of awesome beading and jewelry talent as a stand-alone site, long before I had really sunk my teeth into blogging. When I realized how much fun it was to create posts for the blog, I realized that sharing and celebrating the work of other beaders was just the thing I needed to keep the ball rolling.
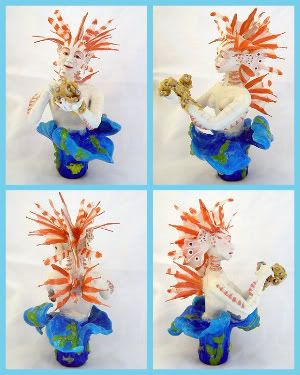
Our first inspired beader was Sheryl Westleigh of Noadi’s Art. Her incredible polymer clay sculptures and pendants caught my eye, and I was very pleased to share some of her inspirations and designs here. Since then, her selection of cephalopod and specimen jar jewelry has grown, but her imaginative designs still have her signature flair.
There have been almost forty inspired beaders featured here in the last three years, each one with their own exciting ideas and techniques, and amazing portfolios of beading and artwork to share. Here are just a few of my favorites:
I’m always on the lookout for unique designs to showcase on Inspirational Beading, and beaders who want to share their ideas and insights into our favorite materials. There are now three separate segments for guest designers, and everyone is invited to join in the fun. I want to extend a huge thank you to everyone that has participated in an interview with me over the years. Thanks for sharing with us!
Copyright 2012 Inspirational Beading and Friends
Subscribe to Inspirational Beading
Get inspired on Facebook
Our first inspired beader was Sheryl Westleigh of Noadi’s Art. Her incredible polymer clay sculptures and pendants caught my eye, and I was very pleased to share some of her inspirations and designs here. Since then, her selection of cephalopod and specimen jar jewelry has grown, but her imaginative designs still have her signature flair.
There have been almost forty inspired beaders featured here in the last three years, each one with their own exciting ideas and techniques, and amazing portfolios of beading and artwork to share. Here are just a few of my favorites:
Lionfish Mermaid
by Noadi
Amethyst Soap Rocks
by Soapsmith
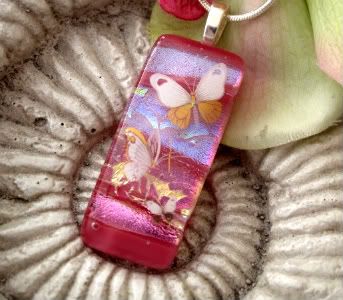
Glass Pendants
by C.C. Valenzo
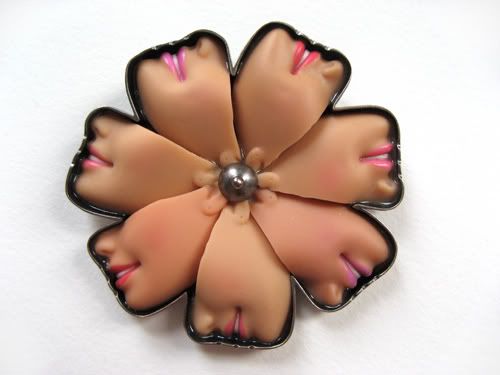
Barbie Smile Brooch
by Margaux Lange
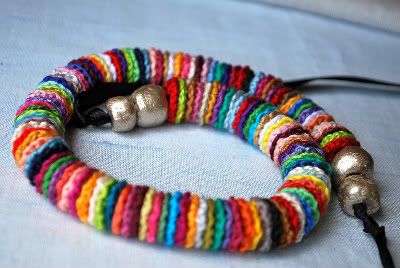
Colorido Crochet Necklace
by Lavender Field
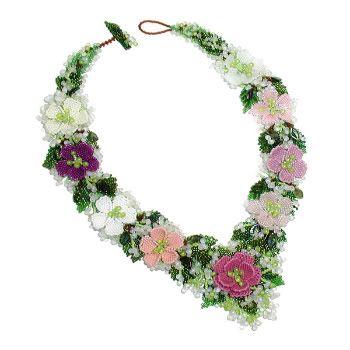
Spring Romance Necklace
by Zoya Gutina
I’m always on the lookout for unique designs to showcase on Inspirational Beading, and beaders who want to share their ideas and insights into our favorite materials. There are now three separate segments for guest designers, and everyone is invited to join in the fun. I want to extend a huge thank you to everyone that has participated in an interview with me over the years. Thanks for sharing with us!
Copyright 2012 Inspirational Beading and Friends
Subscribe to Inspirational Beading
Get inspired on Facebook
Thursday, January 12, 2012
New Beads: Long Magatamas
One of my favorite things about trying new beads, is that there is always an opportunity to learn something new. While this sometimes means trying a new technique, it can also help a beader learn more about the techniques they already love.
My bead budget for November was incredibly small, and once I had purchased some supplies I needed for a custom design, I had very little room left for new beads. I decided to make the most of it, and added a couple of magatama packets to the order, since I’ve been longing to try them all year. I grabbed some in blue, and I couldn’t resist the transparent lemon lime.
These leaf shaped seed beads have a lot of interesting qualities, particularly the angled holes, which make them ideal for organic inspired designs - they make excellent leaves and dragon scales. I wanted to put these beads to use in a design that would really show off their shape, instead of simply throwing them in with my usual work. Bangles have been done, and beautifully, so I had to come up with something else.
I decided it would be fun to replace the 8/o seed beads in a Dutch spiral with magatamas. They would look fantastic snuggled into the beadwork, and spiraling around the chain. After some debate, I settled on a palette of brown and gold to contrast the green and blue, and lend some more organic flair to the leafy shapes.
At first I was really excited about the idea, but after a few turns around the spiral, I started to get bored. The idea seemed to fizzle as I contemplated all the work ahead, even though the project was turning out as I had planned - perhaps better. It was then that I realized that I wasn’t interested in the project because I was forcing myself to do something that worked for the beads, instead of making the beads work for me. It was time to start over.
Instead of making a project that was ideal for the magatamas, I decided to take a chance and see how they would work in a design that was more my style. With the drop-like nature of the magatamas, I couldn’t resist trying a Chevron collar. I removed the topaz from the palette, and simply added some blue and green drops to the edge of dark brown netting.
Although taking the time to make sure that the long magatamas were facing the right direction with each stitch made the work go a little slower, it was much more fun that trying to please the beads, instead of the other way around. And now I have this fun little collar with blue and green leaves along the edge!
Have you worked with long magatamas? What’s your favorite technique to use them with?
Copyright 2012 Inspirational Beading
Subscribe to Inspirational Beading
Get inspired on Facebook
Tuesday, January 10, 2012
Craft Space and Bead Storage Ideas
If one of your New Year’s resolutions is to organize and de-clutter your craft space, you’re probably contemplating some new and improved storage solutions. Although we might fantasize about living in a bead store, since a never ending abundance of supplies in one big room would remove the need to constantly shuffle our stash around, it still wouldn’t help with the little things. Every opened package, cut strand, and salvaged treasure needs a home - preferably sorted by size, color, or shape! Add to that all the extra things that we need to keep on hand, like tools, packing materials and finished designs, the need for dependable and stress-free storage creates a never ending battle for beaders.
Today I want to share with you some of my favorite handmade and store bought storage ideas, plus a few more that I’ve discovered along the way. Many of these handy tools help to keep beading supplies together in a single limited space, and organized enough to know exactly where everything is. The less time you have to spend looking for things, or finding a home for new beads, the more time you can spend creating!
Tackle Trays
It’s interesting to note the little things that all hobbyists have in common, and one trip through a tackle shop or sporting goods store will give you a sense of connection with fishermen and fly-tyers. This is one of the best places to find affordable and reliable storage solutions for beads and jewelry components.
My personal favorite is the compartment tray, especially those with a variety of compartment sizes. These little trays can hold a lot of beads, don’t take up a lot of space, and are very stackable. Clear trays allow you to easily grab the beads that you need, but there’s always plenty of room for labels along the sides. One tiny spill can be a huge disaster though, so I like to store beads in their original packages, and use the compartments for organizing by size and color.
Traditional tackle boxes, like those with hinged, stacking trays inside, are also excellent for materials, tools and larger beads. The locking lids and handles also make them ideal for traveling and beading on the go. Smaller tackle containers like space saving jars are very handy for sorting and organizing small quantities of beads.
Cereal Boxes
Anyone who has ever visited an elementary school has probably seen magazines stored in cereal boxes, which help keep the flimsy booklets upright and easy to browse through. All you have to do is remove the top flaps and cut out a wedge from one side to make a handy book receptacle for beading magazines.
This easy upcycled solution is also great for storing and sorting supply invoices, tutorials and printouts, and packing materials like envelopes and tissue paper. The leftover box tops can also be cut and taped together, making handy bracers for storing beaded bangles.
Food Containers
Food containers of all shapes and sizes can make ideal homes for our materials and tools. Once they are thoroughly washed and dried, baby food and spice jars, dairy tubs, and even cookie trays can make a little space go a long way. To make containers absolutely spotless for bead and jewelry storage, I triple wash them with hot soapy water and a generous amount of baking soda. It works as a mild abrasive that also deodorizes and disinfects.
Totes
For a more professional feeling craft space, there are a wide variety of bead storage options available to choose from. Personally, I find a lot of them too fiddly for my taste, and each one has it’s limits for bead sizes and quantities. But for beaders who are on the move a lot, storage totes can provide both organization and security.
Drawer Displays
I can’t say enough good things about these upcycled beauties. Even though we all know hanging isn’t good for beaded jewelry, it’s hard to resist these pretty little compartments. Something about them is just ideal for the magpie in all of us. In a studio, these refurbished printer drawers would make great displays or storage space for bead strands and hanks.
Other fun vintage and upcycled options include commercial baking trays, science lab accessories, and sewing kits - thoroughly cleaned, of course.
Home Décor
If it has cubbies, hooks, shelves, or drawers, chances are it can be used for storing craft supplies. Any bed and bath or home improvement store will have a treasure trove of storage options for beading and craft spaces. Paper towel racks are great for spools of ribbon, cord and thread. Shoe caddies are just waiting to be filled with tools and other miscellany.
If you’re thinking about an overhaul of your craft space, the Crafty Storage blog might help give you some ideas for how to get organized. There are lots of great images of studios and storage ideas to get inspired with.
Do you have a fun or unusual way to store beads and jewelry?
Copyright 2012 Inspirational Beading and Friends
Images Hosted by Pinterest
Subscribe to Inspirational Beading
Get inspired on Facebook
Today I want to share with you some of my favorite handmade and store bought storage ideas, plus a few more that I’ve discovered along the way. Many of these handy tools help to keep beading supplies together in a single limited space, and organized enough to know exactly where everything is. The less time you have to spend looking for things, or finding a home for new beads, the more time you can spend creating!
Tackle Trays
It’s interesting to note the little things that all hobbyists have in common, and one trip through a tackle shop or sporting goods store will give you a sense of connection with fishermen and fly-tyers. This is one of the best places to find affordable and reliable storage solutions for beads and jewelry components.
My personal favorite is the compartment tray, especially those with a variety of compartment sizes. These little trays can hold a lot of beads, don’t take up a lot of space, and are very stackable. Clear trays allow you to easily grab the beads that you need, but there’s always plenty of room for labels along the sides. One tiny spill can be a huge disaster though, so I like to store beads in their original packages, and use the compartments for organizing by size and color.
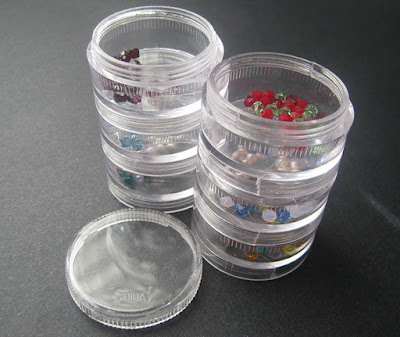
Traditional tackle boxes, like those with hinged, stacking trays inside, are also excellent for materials, tools and larger beads. The locking lids and handles also make them ideal for traveling and beading on the go. Smaller tackle containers like space saving jars are very handy for sorting and organizing small quantities of beads.
Cereal Boxes
Anyone who has ever visited an elementary school has probably seen magazines stored in cereal boxes, which help keep the flimsy booklets upright and easy to browse through. All you have to do is remove the top flaps and cut out a wedge from one side to make a handy book receptacle for beading magazines.
This easy upcycled solution is also great for storing and sorting supply invoices, tutorials and printouts, and packing materials like envelopes and tissue paper. The leftover box tops can also be cut and taped together, making handy bracers for storing beaded bangles.
Food Containers
Food containers of all shapes and sizes can make ideal homes for our materials and tools. Once they are thoroughly washed and dried, baby food and spice jars, dairy tubs, and even cookie trays can make a little space go a long way. To make containers absolutely spotless for bead and jewelry storage, I triple wash them with hot soapy water and a generous amount of baking soda. It works as a mild abrasive that also deodorizes and disinfects.
Totes
For a more professional feeling craft space, there are a wide variety of bead storage options available to choose from. Personally, I find a lot of them too fiddly for my taste, and each one has it’s limits for bead sizes and quantities. But for beaders who are on the move a lot, storage totes can provide both organization and security.
Drawer Displays
I can’t say enough good things about these upcycled beauties. Even though we all know hanging isn’t good for beaded jewelry, it’s hard to resist these pretty little compartments. Something about them is just ideal for the magpie in all of us. In a studio, these refurbished printer drawers would make great displays or storage space for bead strands and hanks.
Jewelry Display by Blue Bird Heaven
Other fun vintage and upcycled options include commercial baking trays, science lab accessories, and sewing kits - thoroughly cleaned, of course.
Home Décor
If it has cubbies, hooks, shelves, or drawers, chances are it can be used for storing craft supplies. Any bed and bath or home improvement store will have a treasure trove of storage options for beading and craft spaces. Paper towel racks are great for spools of ribbon, cord and thread. Shoe caddies are just waiting to be filled with tools and other miscellany.
If you’re thinking about an overhaul of your craft space, the Crafty Storage blog might help give you some ideas for how to get organized. There are lots of great images of studios and storage ideas to get inspired with.
Do you have a fun or unusual way to store beads and jewelry?
Copyright 2012 Inspirational Beading and Friends
Images Hosted by Pinterest
Subscribe to Inspirational Beading
Get inspired on Facebook