Showing posts with label earrings. Show all posts

Monday, July 4, 2016

Inspired Beader: Anika Jaumann

Anika Jaumann Beadwork

Today I want to introduce you to an amazingly talented beader. Anika Jaumann’s elegant beadwork designs are a delight to behold!

Inspirational Beading: When did you first get started with beading?

Anika: As a kid, I used to string bracelets and necklaces out of wooden beads and wore them in kindergarten – I put them secretly on after my mom was gone, because she didn’t want me to do so. When I was eleven, I discovered glass seed beads and strung some bracelets, but this didn’t turn into a regular activity until in 2010 when I decided (out of the blue, actually), I really needed a pair of strawberry earrings. But the metallic ones you could buy on the internet didn’t match the vision I had in mind until I stumbled across a picture of beaded ones. So I went into the next craft store, bought some seed beads and wire and was immediately sucked into my new passion and, I’ll admit it, addiction. After half a year of happily “fumbling around” and diving through colors, shapes and textures, I sat down and taught myself off-loom weaving techniques and later, bead embroidery. All of this very soon lead to my own designs. It all felt like a very natural process, actually. I was and am still astonished at what one is able to do with only a few beads, some thread, a needle, and the gift of imagination.

Inspirational Beading: What is your favorite thing about jewelry making?

Anika: There is a lot of pressure on women and their looks these days, and sometimes I feel the fashion industry doesn’t really help us to come at peace with our body and individuality, but rather forces things on us that don’t fit all. I’m not able to make clothes by myself, but still like to look pretty and feel good when looking in the mirror, but my choice of clothing is limited by the current trends I can’t influence. By making my own jewelry, I can still make a fashion statement, but I’ve got much more freedom to decide what I want to say through my jewelry and how people judge me by my looks. Also, I’ve always loved colors, the different shades, the emotions they convey, how shades change when combined. Beads and other materials I use for jewelry making provide me with the exact thing I’ve been subconsciously looking for when I decorated my apartment, made little colorful books out of self-written poems, or purposely combined unflattering shades within my clothes: A medium that has no limitations in the aspect of color, but rather opened my eyes to what can be done with thousands of different shades and how they’re altered by astonishing bead finishes.

Anika Jaumann Beadwork Earrings Anika Jaumann Beadwork Earrings


Inspirational Beading: Do you remember your first piece? Where is it today?

Anika: This was actually the pair of strawberry earrings I mentioned above. They were made with seed beads and wire, so naturally after a while they fell apart. I replicated them multiple times because I liked them so much, and every pair got better than the one before that. I think the fourth version was finally a 3D-piece. Throughout the first year, I made a lot of “practice pieces“, some with really nice color palettes, some with – well, not so nice. As my skills and knowledge about design and color improved, the pieces got more elaborate, and one by one I could identify the poor decisions I sometimes made in my first pieces and understood why one bracelet or the other just hadn’t worked out. As a part of growing and looking forward, I’ve now torn so many pieces apart I can’t even count them anymore. Sometimes this process hurts, but it also makes me very humble and thoughtful, and I think this helps me to become a better designer.

Inspirational Beading: Where do you look for your favorite inspiration?

Anika: There are three sources of inspiration. First is my stash. I don’t think it’s very huge, but it’s very well sorted by temperature of color, then saturation. This helps me to create the warm, sometimes autumnly palettes I love to work with, while also having some cool shades as accents to throw in. The diversity in shapes and sizes of beads serve as inspiration to me as well, so they aren’t sorted at all.


Second source is the work of other bead designers. Jamie Cloud Eakin’s work is stunning, as well Irina Chikineva’s. I’ve been following “Inspirational Beading“ since my very first beginnings, and I think Mortira really serves her mission of inspiring other beaders with her wonderful pictures and well-written posts. I don’t look at pieces by other designers and try to duplicate them, but rather ask myself: What is it in this piece that grabs my attention? What kind of technique did the designer use, how did she/he use color, materials, finishes? What makes this piece a "Wow"-piece?

Third comes my mind. I’m always trying to get input through books about beading, color and design, pictures by other beaders, my stash, scrolling through online bead stores or visiting actual stores – with all of that combined, ideas come naturally. I don’t try to force them but let my subconsciousness do the work for me. In this way, I feel more connected to myself and can explore my own style in a more honest way rather than trying too hard to reach a certain “level“ or message that I admire in others, but is not my own.


Inspirational Beading: What is your favorite kind of design to make?

Anika: Romantic feminity, with many tiny beads, rich textures, butterflies and flowers, definitely speaks a lot to me. On the other hand, I don’t like to work with the “typical” rose, cream, baby blue or lavender palettes but rather apricots, warm coral rose, honey yellows, gold, terracotta, light copper, olive and so on, so my combinations sometimes may seem a little unusual in regards of style versus color choice. And it’s exactly this contrast that feels right to me. Embellishment is my favorite part of the process. In this step, I get the opportunity to enhance the message the basic piece is already telling. I love the care it takes to balance this emphasizing aspect versus the risk of overpowering the rest of the piece. Concerning the kind of jewelry, I somehow make a lot of earrings, simply because I love wearing them. But the design choices are limited here, because of size, shape, and weight, so I’m currently working on necklaces as well.

Inspiraitonal Beading: What’s the most interesting or unique thing about your design process?

Anika: The most dominant aspect of my design process is the constant change. I always try to control certain aspects of it, as I’ve got the feeling the resulting designs will be better this way, but this just works for a short period of time until everything organizes itself in a chaotic, somehow organic way. My latest method to work with went as follows: I first pick a color palette consisting of different shades, partly with help of my knowledge of color theory, partly listening to the feeling the colors awake in me. I then decide upon the technique and design. With bead embroidery, I usually start with the center pieces, with a vague vision in mind that develops throughout the process. Sometimes I take notes, sometimes not. I’m really awful at drawing, so I don’t really use sketches a lot.

Anika Jaumann Beadwork


Inspirational Beading: Do you have a favorite color to work with?

Anika: I’ve always been drawn to warm colors, mostly the ones that are less saturated, with no preference for light or dark. My favorite neutrals to work with are terracotta, light copper, all shades of gold, bronze, sometimes beige, sometimes amber, sometimes a cool sand. With colors, I prefer shades of honey, vanilla, warm, muted orange, hyacinth, coral pinks and reds, turquoise, blue greens, light olive, blueish violets, sometimes muted rose tones, sometimes cyan, sometimes flashing yellow. I love working with opaque and metallic finishes, accentuated by matte, aurora borealis, ceylon finishes or big stunning transparent glass beads. I used to throw many colors in one palette, but lately discovered the great effect that many neutrals create when combined with just one or two colors. I always strive for slight contrast on the light-dark dimension, but still watch out for wearability.

Inspirational Beading: Do you have any favorite materials or beads?

Anika: Nearly every type of bead or material can speak to me if it comes in my favorite colors or shapes - I prefer round shapes or rounded edges rather than sharp, geometric elements. As a vegan I try to avoid beads made out of bones, teeth or freshwater pearls, shells and corals. Since last year, I’ve started making my own cabochons and beads out of polymer clay, and am currently improving my skills on caning and appliqué techniques. Self-made cabochons give me the opportunity to work with exactly the shade that I want – with color being so important to me, I consider this a huge advantage. I think not just the expensive materials like crystals, semi-precious stones or Swarovski elements are nice to work with, but also “cheap“ ones like polymers or acrylic if they are well made. Also, I lately stumbled across Greek artist Igor Spirin and his wonderful hand-painted wooden jewelry and boxes. I asked him for cabochons, and the ones he made for me are so beautiful I haven’t used them yet because they make me so humble every time I look at them!


Inspirational Beading: What is the most exciting design in your stash right now? What makes it special?

Anika: My latest design is a bead embroidered butterfly necklace, and it is really special to me. When I started bead embroidery two years ago, I always had a butterfly in mind, but didn’t think I would be able to figure out a pattern with good contrast, movement, focal points and rhythm. When I started this butterfly, I was really scared and had to step far out of my comfort zone. But, just as my other designs, it just evolved under my hands in a way I could have never imagined in my mind before. I was and still am astonished by the result and am already kicking in the start hole for many more of them.


Inspirational Beading: Do you have plans for any new designs in the coming year?

Anika: Definitely! I always have visions about my upcoming work. As I mentioned above, there will be more butterflies and probably flowers, big embroidery necklaces, and – this excites me the most – embroidered purses. I myself can’t sew, but I always wanted to embellish a purse with an embroidered piece. I’ve been looking for a purse forever, but they were either too cheap or too expensive or not vegan. But a friend of mine developed her sewing skills and is in the process of making a clutch for me to work with. I am super excited for that! Thus, I’ll be working on my embroidery skills regarding technique, use of color and pattern. Also, I’ve written my first tutorial some time ago, and I want to focus on that as well. I need to get my hands on a nice software for clear graphics and good layout.

Anika Jaumann Beadwork Earrings

Inspirational Beading: Who do you hope to inspire with your work?

Anika: Basically everyone admiring aesthetic and artful things as much as I do! May it be beginner, advanced or professional beaders, artists of other fields, jewelry lovers – everybody with a sense for the beauty we as humans are able to create is welcome. I’ll give my best to inspire people to get their own projects done, be bold to try something new, discover the endless possibilities of color and design, and not be afraid to make a statement with the jewelry they’re wearing. And, most of all, showing your femininity isn’t a weak thing to do – as femininity is so often the center of optical attention, don’t be afraid to be observed and criticized for being too “girlish“, but rather scream it in the face of your opposite “Yes, I am a woman“ by wearing the most interesting, unique and striking jewelry.

You can see more of Anika’s fabulous beadwork on Instagram and Facebook.

Mortira

Subscribe * Facebook * Google+
Send your beading questions to InspirationalBeading@gmail.com
Support Inspirational Beading for bonus tutorials and more! Powered by Patreon

Copyright 2016 Inspirational Beading


Tuesday, April 12, 2016

Sailing Away Earring Tutorial

Sailing Away Silhoutte Fringe Earring Tutorial

For many beaders, there are few things more fun and satisfying than whipping up a pair of fringed brick stitch earrings. The classic design is easy to make and offers lots of fun possibilities for pattern and color play. You can create all kinds of variation within the fringe by tapering, adding drop beads, or incorporating a pattern. This week I discovered that brick stitch earrings are also a great backdrop for silhouettes.

In the nautical-themed March bead box from Blueberry Cove Beads, subscribers got so many wonderful treasures, including a lovely packet of wooden cut-out charms with a sailboat motif. I was totally taken with these pretties instantly because they would go so well with my favorite tagua-slice-and-St.Petersburg necklace design. Front-drilled charms and pendants are great for layering as a unique focal. However, since the charms came in pairs – two each in white, pale blue, and navy – I decided to experiment with earring designs instead, and the Sailing Away earrings were born.

Lightweight wooden beads and charms are ideal for earrings, and are a great way to add oomph without making earrings too heavy. You could also use tagua nut slices, shell charms, or mini pendants.

To create these earrings you’ll need a few grams of 11/o seed beads in three colors, and one matching 8/o seed bead color. You’ll also need some lightweight front-drilled charms or pendants, like the sailboat cut-outs, jumprings, and earring findings. For the example project I used an ocean sunset palette of orange, purple, and navy blue, but any color trio would look great!


Sailing Away Silhouette Fringe Earrings

1. Attach a stop bead to 2 yards (1.8 m) of beading thread, leaving a 6 inch (15cm) tail. Pick up 6 seed beads and slide them down to the end.


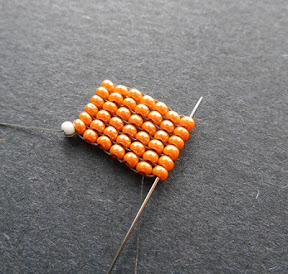
2. Working in square stitch, add 6 rows of beadwork for a total of seven vertical columns of beads.


3. Anchor the thread by stitching down through the 6th column, and back up through the 7th column again.

4. Pick up 2 seed beads. Skipping the nearest bridge of thread between the top beads, needle under the following bridge, moving towards you. Gently pull the thread snug to bring the new beads into place along the top of the beadwork.


5. Stitch up through the 2nd bead just added and pull snug, being careful not to cross or splice the threads.

6. Pick up 1 seed bead. Pass the needle under the next thread bridge at the top of the beadwork and pull snug. Stitch up through the new bead.


7. Repeat step 6 until you reach the end of the beadwork and all of the bridge threads are covered. Stitch up through the last bead added. Flip the beadwork to start the new row.


8. Repeat steps 4-7 until you have a row with just 2 beads. Pick up 1 size 8/o seed bead, and 13 size 11/o seed beads.


9. Stitch back down through the 8/o and into the opposite brick-stitch bead in the final row to secure the loop.

10. Pass down through the beads at the edge of the brick stitch section and all of the beads in the outer square stitch column.


11. Anchor the thread by stitch up through a few beads in the next column, then back down through the same number of beads in the outer column to exit from the bottom. Leave the working thread for now.

12. Remove the stop bead from the tail thread and weave it into the beadwork, passing through the loop section at least once to add strength. Trim.

13. Pick up the working thread again. String about 3cm of size 11/o seed beads, 1 size 8/o seed bead, and a size 11/o.


14. Skipping the last bead picked up, stitch up through the 8/o seed bead and the rest of the strand. Stitch up through a few beads in the square stitch section, then down through the same number of beads in the next column. Check the tension on the fringe.


15. Continue adding strands of fringe, tapering as desired, until you have 7 strands.


16. Weave up into the center of the brick stitch section. Pick up a silhouette charm and 2 size 11/o seed beads. Skipping the 2nd bead added, pass back through the 1st seed bead and the charm, and needle through to the back of the beadwork. Pull snug.


17. Working from the back of the beadwork, stitch through the nearest seed bead. Weave around to retrace the thread path through the charm, then secure any remaining thread and trim.

18. Attach a jump ring and ear wire to the loop. Repeat to make a second matching earring.

Brick Stitch Silhouette Earring Tutorial


Happy beading!

Mortira

I would like to thank Blueberry Cove Beads for giving me the chance to try out the Nautical Bead Box. Inspiration Beading has not received compensation for including products in this post.

Subscribe * Facebook * Google+
Send your beading questions to InspirationalBeading@gmail.com
Support Inspirational Beading for bonus tutorials and more!

Copyright 2016 Inspirational Beading


Saturday, February 13, 2016

Cherry Bomb Fringe Earrings Tutorial

Cherry Bomb Beaded Earring Tutorial

It’s kind of amazing what you can recreate with just a little fringe in the right colors. The idea for this super-easy cherry fringe design popped into my head when I was creating earring projects for Ancient Worlds Modern Beads, and it was just too fun not to make. These cherry bomb earrings look great in opaque or transparent colors, but I do recommend going with a bright green to avoid any resemblance to holly berries. On the other hand, you could modify the design a bit to get a cute holiday earring as well!

You will need:

2 black 8-10mm round beads
2 black 4mm heishi or spacers
4 black 8/o seed beads
4 or more red 6mm rounds
4 or more red 11/o seed beads to match
a few grams each green and black 11/o seed beads
2 jumprings and/or earwires
Size D beading thread such as Nymo

1. Attach a stop bead to 1 yard of stretched and conditioned thread, leaving a 6 inch (15 cm) tail. Pick up 1 8/o seed bead, 1 spacer, 1 8-10mm bead, and 1 8/o bead. Slide them down to the end.


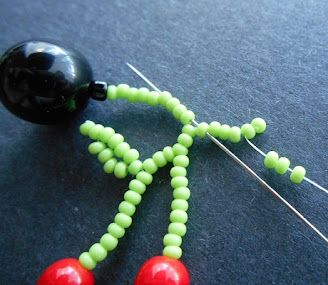
2. Pick up green 11/o seed beads in multiples of three until the strand reaches the desired length for your earring – at least 30 beads are needed for the fringe base, but you can go as long as you like. Add 1 red 6mm round, and 1 red 11/o. Skipping the red 11/o, stitch back up through the round bead and the following 9 green seed beads. Pull snug, making sure there is no slack in the strand.

3. Pick up 7 green seed beads. Skipping the last bead added, stitch back through the 6th bead and pull snug.


4. Pick up 4 green seed beads, and stitch back through the first bead added in the previous step, plus the following three beads in the main strand, moving towards the black round. Pull snug to form a leaf stitch.

5. Pick up green seed beads in multiples of three until you have a second ‘stem’ of the desired length. You can make it longer or shorter than the first cherry stem – whatever looks good to you. Add a red round and seed bead. Skipping the red seed bead, stitch back through all of the beads just added, and the following 3 beads in the main strand. Pull snug.


6. Pick up 7 green seed beads and add a second leaf stitch (steps 3 and 4). Stitch back up through the remaining beads in the main strand, and all of the black beads. Pull snug.


7. Pick up 9 black seed beads. Stitch back down through all of the black beads in the base to form a loop at the top of the beadwork. If desired, string on an ear wire or soldered jump ring before securing the loop.


8. Pick up green seed beads in multiples of three to begin a second cherry fringe. Repeat steps 2-6, making your fringes as long or as short as you like. Weave through the black seed bead loop at least once more to add strength, then secure any remaining thread in the fringe and trim.

9. Add jump rings and ear wires as desired, then repeat all of the steps to make a second earring.

Happy beading!

Mortira

Subscribe * Facebook * Google+
Send your beading questions to InspirationalBeading@gmail.com
Support Inspirational Beading for bonus tutorials and more!

Copyright 2016 Inspirational Beading


Sunday, December 6, 2015

Work in Progress: Earring Experiment

My bead tray is a bit of a mess right now as I jump from one project to the next. I disassembled the components from the diagonal SuperDuo tutorial, but I haven’t yet sorted or put them away. This week I’m working on a few new tutorial prototypes, including a fringed earring design with a little herringbone twist. I’m far too excited about this project to stop and clean up! So far the design is going exactly as planned, so I should be able to get the step by steps soon.

Earring Experiment in Progress


Meanwhile, I’m cooking up some ideas for a new necklace line that I think is going to be really great. It’s been awhile since I’ve added a totally new design to my shop, so I’m looking forward to testing out my idea. I saw a very interesting charm necklace on a fellow shopper the other day, and I think that it can be greatly improved with the right combination of beads. The best part is that if it works, I’ll be able to combine lots of my favorite accents with ease. Can’t wait to try it out!

What are you working on this week?

Mortira

Subscribe * Facebook * Google+
Send your beading questions to InspirationalBeading@gmail.com
Support Inspirational Beading for bonus tutorials and more!

Copyright 2015 Inspirational Beading


Tuesday, November 24, 2015

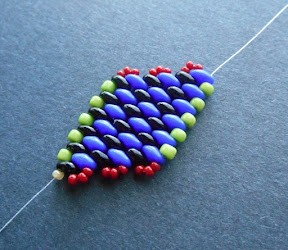
Tutorial: Diagonal SuperDuo Peyote

Diagonal SuperDuo Peyote Earrings

One of the best things about most flat beadwork stitches is their ability to transform with just a few simple tweaks. Start with a ring, and you get a gorgeous rope. Drop or add a bead in the right place, and you’ve got some intriguing shapes and structures crafted with beads.

This variation on diagonal peyote stitch uses two-hole SuperDuo beads for a honey-comb like pattern that is perfect for earrings and pendants. The technique is pretty simple, and the large bead sizes make it easy to stitch. Even if you’re not quite comfortable with ordinary flat peyote stitch, this technique is very easy to start thanks to the SuperDuos.

To make a swatch of diagonal two-hole peyote, you’ll need a few grams of 11/o and 8/o seed beads, and some two-hole beads that are a good match for 8/o’s. SuperDuos are ideal, but you could also try this with Rullas, half-Tilas, Twins, Bi-Bos, or smaller CzechMates. In this tutorial, we’ll be using two colors of SuperDuos for clarity, but you can certainly create any pattern or palette that you like.

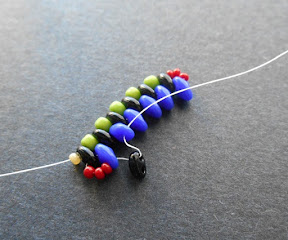
1. Attach a stop bead to a comfortable length of beading thread, leaving a 6 inch tail. Pick up 1 color A SuperDuo and one 8/o seed bead. Repeat 5 times, then add a 6th SuperDuo.


2. Flip the beadwork so the stop bead is facing away from you. Pick up three 11/o seed beads and a Color B SuperDuo. Stitch up through the 2nd hole of the last Color A SuperDuo added in step 1. Pull snug.


3. Pick up 1 Color B SuperDuo, and stitch through the 2nd hole of the next Color A in the strand. Pull snug and repeat along the row to add a total of 6 Color B.


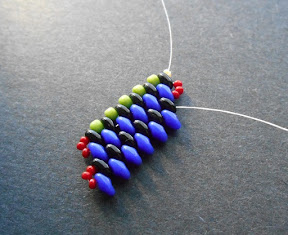
4. Flip the beadwork. Pick up three 11/o seed beads, and stitch up through the 2nd hole of the last Color B added.


5. Pick up 1 Color A SuperDuo, and stitch through the 2nd hole of the next Color B in the previous row. Repeat to add a total of 5 Color A.


6. Flip the beadwork. Pick up 1 Color A SuperDuo, three 11/o, and 1 Color B. Push the Color A SuperDuo up to the work, then stitch up through the 2nd hole of the same Color A. Carefully pull snug.


7. Pick up 1 Color B, and stitch up through the 2nd hole of the next Color A in the previous row. Repeat to add 4 more Color B, for a total of 6 in this row.


8. Repeat steps 4-7 until your swatch has reached the desired length. Finish with a Color B row, and turn to add three 11/o seed beads as usual. Fill in the final row with five 8/o seed beads. Add a loop or finish as desired, then weave in your thread and trim.


Are you a fan of SuperDuos? What’s your favorite stitch to use them with?

Mortira

Subscribe * Facebook * Google+
Send your beading questions to InspirationalBeading@gmail.com
Support Inspirational Beading for bonus tutorials and more!

Copyright 2015 Inspirational Beading


Blog Widget by LinkWithin
Fire Mountain Gems and Beads

Inspiration Topics

accessories amulet Ancient Worlds Modern Beads animals April's Army art ArtFire astrology astronomy autumn awards awareness bangle beach Bead Inspired Bead Shops bead soup bead spotlight bead stash Bead Trays beaded beads beading theory beads belt bezel birthstones black blog spotlight blue boho bone book spotlight bracelet Bracelet A Week branch fringe brick stitch brown bugles buttons cabochon ceramic chain maille challenge charity chevron chain christmas collar Collections color Color Ideas color triads conservation craft shows crafts crochet crystals cuff Culled Beads current events Current Faves daggers Daily Sets daisy chain Delicas Destash drops Dutch spiral earrings Egypt Egyptian Gods embellishing embroidery environment etsy exotic fair trade fantasy fashion Favorite Beads Favorite Techniques feminine fibers film findings fire polish fixtures Flashback Test flickr inspiration flowers food found object free form fringe Geek Jewels geekery gemstones geography giveaway glass gold gray Greece green herringbone hex cuts history holiday home decor insects inspiration tip inspired beader Inspired by... Inspiring Links ivory Jewelry Stash knitting ladder stitch lampwork lariat leaf fringe leather lights literature loomwork macrame magatamas Master Class Medallions metal free metalwork Mini Collar a Week mixed media mixture Mood Board MOP multi-color multi-strand music natural beads nature necklace Necklace a Day Nepal chain netting New Beads ocean ombre orange paint paper patterns pearls pendant peyote photography Picasso finish pink Pinspiration PMC polymer clay poster sketch purple quick inspiration rainbow RAW red resin ring Ring a Day rivoli Rome Russian spiral scarf science seed beads shell silver soutache spiral rope spring square stitch St. Petersburg steampunk stringing stripes summer tagua TBT The Elements thread Tilas Time Capsule tools trade beads triangle weave tribal tropical turquoise tutorial two-hole beads Ugly vintage Wear it Twice weather white winter WIP wire wishlist wood World Beaders yellow
Blog Home * About * Beading Tutorials * Advertise

Learn About Sponsoring Inspirational Beading with Project Wonderful
Affiliated With ShareASale.com and Amazon.com