Monday, May 30, 2011

Bead Wish List: Flowers

Both Canada and the US have had their May long weekend, and that means that we’re both ready for summer. Bring on the ice cream trucks, family barbeques, and flip flops! It’s also the perfect time to wear flowers and floral prints, so today’s list of must-have beads is all about blooms. Enjoy!

Stoneware Green with White Flowers Heart Pendant

Stoneware Daisy Heart Pendant
From Artbeads.com

Capiz Shell Pendant with Purple and Pink Flowers

Capiz Shell Pendant with Flowers
From Auntie's Beads

Clear Glass Fan Pendant with Green Flower

Glass Fan Pendant with Green Flower
From Beads Direct

Jangles Ceramic Turquoise Flower Pendant

Jangles Ceramic Flower Pendant

from Lima Beads

10mm Round Flower Lampwork Beads

Chinese Round Flower Lampwork Beads
From Rings & Things

Long Red Striped Lucite Trumpet Flower Bead

Lucite Long Trumpet Flower
From Beadaholique

May Flowers Beads

Blue Daisy Lampwork Flower Set by Gaye Doser,
Orange Flower Carved Bone Beads from Happy Mango Beads,
Vintage Majolica Green Button Flower Beads from Pickle Valentine

Are you taking your beads on vacation this year?

Copyright 2011 Inspirational Beading
Subscribe to Inspirational Beading


Saturday, May 28, 2011

A Bracelet a Week: Alabaster

Alabaster Vessel from Tutankhamun's Tomb

Earlier this week, I announced on my studio blog that I am taking on a new beading challenge - as many Egyptian themed jewelry designs as I can make. This week’s bracelet is the first piece in what could be a very large collection, and I’m very excited to unveil it!

When I decided to start a new line of Egyptian style beadwork, it was both a light bulb and face-palm kind of moment. I have always loved the Ancient Egyptian look, and with my new found love of tribal beads and designs, it seemed only natural that I should combine the two and see what happened. I think that after all these years of experimenting with beads and techniques, I may have finally found my own little niche. I only wish I had thought of it sooner.

Egyptian Alabaster Bead Palette

Hopefully I can keep things interesting so that my Bracelet a Week pieces don’t get too boring. I may have to make the occasional non-Egyptian bracelet here and there before I run out of ideas!

The first place I looked for inspiration was my collection of books on Ancient Egypt, and I spent some time making sketches based on some of the patterns and motifs on artifacts found in the tomb of Tutankhamun. One of my favorites is a beautiful alabaster receptacle, which features a gorgeous carved boat, decorated with patterns in black and red.

Egyptian Alabaster Cuff

For my design, I wanted to keep the palette neutral, so I replaced the red with red-brown. Ceylon cream makes a perfect stand-in for the calcite, and shiny jet black does the rest.

For two of the plain rows of black in the pattern, I turned the beads on their sides using a herringbone increase, just to keep it interesting. I like the little bit of space it creates between the beads, and it gives the cuff a little personality.

The pattern I used is only one of many on the artifact, so I may have to revisit this piece again, and try out another pattern, perhaps in a new palette.

Copyright 2011 Inspirational Beading
Subscribe to Inspirational Beading


Friday, May 27, 2011

Wear It Twice: Wood Beads

I love the look and texture of natural beads, especially those that come from above ground, like wood, coconut and tagua. One of the best things about vegetable beads is that they are so lightweight; you can really pile them on without creating a piece that is too heavy to wear. Beads made from wood and seeds are excellent for spring and summer jewelry.

Today I thought it would be fun to create some outfits entirely around wooden accessories. Even when paired up with bright colors, the natural qualities of the wooden components allow them to blend well with so many different styles, so you can do a lot more with them.

I started with a beautiful multi-strand necklace with hints of turquoise and yellow. This piece has lots of big, bold, round wooden beads, and looks incredibly versatile. It’s a necklace you could wear to the market, or out for drinks.


First I paired this necklace with a cute and simple sundress with a cinched waist and pretty leaf pattern. The neutral palette makes it almost plain, but it’s a perfect backdrop for the necklace, and whatever accessories one can layer on. I added a pale blue scarf that could be worn a million ways to add a dash of color to the top half of the outfit.

For the bottom, dark yellow platforms by Michael Kors inject a little more personality. When it comes to color, shoes have no boundaries - they can always make a palette come together. I topped everything off with a wood and leather Midori handbag, and simple wooden disc earrings to match the dress.

I couldn’t resist the Catherine Malandrino patterned tunic for a casual outfit. I love the saturated colors, and since they move away from the low-cut neckline, this top is perfect for a statement necklace. I paired it with some everyday denim capris and adorable toe-ring sandals with turquoise accents. A leather duffle bag adds an extra layer to the neutral side of the palette, and has just enough room for a little picnic lunch in the park. For earrings, I chose plain wood discs with tiny filigree accents that won’t compete with the other, bolder pieces.

For both outfits, I selected a fun memory bracelet that almost matches our wood necklace. It’s a little heavier on the turquoise, and makes a great complement for each style.

The handmade and vintage alternatives for this collage are some of my favorites so far. This collection of woodsy spring pieces turned out fabulous.

Wooden Jewelry and Earthy Spring Fashions

And here are a few of my favorite Polyvore collections, featuring picks from today’s collage:


Do you like to use wood or vegetable beads in your designs? What materials do you like to pair them with?

Copyright 2011 Inspirational Beading and Polyvore.com
Subscribe to Inspirational Beading


Wednesday, May 25, 2011

Favorite Beads: Jasper

"Untold Treasures"

Today I want to introduce you to one of my favorite ArtFire artisans, Catherine of Shadow Dog Designs. Her jewelry studio is always filled with beautiful, fun designs that feature a variety of materials, including natural stones in gorgeous colors.

Inspirational Beading: What is your all-time favorite bead?

Catherine: My all-time favorite beads? Boy, is that ever a hard question! Stones are my first love, so I think that working with the fascinating jaspers is my favorite.

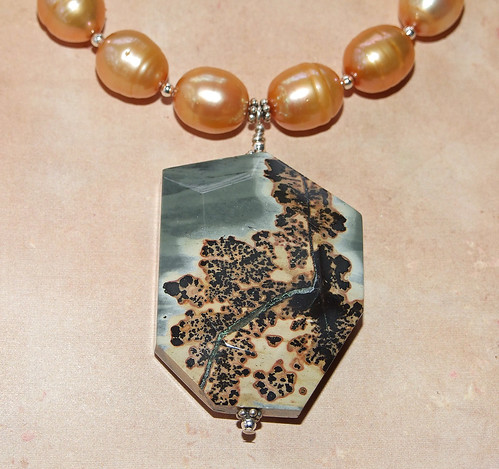
Jaspers are magnificent stones; they come in so many colors, pure white all the way to black and all the colors in-between. Their patterns can be so beautiful and sublime, from the flame designs in the Australian Noreena jasper, to swirls and circles in ocean jasper. But my all time favorite jaspers are the landscape jaspers. When looking at landscape jaspers, I've seen mountain landscapes, ocean scenes (even a surfing frog once!), a volcano erupting and meadows of flowers. It's amazing when you think of the millennia of geological time it takes to create these beauties!

Inspirational Beading: What is your favorite technique or method to use them?

Catherine: It all depends on the stones and how the Muses are feeling that day! The jaspers are so beautiful on their own that I often create a simple necklace design, highlighting the jasper with other complementing stones and/or Swarovski crystals. I also like to wire-wrap the stones to create necklaces, using sterling silver or copper wire. Have been also been working on wire-wrapping jasper cabochons. So far I'm still in the learning phase but hope to offer some pendants in my ArtFire studio this summer.

Inspirational Beading: Of all the creations you’ve made with these beads, which one is your favorite?

"On the Road to Ensenada"

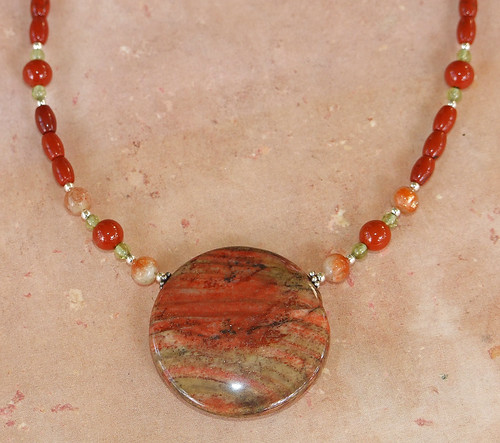
Catherine: A necklace I often wished I would have kept for myself is one named "The Road to Ensenada". It was hand-knotted with glorious red creek jasper rounds on yellow silk. Just look at the beauty of those stones! A simple, classic beauty that can be worn with so many different outfits. It sold almost immediately at a show last year. You could tell the lady who bought it absolutely loved it!

Inspirational Beading: Do you have any tips for making the most of these beads?

Catherine: Let the stones talk to you. Keep the design simple because these stones can definitely stand on their own!

Inspirational Beading: What is your favorite bead or material to pair these with?

Catherine: I definitely like to pair jaspers with complementing stones, oftentimes with other jaspers. Swarovski crystals are sometimes added for a bit of flash. Also, Karen Hill Tribe fine silver pendants and beads look particularly wonderful with jaspers.

Blue Kiwi Jasper Necklace by Shadow Dog Designs


Inspirational Beading: If you were stranded on the moon, and you could have only one kind of bead with you, would you choose these?

Catherine: I would definitely want a large supply of jaspers with greens or blues, like rainforest jaspers or blue kiwi jasper. Rainforest jaspers have wonderful swirls of various greens running through the stones. And even though blue kiwi jasper is dyed, it has a remarkable deep ocean blue about it. I think green and blue are colors that would be sorely missed on the moon! Bet some of the "landscapes" in the various jaspers would look just like moon formations.

Inspirational Beading: In your opinion, what is the best source for these beads?

"Song for Ewaninga"

Catherine: Personally, I think the best sources for different jaspers are at gem and mineral shows. Have found that vendors at gem and mineral shows often offer new jaspers that cannot yet be found in bead stores. I once found some peaceful looking lotus jasper at a gem and mineral show. I bought only one strand. Stupid of me, I know, because it took two years before I finally saw it being offered at bead stores! Plus, I love talking to the vendors at gem and mineral shows who actually cut their own stones. Such fascinating people that are always eager to share their knowledge. One of these days, I'm going to make it out to the Tucson show!

A bead store that specializes in stones can be another good source. I do not like to buy off the internet because I like to pick out that perfect strand, the one that calls to me from all the other strands of the same stone.

You can learn more about Catherine’s work and favorite designs on her ArtFire blog, Shadow Dog Designs, or follow along with her on Twitter for the latest news.

Copyright 2011 Inspirational Beading and Shadow Dog Designs
Subscribe to Inspirational Beading


Monday, May 23, 2011

Collections: Summer Pink and Blue

My favorite thing about giveaway polls is reading all of the different ideas and opinions about beads and jewelry. This month, I asked readers to come up with some fun color combinations for an assortment of soft pink beads. There were so many beautiful ideas, and a lot of fantastic color palettes. Thank you so much to everyone who entered and shared their ideas!

The winner of the Pretty Pinks giveaway is Shannon, of For My Sweet Daughter Jewelry, who chose aquamarine and turquoise. I think these pale, natural blues would look fantastic with pastel pink! To try it out, I found these beautiful supplies and handmade creations in soft blues and pinks.

Bubblegum Ice Cream Collection


Happy beading!

Copyright 2011 Inspirational Beading and ArtFire.com
Subscribe to Inspirational Beading


Saturday, May 21, 2011

A Bracelet a Week: Picket Fence

Picket Fence Cuff

I wish I could tell you where the idea for this week’s bracelet came from, but I can’t remember exactly how it gelled. I was thinking of designs for an upcoming theme, and somewhere along the way I decided it would be really fun to sew a whole bunch of small peyote tubes together.

I wanted an organic look for this piece, so I started with some amber colored seed beads. For a subtle dash of color, I paired them with smoky amethyst, which goes really nicely with the brown and doesn’t overpower the design.

The bracelet I saw in my mind’s eye had jagged, zig-zagging edges, so I made tubes in three different lengths. To save time on what would already be a lengthy creation, I capped the tubes with a 6/o bead, instead of my usual picot clusters. Once I had enough tubes, I stitched them altogether with two rows of 6/0 bead spacers.

Purple Picket Bracelet

The feel of this bracelet is so neat. It’s sort of skeletal, but soft and flexible. It’s lightweight and lightly colored, but has this dominance to it that defies explanation. Even though the process is sort of tedious, I think I could make another without complaint. Perhaps the design will make one more appearance in this challenge.

Copyright 2011 Inspirational Beading
Subscribe to Inspirational Beading


Friday, May 20, 2011

Bead Spotlight: Faux Pearls

Imitation or faux pearls have been around for ages, and are so wonderful that they often outweigh their natural counterparts in value and allure. Offer a beader a choice between a strand of new, natural saltwater pearls, or some vintage plastic baroque pearls worn by Lucille Ball, and chances are the imitations would win.

Assorted Imitation Pearl Beads

Peridot Glass Pearls, Vintage Acrylic Pearls, Night Blue Glass Pearls

6mm Glass Pearl Strands, Red Glass Pearls, Purple Glass Pearls


There are many different types of faux pearls, each with their own pros and cons when compared with the real thing. Even genuine pearls have different degrees of help from humans, and cultured freshwater pearls are among some of the most sustainable beads out there. Faux pearls give a lot of beaders access to beautiful design possibilities, because they are often inexpensive and of course, vegan-friendly.

There are plastic pearls of various make and quality. The old fashioned costume jewelry styles are still sought after by even the most sophisticated designers. Like Coco Chanel did with crystals and gemstones, it is possible to pair up these fake pearls with more luxury materials and make stunning jewelry.

Faux Pearl Jewelry Designs

Pink and Crystal Pearl Earrings, Black Pearl Bracelet, Double Strand Spring Bracelet

Ladybug Necklace, Majorica Pearls Necklace, Gray Swirl Bracelet Set


CRYSTALLIZED™ - Swarovski Elements also has it’s own line of imitation crystal pearls, and they are arguably some of the best quality available to beaders today. They come in a wide variety of colors, have perfectly uniform shapes and finishes, and have larger bead holes than the average drilled pearl. Because they are not as expensive as the real thing, they are perfect for elaborate designs, including bead weaving. However, like many crystal beads, the opening can be sharp, so they aren’t quite as versatile as other types of glass beads, or even authentic pearls.

When your designs call for pearls, what do you reach for?


Copyright 2011 Inspirational Beading and Friends
Collages by BigHugeLabs.com
Subscribe to Inspirational Beading


Wednesday, May 18, 2011

Book Review: How to Use Color

Beading Inspiration: How to Use Color in Jewelry Design

Although color is one of the most important aspects of jewelry design, it is often one of the areas that beaders struggle with most. Which colors look best together? How do different finishes change the look of a palette?

Luckily, we can turn to the expert advice of fellow beaders for some tips and know-how on mixing and matching bead colors. One really great guide that provides plenty of inspiration comes to us from the pages of Bead Style and Bead & Button.

Beading Inspiration: How to Use Color in Jewelry Design features projects from top beading magazines, plus six never before published designs that use bold color combinations and easy to learn techniques. Every color in the rainbow is represented, plus other favorites like metallics, and black and white.

Beading Inspiration: ColorBeading Inspiration: Color - How to Use Color in Jewelry Designbegins with a few helpful guides to recognizing and using color palettes that we see every day - from nature to designer fabrics - and how to mix and match hues from the color wheel. There are also step-by-step photographs for some essential basic beading techniques, like wrapped loops and knots.

Then it’s on to the projects. There are 33 jewelry designs to try, from earrings to bracelets, to necklaces. Each color is featured at least once, with some transition projects featuring pairs of color (like orange/yellow) or variations (like indigo). For every project, there is an inspirational image, and a color wheel to show you the selected hues and their positions, so you can make similar choices in your own designs.

The projects in Beading Inspiration: Color use a wide variety of simple beading techniques, and a range of materials, from seed beads, crystals, and gemstones, to feathers, yarn and chain. Combined with the tips on using color, this book is an excellent guide for the new beader.

Copyright 2011 Inspirational Beading and Kalmbach Books
Subscribe to Inspirational Beading


Tuesday, May 17, 2011

The Ultimate Beading Tray

Serving Tray Beading Workspace

The accessories that we use for beading are often the last thing you’d expect to find in a craft room or workspace. Sometimes, the right tool for the job was intended for something completely different. Fishing tackle boxes of all shapes and sizes are perfect for storage and beading on the go. Serving trays lined with fabric make great bead boards. Nail files are just the right size for buffing the burrs off beads.

Last month, I shared a little glimpse of some Bracelet a Week beads on my absolute favorite beading accessory - a plastic veggies and dip server. One of my wonderful readers requested a closer look, so I thought I’d show you exactly how awesome this unusual beading helper is.

The tray is a durable and portable version of serving trays that have been around forever. Visit any thrift store or garage sale, and you’re likely to find at least one vintage serving tray with cute little compartments for separating hors d’oeuvres and treats. The open style trays are awesome for sorting big lots of mixed beads, or separating different components for a complex project.

Inside my container is a small central compartment. It’s meant for dip, and has it’s own lid to keep condiments fresh and free of debris during transport. This is another one of my favorite features. Over the years, this middle compartment has seen a steady rotation of different supplies.

The outer ring is big enough for almost everything I need for beading. The only thing it doesn’t hold is large spools of Fireline, but I like to keep those within arms reach at all times.
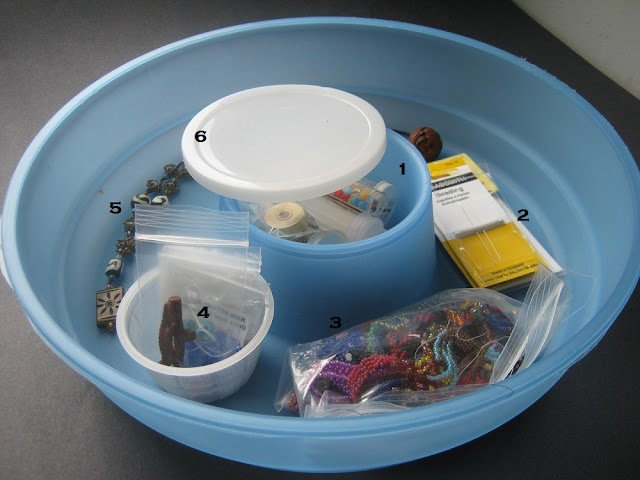
Inside the Ultimate Beading Tray

1. Right now I use the ‘secret’ compartment to hold tubes of stick pins, sewing needles, and bobbins of Nymo. There’s also a little vial of clasps that I saved back when I used to take apart costume jewelry for the unique beads. Since I don’t use these things often, but I don’t want them stuffed into the back of my beading cupboard, I store them in this little cubby for somewhat easy access.

2. Blister packs of English beading needles fit perfectly in the outer ring. If there are a lot of works in progress taking up room, they can even be stacked on their sides to save space.

3. This baggie that I saved from a bead order is always stuffed full of UFOs and miscellaneous beading scraps. I never feel like taking apart unsuccessful projects.

4. There’s usually a cup of floater beads - pieces I want to keep handy for future use. Sometimes I’ll put new finds in here to remind myself that I want to use them sooner rather than later. It also helps me not to forget what I originally intended and use them for something else.

5. Most of the time, there’s space in the tray left over to store finished pieces before photographing them. It’s a safe and convenient place to put designs out of the way until I can get them in front of the camera.

6. This mini lid is almost always on, but once in awhile it actually helps with a project or sorting job.

Atop the Ultimate Beading Tray

What I love most about this portable tray is the enormous, round lid. Turned upside down, it makes an excellent beading board, with room enough for all of my supplies and beads. When I need to put a project away fast, all I have to do is lay the beadwork on the tray and put it up on the top of my roll top desk, so it’s out of reach and unlikely to spill.

The rim on the underside is just the right size for holding 6mm beads, and has been helpful many times for planning projects with accent beads in a specific pattern.

The circular shape comes in really handy when I’m working with a lot of different beads in a sequence. I can place cups of beads around the outer edge, and rotate the tray like a lazy susan to move on to the next color or shape. This is exactly what I did for my Easter Egg bracelet, which used 11 different beads - one style at a time.

1. Another ‘found object’ beading tool I love is the plastic cups from single serving apple sauce. I saved and washed so many of them from kids lunches that they take up a huge space in my cupboard. They’re great for mixing paints, sorting beads, and all kinds of little storage jobs. This particular cup is where I toss all of my culled beads.

2. I usually have a few different cups on my tray filled with empty bead baggies, reserve quantities of the beads I’m working with, and sometimes beads from previous projects that I haven’t put away yet. I also keep a few empty cups around for mixing and sorting, or to funnel beads from coasters, back into their baggies and tubes.

3. This stack of coffee coasters never leaves the tray. They are wonderful for bead weaving, because I can pick up beads one-handed. They’re so shallow that they’re practically flat. If I’m working on a project that switches frequently between bead sizes or colors, I will usually spill a small amount of each onto one or two of these mini trays.

4. The lid from the inner compartment also doubles as an extra large shallow bead cup, which is great for sorting beads or working with mixes.

5. My trusty pin cushion has seen a lot of beading. It always holds two size 10 needles, one size 13 needle, and an assortment of stick pins and small sewing needles that come in handy now and then. There is also one black and one white seed bead pinned to it. These used to be go-anywhere stop beads, but when I started selling my creations, I switched to using a new stop bead - from the culled bead cup - for each length of thread. This makes it easy to count threads used at the end of a project.

6. I find my cups and coasters work really well for setting out beads, but it would be easy enough to glue a piece of fabric to the tray for a handy bead mat. Atop this swatch is a pair of my favorite bead cups - old tealight holders - and my trusty scissors. I grabbed them out of a miniature sewing kit and they are sharp as razors.

7. I have a paper ruler taped to my work surface for easy measuring, but sometimes a flexible ruler is needed. I don’t always have space for my tape measure on the tray, but it often rests here between projects.

So there you have it. The most awesome all in one beading accessory - for me.

What’s your favorite tool or storage accessory?

Copyright 2011 Inspirational Beading
Subscribe to Inspirational Beading


Monday, May 16, 2011

Bead Color Triads: Summer Salads

Summer Salad

Every beader knows that the best colors come from nature, and some of the most inspiring hues can be found in the garden. Fruits and vegetables advertise their healthy benefits through color, and are often as delicious for the eyes as they are to eat.

When I was working with reds and greens for my Colors of Kenya jewelry set, I found myself craving fresh veggies. Although the beads I was using were called pepper, cherry and avocado, they reminded me so much of tomatoes and cucumbers. So I decided to take a look at some tasty color combinations inspired by our favorite salads.

For the best effect, these palettes are made entirely with seed beads. They really are like the paints of beading - you can use a little or a lot, and they blend together so well in all kinds of designs. Instead of three variations of the same palette, I made up three different combinations based on classic summer dishes.

Fresh Veggies Color Palette


Although Gazpacho is technically a soup, it is made from fresh, juicy veggies, and was the first thing that came to mind when I placed avocado and cherry seed beads together. I added some sour apple to eliminate any Christmas effect, and create a feeling of crispness. These colors could easily represent tomato, jalapeno and cucumber.

Gazpacho Bead Palette


Coleslaw is another great summer treat, and a staple for picnics and barbeques. I started with transparent orange for carrots and purple lined rosaline for red cabbage. If I’d had some pale green Ceylon seed beads, I would have used those for green cabbage, and had a perfect palette. Unfortunately, I didn’t have anything quite as light, so I went with white pearl instead. This coleslaw has extra mayo.

Coleslaw Bead Palette


There was one important vegetable color missing, so for the final palette I used Corn Salad for inspiration, with lustered dandelion yellow for the corn niblets. There are a lot of different variations for this dish, and most have at least four colors to them, so I stuck with the basic and most familiar ingredients. Pepper red stands in for tomatoes, and red-brown is perfect for black beans. Add a dash of dark green and it almost looks good enough to eat!

Corn Salad Bead Palette


Have you ever been inspired by the colors on your dinner plate? Which garden hue is your favorite?


Copyright 2011 Inspirational Beading and COLOURlovers.com
Subscribe to Inspirational Beading


Saturday, May 14, 2011

A Bracelet a Week: Tribal Mosaic

Tribal Mosaic Cuff

When you find a material that you really love, it’s hard to give it up. This is true for many types of art and crafts, and is especially true for beaders. It probably explains why you can’t go far without finding some amazing beadwork done with rivolis, and why Delicas are the number one choice for peyote cuffs. When you’ve found the best, why use anything else?

This is sort of how I’ve come to feel about trade beads, especially Christmas beads. Although they are technically just Czech seed beads, a strand of "love beads" is so much more than that. Even though they are often rough and irregular, I’ve fallen for them even harder than I did when I discovered how superior Japanese seed beads were to what I had been using.

This week I wanted to work with them a little more, and perhaps use up what’s left of the large strands of Christmas beads I purchased earlier this year. They aren’t quite as versatile for me as the smaller versions, so I thought it would be best - and fun - to get them all together in one piece.

Freeform Trade Bead Cuff

Since the beads are so colorful and busy all by themselves, I chose a single bead color to work with - one of the last remnants of Czech seed beads in my stash. Copper-lined gray has been one of my favorite go-to shades when earth tones are called for. Even though they have a little metal in the finish, I kept them in my stash during last year’s inventory clean up because they’re good quality, and I had so many. It’s so much easier to design when you know for sure that you’ll have beads left over.

I am so happy with the way this cuff turned out. It was a little scary towards the end, as I worried that I wouldn’t have enough nicely shaped trade beads to finish. I also had to double up on beads in a few places to get the right sizes.

Even though this is the tamest possible kind of freeform peyote I could try, it has me wondering what other possibilities there are. Perhaps it’s not as scary as it looks? I am very tempted to have another go at a cuff like this, with a wider mixture of beads styles. Starting with cubes, I think.

Copyright 2011 Inspirational Beading
Subscribe to Inspirational Beading


Friday, May 13, 2011

Enchanted Charm Bracelet Tutorial

Fairy Charm Pearl Bracelets

Charm bracelets have been around for ages, and never go out of style. They’re a great way to showcase a unique collection, and it’s fun to wear a piece of jewelry that is full of movement, and memories. If you’re not into collecting charms, but you still like the look of ornate dangles, this bracelet project is a great way to show off one special piece that‘s totally you.

The Enchanted Charm Bracelet from Beads Direct pairs easy and versatile stretch cord with pearls for a delicate and intricate looking bracelet that you can make in minutes. The simple design makes it easy to wear and even stack up with other favorite pieces.

To make one fairy charm bracelet you will need:

1 Pandora style metal oval rondelle charm carrier
1 fairy charm
1 jump ring
8 10mm Swarovski pearls
63 Side drilled 5-6mm rice pearls
90 cm (36 inches) stretchy Beadalon stringing cord
Pliers, snips and glue

These materials will make a standard sized stretch bracelet, but the pattern makes it easy to add or remove a sequence of beads to adjust the size to your liking.

Pink Royal Crown Charm Bracelet
This rhinestone crown charm is perfect for making
personalized memorabilia for this year's Royal Wedding.

1. Cut three equal lengths of elastic about 30 cm (12 inches) long, and pass all three strands through a 10mm pearl. Center the pearl on the strands.

2. Separate the strands, and string 3 freshwater pearls on each. Pass all three strands through one 10mm pearl.

3. Repeat the sequence to each side, creating little clusters of smaller rice pearls between each Swarovski pearl. Finish each side with a 10mm bead.

4. Thread the charm carrier onto one end, then tie the elastic cords together with a square knot. Push the knot down as close to the bracelet as possible.

5. Secure the knot with a dab of glue, epoxy or nylon lacquer for extra strength. Trim the excess cords, and pull the rondelle over the knot to hide it.

6. Open the jump ring, and attach the charm to the rondelle. Close the jump ring, and you’re done!

There are lots of different color and pattern possibilities for this project. You can change up the pearl colors, use different hues for each strand, and showcase any charm or dangle that suits your taste. You could even make your own special charm using a headpin and wrapped loop. By attaching your dangle to the charm carrier with a lobster clasp, you can easily switch it out to suit your mood or match your outfit.

Copyright 2011 Inspirational Beading and BeadsDirectUK
Subscribe to Inspirational Beading


Wednesday, May 11, 2011

Combination Collar and Pendant

Island in the Sun Lampwork Pendant by Firedance Beads

Have you ever created something that you absolutely loved, but got plenty of strange looks, weird comments or terrible critiques? It happens to the best artists and crafters from time to time. The real test is whether or not we take the advice, learn from the experience, get discouraged or just keep doing what we like anyway.

When it came time to decide what to make with April’s unique bead find, I found myself leaning towards a design style that got many mixed reviews the first time I tried it. It was a piece that I really liked, and despite lots of unimpressed comments, it sold almost right away, so I took that as a good sign. I wasn’t discouraged, so I didn’t hesitate to do it again this time around.

The bead in question is an absolutely gorgeous off-mandrel lampwork pendant from Firedance Beads. The studio is very close to my home, so it was a real treat to order the piece that I wanted, and then find it in my mailbox just 2 days later. I had lots of time to think about what I was going to make with it.

Giant Astro Pop!

The Inspiration:

I really like to do simple projects with art glass, because it allows them to stand out, and it keeps the price low. But since I’m buying new beads every month as a topic for this blog, I want to avoid doing the same thing over and over. This pendant needed something besides the same old caged bead chain.

I love the combination of transparent yellow, red and green, and the way they light up. It reminds me of one of my favorite childhood treats - the Astro Pop. It seems that the giant conical lollipops are no longer being made, and I thought for a moment that it would be fun to pay a little tribute with a color-blocked spiral rope in matching colors.

The Beads:

Luckily, before I could convince myself that an Astro Pop spiral rope would look great, I realized that I didn’t have enough transparent yellow seed beads. I had to come up with something else.

Then I remembered the bib necklace that I made awhile back, with a huge Cubic Zirconia pendant, and a new idea started to form. Instead of highlighting all three colors from the pendant, I chose one - dark green. Some earthy dark topaz drops were all I needed to finish the palette and get to work.

The Beadwork:

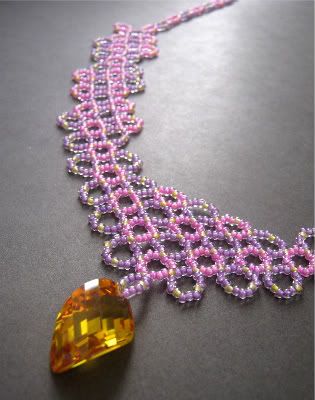
I used the transparent emerald seed beads to make a plain netted collar. The drops along the outer edge are like tiny mimics of the pendant, which I suspended from the center of the collar in the same fashion.

Summer Green Collar

Maybe adding a large lampwork pendant to a netted necklace seems strange, but I love the way it turned out. With the single color netting, the pendant doesn’t look out of place or overdone. Likewise, the netting makes a nice background for the pendant - wide and strong but not too complicated.

I’d love to hear your thoughts on this design, good or bad! What’s your weirdest and most wonderful creation?

Copyright 2011 Inspirational Beading
Subscribe to Inspirational Beading


Monday, May 9, 2011

Beading Tutorial: Nepal Chain Stitch

Nepal Chain Beadwork

Nepal chain is an incredibly easy beading technique, perfect for bracelets and delicate necklace straps. It’s also an excellent bead weaving technique for beginners, providing a beautiful but simple piece of beadwork that works up quickly. A basic understanding of tension and working with beading thread is all you need to master this stitch.

The technique itself isn’t very versatile - there isn’t much room to change up the beads or add embellishments. But you can create a lot of different looks by changing the bead colors and patterns. You can start with a simple flower palette, or experiment with unique looks by using different colors for the vines or petals.

To weave a Nepal chain strap:

Attach a stop bead to a comfortable length of beading thread, and pick up 3 vine beads and 5 petal beads. Slide them down to the stop bead.

Pass back through the 3 vine beads, and pull the thread snug. The petal beads should form a round cluster at the top of the stack.

To step up, pass back up through the top 2 vine beads and pull snug.

Nepal Chain Tutorial Nepal Chain Stitch


Pick up 3 new vine beads, and 5 petal beads. Slide them down to the beadwork. Pass back through the 3 vine beads and pull snug to form a new flower cluster with the petal beads.

This time when you step up, you will pass through only the 5th petal bead from the previous stitch. This is the one closest to the new stitch, at the center of the chain. Pull the thread snug.

How to Weave Nepal Chains Nepal Chain Stitch Tutorial


As you work, press the beadwork along the center each time you add a new flower, to keep the chain from twisting. Strong tension is important, since there are natural gaps between the stitches. Make sure to pull your thread snug and keep the beads as tight together as possible to minimize the gaps and achieve a neat beadwork chain.

Nepal Chain Stitch Flower Chain Beading Tutorial


Beading Nepal Chains

Pick up 3 vine beads and 5 petal beads, and repeat the previous stitch, stepping up through the 5th petal bead from the previous flower. The chain works in a zig-zag pattern, with new flowers alternating from side to side.

You can finish the chains just about any way that you wish. To make my Nepal chain bracelets, I added the loop half of the clasp at the working end, and mimicked the step up stitch to secure it to the beadwork with a more natural look.

Nepal chains would also make interesting fringe or dangles. You could finish off the top of the chain by adding the last flower, then weaving all the way through the previous one instead of stepping up to add a new stitch.


Nepal Chain Bracelets
Win These Bracelets

This technique is so much fun to work with - like a daisy chain, only more interesting. Once you’ve got the sequence down, stitching is a breeze.

Happy beading!

Copyright 2011 Inspirational Beading
Subscribe to Inspirational Beading


Blog Widget by LinkWithin
Fire Mountain Gems and Beads

Inspiration Topics

accessories amulet Ancient Worlds Modern Beads animals April's Army art ArtFire astrology astronomy autumn awards awareness bangle beach Bead Inspired Bead Shops bead soup bead spotlight bead stash Bead Trays beaded beads beading theory beads belt bezel birthstones black blog spotlight blue boho bone book spotlight bracelet Bracelet A Week branch fringe brick stitch brown bugles buttons cabochon ceramic chain maille challenge charity chevron chain christmas collar Collections color Color Ideas color triads conservation craft shows crafts crochet crystals cuff Culled Beads current events Current Faves daggers Daily Sets daisy chain Delicas Destash drops Dutch spiral earrings Egypt Egyptian Gods embellishing embroidery environment etsy exotic fair trade fantasy fashion Favorite Beads Favorite Techniques feminine fibers film findings fire polish fixtures Flashback Test flickr inspiration flowers food found object free form fringe Geek Jewels geekery gemstones geography giveaway glass gold gray Greece green herringbone hex cuts history holiday home decor insects inspiration tip inspired beader Inspired by... Inspiring Links ivory Jewelry Stash knitting ladder stitch lampwork lariat leaf fringe leather lights literature loomwork macrame magatamas Master Class Medallions metal free metalwork Mini Collar a Week mixed media mixture Mood Board MOP multi-color multi-strand music natural beads nature necklace Necklace a Day Nepal chain netting New Beads ocean ombre orange paint paper patterns pearls pendant peyote photography Picasso finish pink Pinspiration PMC polymer clay poster sketch purple quick inspiration rainbow RAW red resin ring Ring a Day rivoli Rome Russian spiral scarf science seed beads shell silver soutache spiral rope spring square stitch St. Petersburg steampunk stringing stripes summer tagua TBT The Elements thread Tilas Time Capsule tools trade beads triangle weave tribal tropical turquoise tutorial two-hole beads Ugly vintage Wear it Twice weather white winter WIP wire wishlist wood World Beaders yellow
Blog Home * About * Beading Tutorials * Advertise

Learn About Sponsoring Inspirational Beading with Project Wonderful
Affiliated With ShareASale.com and Amazon.com