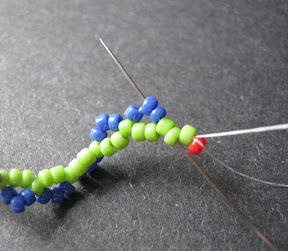
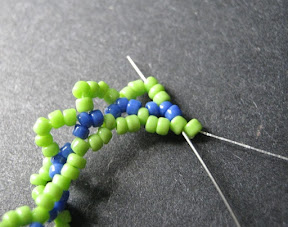
Ogalala stitch is a variation of netting that is worked from an existing strand or strip of beadwork. The tightly packed stitches create a wonderful ruffle effect with a very organic feel. The basic technique uses beads of the same size, but once you get the hang of it - one try is all you need! - you can experiment with switching up the bead types for different effects.
To Make an Ogalala Bracelet Strip:
Attach a stop bead to a comfortable length of beading thread. Here we’ll work with two bead colors (A and B) for clarity, but once you know the steps, you can easily work with a single color, or create a pattern within the netting.
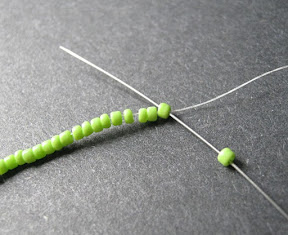
As you may have guessed, this technique finishes off smaller than it begins. To make a strip of ogalala long enough for a 7 inch bracelet, start with about 8 inches of 11/o seed beads. String Color A beads in multiples of three, until you reach the desired length. Since the stitches are worked in 3-bead sequences, you can skip the counting and use your bead spinner if you like. At the most, you’ll have 2 extra beads at the end of the strip.

Slide all of the beads down to the stop bead, and pick up one more Color A seed bead, then stitch back through the last bead added to the strand (skipping the bead just picked up). Pull snug, but not taught. Tip: Because ogalala is such a snug stitch with lots of twists, I don’t recommend using matte finish beads for your first try. It’ll be awfully crunchy!


Pick up 3 Color B seed beads. Count up 3 beads in the base strand, and stitch through the 3rd bead. Do not count the bead that your thread is exiting. Pull snug to form a little arch with the new beads. Pick up 3 more Color B, and stitch through the 3rd bead up in the base strand. Continue adding stitches this way until you reach the end of the strand.
Stitch through the end of the strand, and back into the beadwork, skipping the bead on the end. Exit from the middle Color B bead of the set you just added.


Pick up 5 Color A seed beads, and stitch through the middle Color B of the next set in the previous row. Pull snug. Continue adding sets of 5 beads between Color B sets, stitching through the middle of each set.
To get a fluffy, freeform ruffle, allow the stitches to rest wherever they fall. If you would like a more uniform spiral, hold the beadwork securely with your off-hand, and gently feed it through your fingers as you add new stitches. Make sure that new beads are all added on the same ‘side’ of the beadwork. Ogalala is naturally curvy and twisted, but this will make it easy to adjust the placement of the turns for further embellishing later.

Pass through all of the beads at the end of the work, skip the last bead, and stitch back up through the beadwork to exit from the middle bead of the last Color A set added. Pick up 7 Color B seed beads, and pass through the middle bead of the next Color A set in the previous row.

Continue adding sets of 7 beads along the strip, until you reach the end, adding thread if necessary. To make the strip into a bracelet, add a loop of seed beads at one end, and use the tail thread to secure a button. Weave in the threads, and you’re done!
Copyright 2013 Inspirational Beading
Subscribe to Inspirational Beading
Get inspired on Facebook and Google+


Thank you very much for the clear tutorial!
ReplyDeleteWith best greetings from Lower-Austria:
Uli
I love this stitch. It's so beautiful. And seems so doable. Thank you for this wonderful tutorial. Is this a Native American stitch as a name would seem to indicate?
ReplyDeleteI have a question: what would happen if you made the ruffle on both sides, in other words two ruffles, one on the left, one on the right? I know it would be asking for a lot of work on the beaders part…
Thanks, ladies! I'm not 100% sure where the name of the stitch comes from. I did a little searching but couldn't find a definite answer. I seem to recall that it's actually named after a type of moth or butterfly.
ReplyDeleteI think it would certainly be possible to add a second ruffle, assuming that the new stitches wouldn't pull the beadwork in the wrong direction. I'll have to give it a try!
Thanks so much, Morti. I had never even heard of this stitch and it's very cool and interesting (and doable!).
ReplyDeleteThis comment has been removed by the author.
ReplyDeleteThis comment has been removed by the author.
ReplyDeleteTrying this stitch now and your directions were so easy to follow, along with the clear photos. Thank you so much!
ReplyDeleteThanks, Dee. I'm glad that you found it helpful!
DeleteI just couldn't wait to try my hands on it and I'm so very impressed wit d results. Thanks so much, keep up d good job
ReplyDeleteThank you! I'm so glad that you enjoyed it.
DeleteThank you very much for this tutorial.
ReplyDeleteYou're most welcome. I hope you have fun with the stitch!
DeleteThank you for the clear tutorial. Greetings from howick south africa. Judy
ReplyDeleteThank you for this. It's very helpful. You're a wonderful tutor.. 😘
ReplyDeleteThank you! I'm always looking for new tutorial ideas if you have a stitch that you'd like to see. Happy beading!
Delete