Thursday, April 14, 2011

Blending Color, Proportion, Technique and Placement

English Garden Bead Palette

When making jewelry, choosing the right bead colors and finishes is an important part of the design process. But once those selections have been made, there is one more step to creating a piece of jewelry that pleases the eye. The colors have to be combined in the right proportions, and used in a way that allows them to complement each other.

We don’t often have to think about this step, because when the colors are already harmonious, they can guide our creativity in the right direction. It’s when color palettes challenge the norm that proportions and placement become essential.

This week I am working on a few different pieces for various fundraising events and campaigns, and I nearly had a color disaster. I wanted to share the mishap, and show how a few simple tweaks can change a design from scary to sensational.

The piece I am working on started with a pink tagua slice - the last one in my stash. I wanted to keep it simple, so I planned to make a caged bead (or reverse daisy chain) pendant. Just like my Beach Rubble necklace, I had to use some flat beads to cap the tagua slice, because the holes are too large to cover with seed beads.

The World's Ugliest Bead Chain

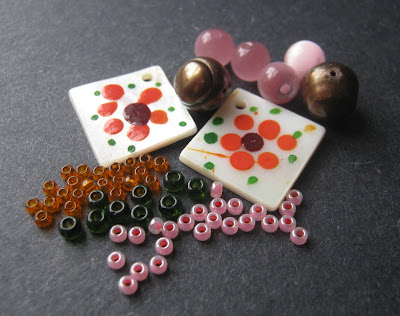
As I was gathering up the various components, I came across these little mother of pearl tabs with painted flowers on them. I picked them up at a sale ages ago, and have been waiting for an idea that would make good use of them. I thought the tagua slice would look so cute dressed up with a little orange flower.

I tested out lots of different seed bead colors for the palette, and finally decided on salmon pink, transparent orange, and transparent jade. The centers of the flower are a deep reddish brown, so I scooped up the last of my chocolate pearls to balance the shell pendant. I almost grabbed some bright orange shell coins as well, but they clashed horribly with the dark orange seed beads. For the caged beads, I chose pink cat eye rounds.

English Garden Pendant in Progress

As soon as I had made one section of my bead chain, I knew I had made a mistake. My first reaction to this palette in use was “Yuck!”. There was no way I could present this to the fundraiser. I had to make some changes.

I’m fully aware that this palette already teeters on the edge of obscene, so I had to tread carefully. I couldn’t add any more beads or colors, and I didn’t want to take anything away. I looked over the failed chain again, and decided to try putting the orange seed beads in the background. I had to let go of my notion that caged beads have to be done in two different colors, but I was willing to try anything to make this necklace work.

So, I frogged my original stitches and started over, this time stringing with orange, and embellishing the cat eyes with pink. The new chain is so much prettier! It’s still a little brazen, and I like that about it. I’ll be finished this pendant and a ring to match by this weekend. I hope it can find its owner and help out a good cause.

Copyright 2011 Inspirational Beading
Subscribe to Inspirational Beading


Wednesday, April 13, 2011

Bead Shops: Beads and Babble

Picasso Finish 3 Cut Seed Bead Mix by Beads and Babble

As beaders in the internet age, many of us have our favorite websites to shop from, but sometimes it really pays to look a little deeper to find the real gems. Small suppliers often have a unique and varied selection of our favorite bead types, so we can get exactly what we want, in plenty of shapes and colors to spark creativity.

One of my favorite places to browse is Beads and Babble, a shop which specializes in unique glass beads, liked Czech pressed glass and seed beads. The seller, Shannon, has a great eye for shapes and colors that make bead and jewelry creations stand out!

Inspirational Beading: How did you get into the business of jewelry supplies?

Shannon: Well, about four years ago, I decided I wanted to work for myself doing something I loved and with the support of my wonderful family (my husband and three sons). I did just that. I couldn't be happier I did. It's one of the best decisions I've ever made.

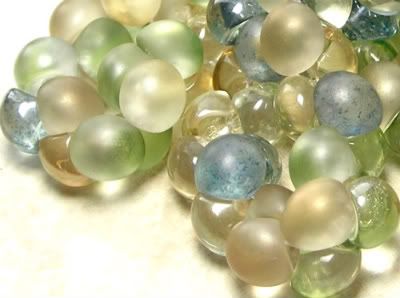
Czech Beach Glass Mushroom Buttons by Beads and Babble

Inspirational Beading: In your opinion, what’s the best thing about small supplies shops vs. the big bead retailers?

Shannon: The genuine customer service you receive from start to finish. Its nice to feel like you're not just a number or another PayPal transaction.

Inspirational Beading: Do you have a favorite material, color or bead style to keep in stock?

Shannon: You're asking a self-proclaimed bead addict to choose a favorite? Oh, dear that is impossible. One of my favorites is the Picasso finish because it has a wonderful way of blending with all sorts of media. It’s extremely versatile.

Inspirational Beading: What makes your bead selection stand out from other craft supplies shops?

Shannon: The quality, unique selection, experience and personalized customer service.

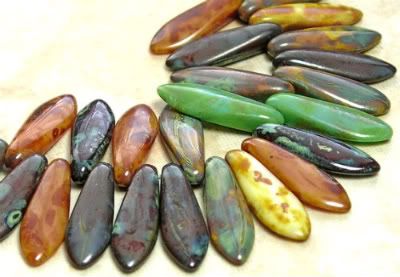
Southwest Picasso Czech Glass Daggers by Beads and Babble

Inspirational Beading: Many beaders are familiar with the emotion that comes from selling a finished design. How does it feel when you well something that will become a beautiful work of art?

Shannon: One of my favorite parts of my job is receiving pictures of finished pieces from my customers. I often post the pictures in my bead listings to showcase the amazing talents of my customers. I have the honor of supplying beads to extremely talented artist/beaders.

Inspirational Beading: What is your favorite thing to make with your beads?

Shannon: I love making bracelets in numerous different styles. Lately I've been making the leather wrap bracelets for friends and family. They're easy and fun---a great way to relax.

Inspirational Beading: Baggies, tubes or hanks? Which is your favorite?

Shannon: Personally, I prefer hanks. Strung beads are less likely to spill.

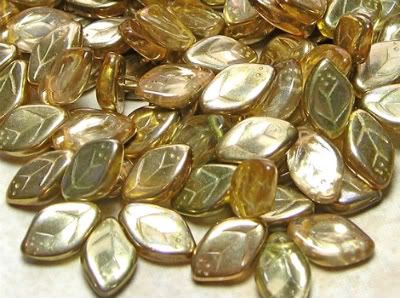
Star Dust Czech Glass Leaves by Beads and Babble

Inspirational Beading: Do you have any plans for new products in 2011?

Shannon: Oh, yes! I'm constantly adding to my inventory and I plan to attend some of the larger wholesale shows this year so I can hand pick beads. In the future I would like to add a bigger gemstone selection to my store.

You can see more fantastic hand picked beads and supplies by Beads and Babble on ArtFire and Etsy.

Copyright 2011 Inspirational Beading and Beads and Babble
Subscribe to Inspirational Beading
Share Your Wares


Monday, April 11, 2011

Tila Right Angle Weave Tutorial

Country Blue Tila Cuff

Last week I promised to share the openwork right angle weave technique behind my new Tila bead cuffs. The RAW variation uses Miyuki’s unique two-hole beads and seed beads, and can easily be adapted with different patterns and accents.

In order to incorporate the Tilas into the beadwork, you must make a turn by adding accents to either side of the squares. Both 8/o and 11/o beads work well, or you could also use small magatamas. If you don’t mind a little thread showing, skip the accents and do the turn stitch naked. There are lots of possibilities!

This tutorial will also show an example of a striped pattern within the beadwork. The rows of seed bead loops are connected horizontally, and separated by the Tilas, so you can create different looks by switching your bead colors.

In order to make the stitches a little more intuitive, it helps think of how each circle is being built. The RAW units are actually rectangles, with 3 beads in the short sides, and 7 in the long sides. A Tila represents 3 seed beads, so those walls will have 2 seed beads on either side of the Tila to make 7 (2 + 3 +2).

In these directions, I’ll give the actual bead counts for each stitch, as well as a breakdown that separates them by ‘sides’.

Right Angle Weave with Tilas:

1. Use a stop bead to mark a tail on a comfortable length of beading thread. The length of the tail will vary depending on how you want to finish your project. Ten inches is a good length to start with.

2. Pick up 2 seed beads, 1 Tila, and 15 seed beads (2 + 3 + 7 +3). Pass through the first two seed beads, and the Tila bead again.

This first unit makes a rectangle with sides of 3 beads, 7 beads, 3 beads, and a side with 2 seed beads, a Tila, and 2 seed beads. Like any variation of right angle weave, each new cluster will build off this first unit, and will have the same basic structure, with sides being shared.

3. To reach the other set of Tila holes, we need to do a turn by adding the accents. Pick up one 11/o or 8/o sized bead, and pass through the next hole in the Tila bead, on the same side that your thread is exiting. Pull snug.

Openwork Right Angle Weave with Tila Beads Tila Bead Right Angle Weave Tutorial RAW Beadwork with Tilas

4. Pick up one accent, and pass through the opposite Tila hole on this side. To step up, pass through the first accent bead added again, and through the Tila.

5. Pick up 7 seed beads, 1 Tila, and 7 seed beads (2 + 3 + 2 + Tila + 2 + 3 + 2). Pass through the previous Tila from the opposite side, chasing your working thread. Note how the first and last 2 seed beads will complete the Tila’s side of the new rectangular unit.

6. Pass through the first 7 beads picked up, and through the Tila. Pull snug to form the next unit.

7. Add two accent beads and step up. This step will always be the same throughout the beadwork, but you can change up the accent beads to create different patterns.

How To Use Tilas with Right Angle Weave Tila Beadwork Project Tila Right Angle Weave Tutorial

8. Repeat steps 5 and 6 to add more RAW units, with a step up between each, until your beadwork us just short of the desired width.

9. Pick up 17 seed beads (2 + 3 + 7 + 3 + 2). Pass through the previous Tila again, and pull snug to form the final unit. Pass through the first 15 beads again. Note how the thread exits between a 3 bead side, and a Tila side.

10. To start the next row, pick up 2 seed beads, 1 Tila, and 12 seed beads (2 + Tila + 2 + 3 + 7). Pass through the short side of the previous unit - 3 beads back from where the thread is exiting. Pull snug to form the new unit.

11. Pass through the first 2 seed beads and the Tila. Add 2 accent beads and step up.

Openwork Right Angle Weave with Tilas Right Angle Weave Tila Tutorial RAW Tila Bead Project

12. Pick up 2 seed beads, and pass through the middle 3 beads of the next unit in the previous row.

13. Pick up 2 seed beads, 1 Tila, and 7 seed beads (2 + 3 + 2). Pass through the previous Tila, and continue through the following 7 seed beads (2 + 3 +2), and the Tila just added.

14. Add two accent beads and step up.

Tila Bead RAW How-to DIY Right Angle Weave with Tilas Tila Bead Project

15. Repeat steps 12 and 13 for each new unit, with a step up between each. At the end of the row, pick up 2 seed beads, and pass through the 3 side beads of the lower unit.

16. Pick up 12 seed beads, and pass through the previous Tila. Pull snug to form the final unit of the row.

17. Pass through the first 15 seed beads of the unit, and exit from the short side to begin the next row.

How To Use Tilas with Right Angle Weave Right Angle Weave Tila Tutorial Tila Beadweaving Project

That’s it! Simply repeat these steps to add more rows as desired. If you’re already familiar with openwork right angle weave, it’s just a matter or remembering to add accents to the Tilas, and count your additions as separate ‘walls’ or sides. The more you do it, the easier it gets.

For a variation, you can make the first row the long side of your beadwork, and build only a few more rows onto it, so the Tilas and seed bead rows are vertical instead of horizontal.

Happy beading!

Copyright 2011 Inspirational Beading
Subscribe to Inspirational Beading
Share a Tutorial


Saturday, April 9, 2011

A Bracelet a Week: The Summer of Tilas

Openwork Right Angle Weave Tila Cuffs

This week’s bracelet is actually two - a double dose of Tila bead goodness! The first one started as an experiment, and it turned out so well that I had to make one more, so that I could share the technique in an upcoming tutorial.

Tila beads are everywhere right now, from bead shops to our favorite magazines and blogs. Even though they are the hottest new bead of the year, I’ve been having trouble finding Tila projects that I really like. Seed beads are my muse, and I rarely find myself drawn to designs that don’t have a backbone of good old fashioned round seeds.

I wasn’t really pleased with my first attempt at using Tilas. They do make great marshmallows, but I wasn’t at all satisfied with what I had done. Their potential had not been reached. So I started thinking of ways that I could use them that would suit my style, and make good use of their unique shape.

Right Angle Weave Tila Bracelets

The best idea I had was to try and combine them with openwork right angle weave, which worked really well for some troublesome side-drilled rectangles last year. The trick was to figure out how to get from one set of holes in the Tilas to the next, so that the beadwork could continue smoothly.

My first experiment with the stitch was a total success. I just kept on beading until I had this fun little blue bracelet. I had time to make a second in happy white and yellow, with a little variation in materials and pattern. This time around, I took pictures of the steps. I’ll be sharing all the details behind the technique in a free tutorial next week.

Have you tried Tila beads yet? How well have they blended into your work?


Copyright 2011 Inspirational Beading
Subscribe to Inspirational Beading


Friday, April 8, 2011

Favorite Techniques: Right Angle Weave

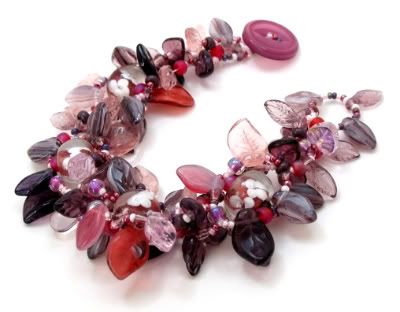
Purple and Pink Leafy Series Bracelet by randomcreative

Sometimes you can tell, just by looking at an artist’s designs, that they absolutely love beads. This is the impression one gets while browsing through the creations at randomcreative. The artist, Rose, shares a little insight into a great way to use them.

Inspirational Beading: What is your all time favorite beading or jewelry technique?

Rose: It’s a tie between right angle weave and peyote stitch. I’ll be discussing right angle weave in this interview.

Inspirational Beading: Where/how do you first learn to use this technique?

Rose: I learned how to bead weave from beading books and tons of pictures online.

Inspirational Beading: Of all the creations you’ve made with this technique, which one is your favorite?

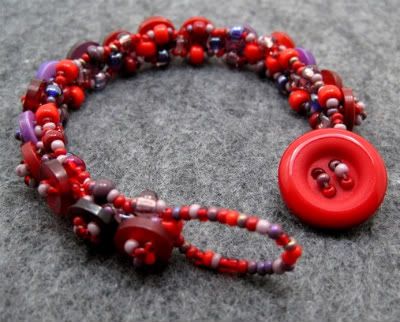
Purple and Red Button Embellished Bracelet by randomcreative

Rose: It is so hard to pick a favorite, but I really love my leafy series. I also love my button embellished series, which has a right angle base.

Inspirational Beading: Can you share any tips for getting started with this method?

Rose: The best advice that I can give is to start simple and then build on your technique. I made a lot of bracelets in this right angle weave design when I first started bead weaving: Petite Garden.

Inspirational Beading: Do you have a favorite material to use it with?

Rose: I love all sorts of Czech glass. I use a fair number of seed beads in almost all of my beadweaving pieces. For right angle work, I also use pressed Czech glass, lamp work, and gem stone chips fairly often. Of course many of pieces include plastic or metal buttons as well.

Inspirational Beading: If someone had to choose to learn only one technique, would you recommend this one?

Polka Dot Barrels Bracelet by randomcreative

Rose: Most beadweaving techniques are very versatile. Right angle weave is no exception. Once you have the basics of the stitch down, there is no end to the possibilities for designs that you can create.

Inspirational Beading: In your opinion, what is the best place for beginners to learn this technique?

Rose: The two books that I used most frequently when I started beadweaving were Getting Started with Seed BeadsGetting Started with Seed Beads by Dustin Wedekindby Dustin Wedekind and Mastering BeadworkMastering Beadwork: A Comprehensive Guide to Off-Loom Techniquesby Carol Huber Cypher. Tammy Powley has a lot of great right angle weave techniques, too. I have a compilation book of hers from Barnes and Noble that isn’t available on online, but she has several books that are available on Amazon.

You can see more of these fun and bead-tastic designs on The Beadings and Buttons of Randomcreative or follow randomcreative on Facebook.

Copyright 2011 Inspirational Beading and randomcreative
Subscribe to Inspirational Beading
Share Your Designs


Blog Widget by LinkWithin
Fire Mountain Gems and Beads

Inspiration Topics

accessories amulet Ancient Worlds Modern Beads animals April's Army art ArtFire astrology astronomy autumn awards awareness bangle beach Bead Inspired Bead Shops bead soup bead spotlight bead stash Bead Trays beaded beads beading theory beads belt bezel birthstones black blog spotlight blue boho bone book spotlight bracelet Bracelet A Week branch fringe brick stitch brown bugles buttons cabochon ceramic chain maille challenge charity chevron chain christmas collar Collections color Color Ideas color triads conservation craft shows crafts crochet crystals cuff Culled Beads current events Current Faves daggers Daily Sets daisy chain Delicas Destash drops Dutch spiral earrings Egypt Egyptian Gods embellishing embroidery environment etsy exotic fair trade fantasy fashion Favorite Beads Favorite Techniques feminine fibers film findings fire polish fixtures Flashback Test flickr inspiration flowers food found object free form fringe Geek Jewels geekery gemstones geography giveaway glass gold gray Greece green herringbone hex cuts history holiday home decor insects inspiration tip inspired beader Inspired by... Inspiring Links ivory Jewelry Stash knitting ladder stitch lampwork lariat leaf fringe leather lights literature loomwork macrame magatamas Master Class Medallions metal free metalwork Mini Collar a Week mixed media mixture Mood Board MOP multi-color multi-strand music natural beads nature necklace Necklace a Day Nepal chain netting New Beads ocean ombre orange paint paper patterns pearls pendant peyote photography Picasso finish pink Pinspiration PMC polymer clay poster sketch purple quick inspiration rainbow RAW red resin ring Ring a Day rivoli Rome Russian spiral scarf science seed beads shell silver soutache spiral rope spring square stitch St. Petersburg steampunk stringing stripes summer tagua TBT The Elements thread Tilas Time Capsule tools trade beads triangle weave tribal tropical turquoise tutorial two-hole beads Ugly vintage Wear it Twice weather white winter WIP wire wishlist wood World Beaders yellow
Blog Home * About * Beading Tutorials * Advertise

Learn About Sponsoring Inspirational Beading with Project Wonderful
Affiliated With ShareASale.com and Amazon.com